Claw Clip Tutorial On The Most Natural And Affordable Curly U Part Wig | Alipearl Hair
- Posted on 17 March, 2022
- T Part Wig
- By Anonymous
Hi babes! Please enjoy this simple and beginner-friendly tutorial on how I achieved the sleek claw look using a curly u-part wig from AliPearl hair! This will seriously be my go-to hairstyle on those days that I'm super busy or need to run errands. Not to mention this only takes 5 minutes!
Shop Now➤https://bit.ly/3IAGRyZ
Hair Info: 22inch curly u part wig 180%density
❤#AlipearlHair Official Store:➤https://bit.ly/3In4ydF
1.Join FB Group, Win FREE HAIR➤https://bit.ly/3BSrEX7
2.Lace Front Wigs for Sale!➤https://bit.ly/3Ip60wg
3.Invisible HD Swiss Lace Wigs:➤https://bit.ly/3BRvzUr
And as always, If today's video inspired you make sure to like, comment, and subscribe!
Love you,
Rikki Lee | THAT girl
✷ Purchase the "That" Girl Planner
https://www.therikkilee.com/product-pa...
✷ Purchase the "That" Girl To-Do List
https://www.therikkilee.com/product-p...
✷Join my "That" Girl Newsletter
https://view.flodesk.com/pages/5e4050...
✷ Shop My "That" Girl Must Haves: https://www.amazon.com/shop/rikkilee.c...
✷ Follow my socials
Instagram: https://www.instagram.com/rikkilee.co/...
Tiktok: therikkilee
Twitter: iamrikkilee
Pinterest: Loverikkilee
✷ Are you ready to present your best self online and grow your audience? Apply to work with The Rikki Lee Agency: https://www.therikkileeagency.com/wel...
For serious business inquiries: [email protected]
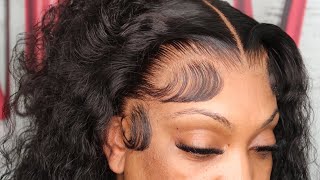
Hmm, hey guys, it is your girl, ricky lee here and i'm so excited for today's video, because i'm going to be showing you guys how i achieved this really cute: look using a u-part, wig, okay, a u-part, wig honey. I know we're on the lace, front, training and all that stuff, but i'm a college student. I have no experience with laying laces, i am not tay and elena. She telling me is the best and i'm one of those types of people that the first time i do something i need mastery. So the very first time i do this. I need it to look right because i don't have time to be playing in my hair and today's tutorial is going to show you exactly how you can achieve this on the go. Look on those days when you're running errands, when you're in between styles - and you just want to allow your hair to breathe. You can put on this. U part wig and achieve the same look, and i wanted to give a huge shout out to ally pearl hair for partnering with me on today's tutorial. This hair is so luscious and it just really emulates our hair, like the way these curls were bouncing and moving. It reminded me of my hair as a kid, so this was kind of nostalgic for me, because the really cool thing about today's tutorial is that i have relaxed hair. My hair is not a lick of curly, as you guys will see in the tutorial. So i am going to be achieving this look with relaxed hair and i'm just going to be slicking the front of my hair and applying a claw clip and i'll actually show you guys another look that you can achieve using this u-part wig inside. You will receive a wig cap for those of you who are interested in wearing this more long-term. You can do a braid down, and then you can just reapply. The wig every single day also came with a scarf, i'm so excited about this print. I think this is really fun and funky, and i would love to wear this during the summer, also an elastic band for your edges. If you are interested in you know, getting that really sleek edge look a complimentary edge brush like they are really getting us together. Y'All and then also a pair of lashes like this is hair on the go stuff like i'm thinking. I should just put this whole thing in the back of my car for those days when i'm just out and about, and i'm looking crazy just have this wig in my back seat with some edge control and be able to still look okay, because i could throw The little um scarf on top of it and be out the door like that is really insane to me and then also came with another little headband. This is what the wig is giving straight out of the pack. I moved you guys back a little bit so that we could get a full look at the wig now, as you guys can see from top to bottom. It is thick like it does not thin out really towards the bottom, and yesterday i tried to style it. A little bit just to make sure i could do the exact style that i was looking at. I haven't still not have put any product in here. I just really put water on it and i brushed it out with the water for today's tutorial. We won't be using any products really because i want you guys to see what this wig looks like. Even if you don't have curly products, i don't even have curly products. The most that i have is conditioner, so i'm going to utilize all that i have currently to try to style this wig and a few different ways so that you guys can see what it looks like right now. I currently have my hair back in a little bun, so i'm going to take it out and i'm going to section off a little bit of hair about an inch worth of hair because you want it to cover the track. And then you also want to make sure that you have some hair left over in the back a section of this, then i'm going to put my hair back into its little ponytail in the back and i'm going to turn it into like a little bun. That'S like relatively flat, then we've got these little pieces right here and, as you guys can see, this is straight, but because of the type of style that we're going to be doing, that does not matter so much. The wig has six clips inside of it. Two towards the perimeter of your head on either side, one at the back of the part so that you can secure it back there and then you have three clips around the back. I just noticed that they have these little things back here for you to adjust how tight the wig is. It'S like a bra clip. I'M going to move this back because my head is kind of small and i want the wig to be as tight as possible in the back, because we don't want it to be gappy and bulky um just so that we can really get that. Snatched. Look first. Make sure that all of the clips are open when you first get the wig for the most part, all of the clips are going to be closed, so you're just going to snap all of them open. So now that we've gotten all of the clips open, i'm going to place it on my head and just going to clip it so clip number one, placing it right here towards the top of the part sliding it down, so that the teeth are in my hair And then we're just going to clip it, i'm going to go to the back of the head this one, and this is what it's looking like with just the top three clips, but there are quite a few back here that we need to clip as well. Now i do have one complaint: the location of these back three clips don't make the most sense to me. I would have much rather like the clips are like right here. I would much. Rather, the clips have been back here on these two back here, so that it could be more secured in the back because it doesn't need to be secured so much on the sides guys. This is the raw hair texture. This is what it's looking like. I will say that being in college and having a quick fix like this, like this literally took me no more than three minutes to throw on and look at just how easy it is to comb through this like this is literally just straight water and look at How pretty and defined this curl pattern is the first tip i will have - and i will say, is to wet the wig before you even put it on. I would wet the wig pretty much get it really damp and brush through the curls, so that they're all defined put in whatever product of your choice. And then i would apply the wig once it's wet because trying to get all of this wet and then having it drip all over your body. While it's on, you is a bit much and that's exactly why most people style the wigs off of their head first, but i don't really wear wigs that much guys. So i don't have a wig head. I don't have any of that um. So i'm just going to wet all of the hair first and i'm going to get it pretty damp and then i'm going to slick down on all of my hair. I recommend using jam rather than gel, just because jam is going to make your hair shine and that shine is going to emulate this hair texture so that it blends really well also jam doesn't have alcohol in it and if you plan on doing this style on The regular, i would just prefer you use jam because i feel, like that's less harsh, on your hair rather than gel, because it can be kind of drying. So now we're going to go over to my vanity, as you guys can see, i've wet one side, the hair kind of stops here and it's just air dried and then this is it wet and it's more closer down to. Like my hip, keep in mind, i am 411, i'm going to clip off a little bit more of this little elastic piece, i'm just going to take some of the shine jam. I haven't used gel in like a really long time and i don't know if it's just because i don't wear my hair curly or whatever, but i just really like shine jam for styles like ponytails and stuff. It makes your hair do just that shine and you want to know. What'S even crazier is that i don't even own a brush. I don't own like a bristle brush, so we're gon na have to see how this goes without that, but i'm sure you could get it even more sleek with a bristle brush go ahead and begin to start laying your baby hairs. If you want um, i wouldn't lay my baby hairs with shining jam, especially in those hotter months, but for demonstration purposes. I'M just going to lay them down a little bit, so you guys can see, and then i also like to take care of my sideburns. Give them a little love, and i also recommend doing that when you're going to wear a hat. Just so that when you have the hat on, and people can see your little sideburns, it looks like it matches the texture of the hair, just slick them down a little bit. There'S water for this, you can use gel. You can use edge control, i'm just using shiny jam so that my hair can shine as you guys can see it's shiny. Now, i'm just going to wet this other side of my hair. Now that i've gotten both sides of my hair wet, as you guys can see, look at these ends literally luscious, but now that we've gotten all of the hair wet, i feel like somebody's gon na be like well, i want to see what it looks like with A hat as it's wet, so, let's say you're running late: you just hurry up and wet the wig, you brush it out um, and then you place it on your head. I recommend for days like this to have a baseball cap that is velcro, so you can literally throw it on and then adjust it once it's on your head and snap, it on and you're good to go and, as you guys can see, it just looks like I'Ve got a curly head. I just got on the hat like it has a high porosity. I can tell because it just soaks up all of the water, so i mean i'm wet a little bit, but it's not like unbearable, although i literally just wet all this hair. So this looks super cute. I'M really pleased with this. This will be one of my go-to looks throughout the week and during school on those days when i'm just like, i can't do my hair. This is the one look that you can do so now that we've gotten that done, i'm just going to start taking the hair, smoothing it smoothing it swimming and smoothing it, and this is the part where you can add product, but for today's video, i'm not going To add any product to the wig, so you guys just can see how ready it is out of the pack to be installed. So i'm going to begin taking the hair and bringing it back towards the back of my head. I'M just going to clip this back. So i can focus on the other side of my head um, so we're just going to take it and go back and although i adjusted the wig i will say it's still. A lot of wig left like there's still some space back here, but we're still gon na work with this. We'Re still gon na manipulate it and get it done so now that i've gotten the other side back, i'm going to now take it in my hand. Take this clip out and i'm going to begin smooshing all this hair together, we're going to now begin grabbing the hair and i'm going to begin twisting it like this twist. Then i'm going to bring it up and then i'm just going to take the claw clip and clip it to where it is like in the wig. Now this hair is super duper curly, the first time you do it. It'S not going to be perfect, as you guys can see it's a little bulky and that's mainly because i don't have an actual brush to brush down the hair. If you my friend, have a brush, then you can make sure it's super uber flat. Now, if you want it to sit higher like this, i would recommend placing the claw up higher like that, and then you can take any place where you see that your hair is kind of coming up. I would just take a little bit of the shining jam and shine jam. Your hair to the wig shine jam that baby to the wig and then we're just going to adjust the back to make sure that no part of the wig is showing, and it appears as though it's not so. This is quite literally seamless all around remove this hair up here. I am absolutely in love with this. So comment down below and let so comment down below and let me know what you guys think of this look. I absolutely love it so effortless, as you guys can see. I am a crew neck wearing biker, shorts, gym shoes, sweatshirts, sweat, sets type of girl, and this type of hairstyle was so easy to achieve, even with relaxed hair by just slicking the front part down and clipping it up, and i think this is so simple and Easy and anyone can achieve this look, so what do you guys think give this video a thumbs up? If you think i have achieved the claw clip with this u-part wig, i think i pretty much did. I think i did that and i saw a girl achieve this, look with a lace front um, but i don't know how to lay a lace front and i was like you know what let me stick to what i know how to do, and i do know How to manipulate my own hair, so i manipulated my leave out just so. It can match this and it looks absolutely stunning. So if you guys are interested in this wig make sure to check out the link in my description box and get this ali pearl. You part curly wig was so easy to do. It took me literally less than 10 minutes um in between having to explain to y'all what i was doing while i was doing it, but i think overall this is a 10 out of 10 style. I will be wearing this and rocking this all the time. I think this might even be like my airport look like for the most part. This is like the type of stuff that i wear. I wear crew necks and, like my little watches, i wear little rings and stuff and it's so easy to just put something like this together with a curly u-part wig and be out the door and be done and still look like i'm semi put together. But if you like, this video make sure to give it a thumbs up and to subscribe to my channel and hit that notification bell so that you're notified whenever i make a new upload, i create lifestyle vlogs here centered around my college experience as a student entrepreneur, Influencer and you know just tackling so many other things in life and how i create balance. So, if you're interested in that make sure to subscribe to my channel, we are a tight-knit community here we are those that girls and, let me know if you guys want more videos like this of me, showing you guys how i do my hair to give you Guys different types of content, besides the vlogs, because i know my life is pretty interesting, but i also want to show you guys, you know other things that i'm able to do. I just wanted to give you guys a variety of different types of content so that you're, not bored if you choose to recreate this, look, make sure to tag me at ricky lee.co on instagram. I cannot wait to see your looks or, if you do this, look on your tiktok make sure to tag me at the ricky lee. I literally cannot wait to see you guys do this, but it's so cute and so chic and so effortless, like anyone can do this. A toddler could do this, like it's so simple. So i'm super excited about this. I hope you guys enjoyed today's tutorial and i will see you guys next time. Bye,
Comments
Ali Pearl Hair: The style is so bomb! Absolutely stunning~
I Am Alexia: Girllll I loveee this hair and how you styled it!!!!… you make everything look simple and flawless…
LeShawnda Morris: You look so cute with the curly hair!!!! It's givingggg
Rayal👸🦋: Ugh rikki beauty is something else ughh
De'Myah Unique: You killed this
iesha: i see so many people especially on tiktok say “clean girl look” lol what does that mean i don’t get what’s the clean the girl aesthetic