How To Make A Upart Wig From Start To Finish | Using Feshfen Kinky Curly 18" Via Aseamae
- Posted on 21 October, 2016
- U Part Wig
- By Anonymous
♡ Watch in HD!! ▲
Learn how to make a upart wig with this easy to follow tutorial where AseaMae show you the process from start to finish. This is beginner friendly. She used Kinky Curly hair from Feshfen Hair & Beauty. This u part wig tutorial was done on a dome cap and I sewed in wig clips for easy everyday wear. Hope you find this u part wig with leavout tutorial really helpful! Be sure to SHARE, LIKE, and Let me know what you think!
Products used:
Feshfen Kinky Curly 18" 3 Bundles (10% off COUPON CODE: AseaMae):
http://www.feshfen.com/natural-black-k...
Stroe:http://www.feshfen.com/
Origin video from Asea:
https://www.youtube.com/watch?v=S8Vu0...
Feshfen - Your Keenest Eyes On Fashion. We provides you with the finest of 100% Remy Human Hair Weave, Lace Closure, Full Lace Wigs, Lace Front Wigs, Clip In Hair Extensions etc. Where there is a fashion women, there is a popular wigs. That's Feshfen, your private hair consultant.
Surbscribe if you like it! ❤❤❤
√To Get More Details:
❤Visit Feshfen Website:
❤Like Feshfen On Facebook:
https://www.facebook.com/feshfenhair
❤Follow Feshfen On Twitter:
❤Follow Feshfen On Pinterest:
https://www.pinterest.com/feshfen
❤Follow Feshfen On Instagram:
https://www.instagram.com/feshfen/
❤Follow Feshfen On Weheartit:
Enjoy the video!!!
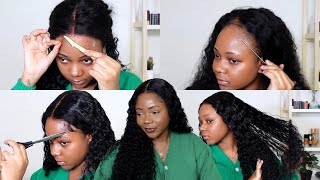
I what's up lovely today, I'm going to be showing you how to make your own. U part wig! This is the hair that I'm going to be using today. It is very nicely packaged. It actually came with a paddle brush, I'm using three bundles of the freshman Peruvian kinky curly in 18 inches. This is what the hair looks like once it comes out the packaging. It is a very nice curl pattern. It blends really well with your natural hair, which you will see me do in the end of this video. I have the links to this hair and also a coupon code in the description box will be sure to check it out. The west of this hair is pretty thick and it's really easy to use. So I'm going to be using this head that I got from amazon com of curves needle some nylon thread and a spandex. Don'T cap you can find all the materials and links in the description box. So first I'm going to start off by putting on the dome cap and pinning it down with some pins and needles. Then I'm going to take this white jumbo eye pencil from NYX in the color milk and I'm going to mark out my leave out. I want minimal leave out here, so I'm only doing about three finger widths apart then I'm going to begin to sew down the tracks on the dome cap. I am NOT going through the elastic band when i'm attaching this track or when i'm selling the track down. I'M just showing it on the fabric it's important to have a sharp needle, not a dull. Needle. When doing this process, you will find that it's a lot easier and it moves so much faster than when you're using a dull needle so make sure that you get a brand new needle for this I pin the hair down. While I'm sewing the track. This makes it so much easier to sew on the dome crap. It just makes the process a lot faster than trying to fold the track. While you sell, I do the fold-over method when I'm actually slowing down my tracks. Basically, I sold all the way to the end flip the track over and I make sure that the knot is secure so that it lies flat and then I just continue sewing. This footage is pretty self-explanatory. I have it sped up, so you can just kind of watch and see exactly what I'm doing to make my wig. I just continue to Seoul side to side until I close the gap when I get towards the top of the air, I'm just continuing to do the fold-over method and, as you can see, the tracks that i folded over are not bulky. They'Re, not sticking up. Everything is Elaine really flat. I would recommend that you do you're sitting close together. You know take your time and you make more wins. You'Ll get quicker with the process. This wig took me about an hour to do once. I get to the point where i'm closing the gap. I will cut the track in this case. When closing this wig, I did cut the tracks. I don't usually do that, but i really wanted to make sure that it has a minimal leave out. So i went ahead and i measured the tracks and then I just kind of sold it in and everything once you finished closing the gap. You want to make sure that you, you know not everything securely and then you're going to go ahead and cut out your leave out section now. I did not do all of this on camera because I do not want to mess up my unit, but um. You want to be really careful and then I'm going to sew on the weight clips. I do so by just sewing across the top and viola. This is it. This is what it looks like once I have completed the actual: u part wig, so then you want to watch the unit and install it when you wash it that white will come out. I have not washed it yet in this footage I was pressed for time. So I just kind of put it on you know, right after making it to show you guys what it looks like when blended with my natural hair - and this is some three strand twists that i actually did. I have a full tutorial on how to blend your hair with natural hair extensions. You can find that by clicking the I button, if you are not a DIY person, and you would like someone to make you a wig, I would advise you to go. Follow my instagram at a chimay wigs, I will eventually be posting wigs am selling on there, so you can be up to date once my line launches, so I hope that you guys enjoyed this video make sure you give this video a thumbs up and I'll kiss. You lovelies in my next one be sure to connect with me. You can find me on Facebook and Instagram at Asia may on twitter at asia me underscore and on my blog at asia. Me, calm click, the link to watch my latest video and, if you haven't already make sure you subscribe, you


Comments
Saraa Lin: I've been always curious about how to make a u part wig myself and this tutorial is just in time! Thank you for sharing! XX
anna kalier: Great! Your video is so helpful!