How To Make A U Part Wig Ft. Sunber Hair |Best Tips And Tricks |Peggypeg_
- Posted on 12 February, 2019
- U Part Wig
- By Anonymous
Ali express Sunber Hair Valentine's Day UP TO 58% off during 2.1-2.15
use "Peggypeg " code for $$ off
Direct hair link:https://goo.gl/6aqrg5
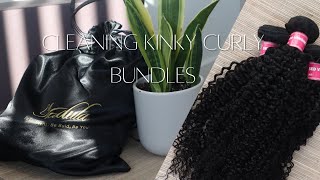
Hair details: Peruvian body wave 22"22"22"+20"closure
Top selling on Aliexpress:https://goo.gl/XsbhJh
Wig group:https://goo.gl/eKxAYH
Sunber website:https://goo.gl/wVw4RE
#Sunber Hair Amazon Store: https://amzn.to/2NJtuAc
Imessage/Whatsapp:+8618539016543
Email:[email protected]
Subscribe "Sunber Virgin Hair" on Youtube:https://goo.gl/PvpSX1
Follow "@sunberhair" on Instagram:https://goo.gl/fSdGkV
Hi everybody!
So in this video i'm just showing you my first time EVER doing a wig and i gave you the best tips and tricks that actually made it easy for me!
I used 2 and a half bundles from Sunber Hair and it took me around 5 hours to do it.
What do you think of the results??
Don't forget to subscribe and to follow me on instagram @peggypeg_
You can now shop my favorite hair products and tools on my Amazon store : http://www.amazon.ca/shop/peggypeg_
For buisness inquiries: [email protected]
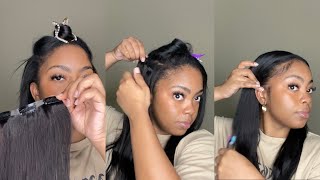
Hi everybody, my name, is Peggy aka, Peggy peg. Welcome to my channel. So today I am gon na show you how I made my first week ever so yeah. This is not a week. This is my real here, but I'm gon na show you at the end of the video how the wig looks like on myself. So yeah, I'm not an expert or anything like. It was my first time making a wig, but I did watch a lot of YouTube. Videos before that, so yeah in this video, I'm gon na, show you like the top tricks and the best trick that made it easy for me to do my wig. So I think that it looks like okay, like I did quite a good job. For the first time, but if you have like any tips and tricks that you can give me or give to other people that if their first time doing a wig write it in the comments piece, it's gon na help. You help me for the next time that I'm gon na do one cuz yeah. It was so fun that I am gon na do like other ways for sure so. Yeah give me other tricks that you think that are gon na be helpful for me and for other beginners, so yeah, I'm gon na show you how the process of me with making my way and the final result. I looked at the end. Alright, so that's it guys! Thank you. So you're gon na need a dome cap. Some needles and thread mannequin head mine is a 22 inches that I got from Amazon. You'Re gon na need some t pins to hold the wig cap in place and B share extension. So that it's gon na be easier to sew so yeah I did use quite a lot of Tippin, so be prepared for that. You'Re gon na need some come for the wigs and, of course, some hair extension. I got mine from Humber hair, so what I did first is I draw where I wanted my leave out to be, and I use my t-pain's to lay where I wanted my first track of hair to be that way is going to be easier to sew in The right direction, okay, so at first I'd pass the needle through the base of the hair extension, and I pass it through the first layer of the wig cap and I did turn twice around the needle so that everything is gon na be secured. So I continued and I did that all around the track, but what I did with the other stitches is. I passed the needle around the base of the hair extension and not through it so yeah everything was secured, so I did do that all around and I use default over method, so I didn't have to cut my track and it's gon na avoid some excessive shedding. So yeah here I just fold it over and I use my teeth pins to lay in place where I wanted. My second try to be so yeah here I did so, but I thought that it was quite far from the base. Why I did this. I went back so that everything could be a little bit more flat. So then I continued with my regular regular sewing, so I did do that all around and then when I got a D and I did the same thing - I just fold over the track and I continued so yeah. The tip pins were really helpful. So here you can see how close from each other that I'm actually sewing so that everything can be secured and nothing could unravel, and I did turn twice around the needle so to make sure that everything was really secured once again. So when I got at the end of my thread, all I did was cut it and I did like four to five knots so that nothing could unravel, and then I did cut the excessive the excess thread and I continued on so yeah for this week. I use two and a half bundles, so I couldn't fit three, but I used two and a half so that it could look a little bit more natural, so yeah. You can see that at the top. I didn't quite follow the line that I use for my leave out, but it's okay, but what I would recommend is making it a little bit more larger than what I did cuz when I did cut the excessive weight tab. It did stretch a little so yeah if you can just do it a little bit closer and add more hair at the top. So at the end I did five not so that nothing could unravel and I did cut the excess, excessive thread and excess hair. So this is what my leave out is gon na look like - and this is how my wig looks like, and this is how it looks like on the inside, so that you can see all my stitches, so I did cut the excessive weight chart. So I did cut it close to the nuts, but not too close to the point where everything would unravel so be careful with that stuff, and I did so some combs three combs so yeah it could be easier to apply the you part way. So I hope it was easy to follow. Thank you guys, alright, so guys this is the result of my weight, so it goes like long like that, so yeah. I think that I did quite a good job for it it being my first time. So if I want to blend my real hair more with the extensions like, I think that I'm gon na do like some event to nuts with the leave out, because it's a little bit like straighter than the actual hair. But I feel like it blends quite well. Like the color is good and the pattern and the texture of the hair and my hair, like really blend together, just to show you like this - is my real hair. This is my real hair and this is the fake. So it's just I it's a little bit straighter, but if I do something bad to nuts with it like it's gon na plan like better so I'm just gon na show, you like this is where the clip are. So this is my hair covering it so yeah. It looks like that so tell me in the comments, if you think that I did a good job like what advice would you give me to do my hair a little bit better next time so yeah? I can't wait to. I can't wait to hear a to be sorry. Your comment on this hair, but I really love it so yeah. Once again, their hair is from Sundberg hair. So I'll leave the link to this hair in the description but but yeah I really like it guys. So tell me if you love it too, though yeah don't forget to subscribe to my channel, don't forget to watch one of the last video that I posted before. Don'T forget to like this video, like all that stuff subscribe comment share like like all that good JA, so yeah. Thank you for watching guys, bye,

Comments
Abi G.: For your first try, you did really well!
Haruki: That moment when your hair is as long as a wig .... I wish I could say the same xD
MsQueen Shelle: Fantastic job. Perfect match!!!
April Love: Good job peggypeg looking exactly like your own hair just put some "Chinese bumps" at the front and you're good to go tfs
Sarah Mpungek: You did great
Ericka Love: You did good ❤️
Sunber Virgin Hair: My cute girl, could you help add Valentine's Day sale information in the description box? Ali express Sunber Hair Valentine's Day UP TO 58% off during 2.1-2.15
prettylady818: Your accent is so cute ☺️ Good job on the wig. Looks natural.
Kimberly Cameron: Wigs videos love the result