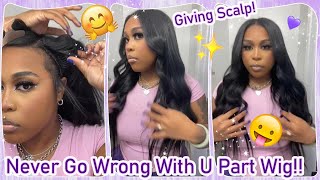
Start To Finish U Part Wig Tutorial Install & Style Layered Curls W/ Wig Dealer Raw Bundles
- Posted on 03 February, 2023
- U Part Wig
- By Anonymous
In this full wig tutorial that is beginner friendly, you'll learn how to put on a full wig, style it using curls, and make sure it looks perfect. We'll also be giving you a wig dealer review so you can find the best wig for your needs.
If you're looking for a wig that will look amazing on you, then this full wig tutorial is for you! You'll learn everything you need to know about choosing the right wig, styling it using curls, and making sure it looks perfect. After watching this video, you'll have the perfect wig for your black woman look!
SUBSCRIBE if you are NEW!
Give this video a thumbs up and leave a comment down below
Hair from Wig Dealer Raw Body Wave Bundles
22 24 26
https://shopwigdealer.com/collections/...
Business Inquiries
EVERYTHING SHOWN IS LINKED in my Amazon Storefront
https://www.amazon.com/shop/brijournal...
Topicals use BRIJOURNAL for 20% of first order
Class Pass Free Trial
https://classpass.com/refer/5I712T7U14...
Chat books
http://invite.chatbooks.com/7sy21j
CHAPTERS
0:00 INTRO
0:46 EVERYTHING YOU NEED
1:16 HOW TO OUTLINE U PART WIG
4:02 WIG DEALER RAW BUNDLES UNBOXING & FIRST IMPRESSION
7:14 HOW TO CREATE UPART WIG
18:49 STYLING PRODUCTS YOU NEED & HOW TO CUT BOUNCY LAYERS
21:30 HOW TO GET SILKY LEAVE OUT & BOUNCY CURLS
24:03 FINISHED RESULTS
Check out my other videos
----------------------------------------------------
MOVING VLOG PLAYLIST
https://www.youtube.com/playlist?list=...
CLEAN WITH ME PLAYLIST
https://www.youtube.com/playlist?list=...
Meet my First Puppy
https://www.youtube.com/watch?v=2eiMVF...
Silk Press Routine
https://www.youtube.com/watch?v=bWICCs...
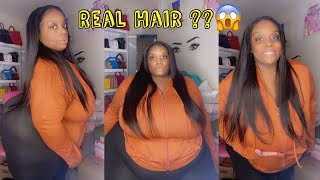
Foreign, if you look into Fun, ctions yeah, hey y'all, it's a Brie Journal. Today, I'm going to be giving you a full tutorial on how to make a u-part wig, and these are all the materials that you will need. An extra large spandex Dome wig cap, a light highlighter so that it can show on the actual cap, a pair of scissors, some measuring tape, some tea pins, as well as needles, and a thread of your choice. You will need these wig clips traditional wig clip and then the clamp wig clips a dome head. This needs to measure your head perfectly just so that it has the perfect fit and then the tripod for the wig head. This is optional, but it just makes it easier. So to start off, I'm just showing you guys what I am going to be leaving out the straightened hair is my leave out and everything that is braided. It'S going to go under my wig cap. I don't have any leave out, that's going to go out in the back, so everything is going to go under the cap and the sides are going to be out as well to guarantee that our leave out isn't too long on the actual wig cap. We'Re going to measure how long our part is on our actual head, and here you see that it measured to four inches. So we just need to note that and make sure that on the wig cap, the part isn't longer than four inches or shorter. I'M gon na use this wig cap and stretch it out just to make sure that it's not super tight or that it doesn't stretch out over time and we're going to carefully place that over our head not to mess up our leaves out just so that we Can know exactly where we need to highlight, or the wig so using a pencil of your choice, I'm going to carefully feel where my braids are and line that out, so that I know what it's going to be for the actual wig cap for the u-part wig And what I am going to be leaving out for my leave out that I showed you guys earlier. So I'm just carefully going around doing some of my braids and parting off, where the new part is going to be cut off. So everything that is inside of the line for where the braids are is where I'm going to be sewing the hair onto the cap. We can close, that's too slow. This is a pretty easy step, you're just going to be basically drawing where your braids are to, where the leave out is going to be, and just make sure that you take your time because you don't want to have to keep drawing over something and not know Where you will need to actually make the blue part wig, so if you did it correctly, you should basically see the outline of your leave out earlier before you put the cap on and it should just be a drawing of what was before so now. I'M just measuring just making sure that it is at four inches and it fits perfectly. So we did this correctly, so just make sure that you guys are just taking your time and using your measuring tape just to double check. And here you can feel inside of the cap, and I realized that I was having a problem with farther back than I wanted to. So I'm just going to carefully go over that and draw some lines just so that I know that I need to add hair right there and I'm doing the same. On this side. I saw that the hair for leave out was a little farther down, but I decided that I wanted it to be equal on both sides, just so that it could be easier if I decided to wear this see part wig and a middle part, once you're done, Outlining your whole head you'll just take the wig cap off and get ready to sew your bundles onto the cap. So I'm going to show you guys my unboxing of this hair. This is the first time that I ordered from this company and it's from the wick dealer. I got their raw body wave bundles and the lens 22, 24 and 26, and they gave me some free goodies. So the first one is this head wrap. They also gave me some hair oil and a coupon for if I wanted to purchase from them again, I love how it came with the Box in a bag, and these are the bundles. I will give you guys some insight on how I thought about this. From my first impression so make sure you keep tuned and watch the whole entire video and make sure that you subscribe to my channel if you have not already just so that you can get many updates along my videos, like my Vlogs, just to see how I Feel about the hair, because hair changes over time y'all saw that I unboxed the hair. I am honestly a little scared. This is supposed to be raw hair, so it's not as processed as other hair from other vendors that will like coat it with shiny stuff to make it more manageable. So I did see a little snagging I didn't see shedding for anything, except for this 26 inch and honestly. That is what I'm scared of, because I know for sure I'm going to be adding the 26 inch into my wig, because it's going to be at the bottom, so yeah it was shedding really not so shedding, but breaking off at the ends. So I think if I just trim the ends, it should be okay, but I've never had raw hair before and I was watching and Daisy does my hair on Tick Tock. I really love her videos and I was trying to see how much her pricing for everything was her services and on her website. She includes a list of vendors that she only works with, so they have to be good vendors, so I saw the WIC dealer had a cyber monday sale, so I went ahead and got this because it was relatively cheap for raw bundles. I am most likely going to have to go in and dye the hair with my temporary dye from a door or chase whatever brand. I have on me um because it's pretty brown, but I'm honestly scared and you guys do not order their hair from that Wholesale store. I put y'all on the curly. Hair is amazing, but the body wave is horrible. It lasted. I don't even know how long probably a month - and I cannot wear it anymore because it Tangles up so bad and it just turned into like crazy, looking hair. So I can't even wear it. I literally cannot wear it so hopefully this does me good. I'M really tired of spending my money on hair. To be honest, I just want to find a good um hair company that just has good quality hair. I thought that I found one, but apparently not so. I'M gon na update you guys along the process of this hair. Hopefully it does well. There is a slight smell. If you guys are from Georgia, it kind of smells like True Glory, Hair back in the day it has like a specific hair smell. It doesn't necessarily stink, but it does have a um scent to it so yeah. I will update you guys um in the next couple of months. Just make sure you guys are checking my blogs out. This will be the hair that I will be wearing, and I will just you know, give you many updates along my Vlogs, so make sure you subscribe if you're not already go ahead and double check that you are, you might think you are, and you might not Actually be, and I will go ahead and make this into a u-part wig. So now it's time to make the u-part wig make sure you have something really good to watch, to keep you entertained and have your wig Dome, hair ready. So we're going to make sure that the curved part of the head is going at the front and that the flat part is for the back of the head, and this just helps to make sure that there are no lumps when you make your wig. I'Ve learned this from experience, so the curved part is going to be where your leave out and stuff will be, and we're just going to make sure that the cap is on there securely. There'S no extra fabric sticking up we're just going to make this as flat as possible on the head foreign. So now that the wig is on we're going to add these tea pans into the Dome head. Just so that the wig cap is secure on here. And it's not slipping and sliding so we're going to add as many as we need to keep it secure and then you're going to want to start off with your longest bundle. I'M starting with the 26 inch, and I have my needles ready to start and end. Every bundle we're going to make sure that we put the needle through the actual weft, and this just makes it so that it is more secure onto the cap and I'm starting on the side of the head. Just so that I don't have to keep going around more than I need to, and here is just the end result, I'm just showing you guys that you should not put any bundles under where the line is created. So we're going to make sure that we do not sew below that line that we drew, because that is what we're going to be cutting off the cap. And here I'm just putting a T-Pain just so that it's easier and that the bundle is strained out. For me, so that I don't have to keep holding it the whole entire time you're going to be wrapping the thread around the needle a couple of times, and this just makes it more secure. I usually do it three to four times and then, after that, I go in normally and just wrap it around the needle just one time so, as you'll see we'll be putting the thread around the needle just one time and whenever we want it to feel a Little more secure, we can wrap it around three to four times and I do that randomly where I just want it to be a little more snug onto the head. I'M going to be doing this until I get to the other side of the head and we are going to flip the track and I will show you guys how I did it and how I realized. I should do it off of somebody on tick: tock, yeah, yeah, yeah yeah, make a moon here for me now that I sewed across the head, I'm ready to flip the track, so I would grab both of the double webs and flip it over and just make Sure that I sewed it flat onto the head just so that it can flip properly and then I would go ahead and sew across like I normally would, but it can be a little lumpy this way. So I did look up some Tick Tock videos on how to properly flip over a track, and I was really impressed with this video I saw - and so I did this when I was at the middle of the head. So this is my way, and this is a clip of how to do it. Uh, I would say proper way. Yeah yeah, I want you to come on over here - need you again so, hopefully that video was helpful for how to flip over a track. You can decide which one is better for you, but I think the tick tock one is just way better when it comes to like a flatter install, so I'm just going to be sewing across the whole entire head. I use exactly three bundles of the hair, so this fit perfectly and I'll give you guys update once I get to the top of the head foreign foreign for the face. Now we finally made it to the top of the head. So, instead of going up and out with the thread I'm going in and under - and this just helps so that the thread is sitting on top of the weft instead of the other way around and I'm just making sure that the hair isn't sticking out. And there's no unnecessary thread and making sure that the thread is even on both ends. So I'm just going to go across the whole entire width of the hair. Until I get to the part where I have it cut off and we're going to make sure that we don't go over the line that we drew, because that is needed for it to make an extra two part wig. This is where we'll need to stop. So I'm going to have it parted out and make sure I don't cut any unnecessary hair because we need all of the hair that we can get so I'm going to part it and then I'm just going to cut right in the middle making sure I don't Cut any unnecessary hair and then we're just going to thread all the way until we get to the end of that whisk. This is true. While I'm making the wig, I saw that I had some extra gaps, so I'm going to go in and add the bundles, where it's needed, I'm just making sure that I don't have it too close to where it is Lumpy. So, as you can see, it was a little lumpy, so I pulled it back a little bit and we're just going to thread all the way across until we get to the other side of the cap, and you will see that I do this on two other Parts where it was a little too much of a gap just so that the hair isn't thin looking foreign good amazing. As long as you got your eyes, making trips come back over and over again, I am finally done sewing all three bundles onto the cap. You should be able to see where you need to cut off the extra cap and have put all the bundles inside of where you had it outlined. So everything should be now covered up and now you can take the tea pins out of the hair because we're about to get ready to cut the extra cap off. So I'm carefully going in and cutting that extra cap being as careful as I can, but I'm going very slowly making sure that I don't cut too close to the thread because it can unthread. If you do I'll, just be going all the way around. Until I cut all the extra cap off whatever God is good wasting my time here is the final result. It should curve until you naturally - and that is how you make a u-part wig. The last step is to sew the wig clips onto the cap, and this just helps it so that it's more secure on your head and you don't have to sew the hole you part wig down. If you don't want to so I'm going to start and put the thread through the needle, and this just helps it so that it is more secure and it doesn't come loose and I'll just be sewing that clip onto the cap. I use two of the wig clips that clamp on each side of the. U and then around the perimeter up there. You part wig. I just use those traditional wig clamps just so that they can fit snug. While I have my braids on foreign Clips on each side of the: U and then around the perimeter, we have those traditional wig clips. Now it's finally time to style the wig. So I'm just going to be clamping. Those wig clips around my leave out and then I'm going to be using the wig clips around the corner just to secure it around my head, and this is just a glueless and threadless install that we can just put on and off at night or leave it On if we decide to wash our hair every week and not have to deal with accidentally cutting our hair and it's just so easy - I love you part wigs, so I use this on the actual weave. I use this on my leave out the wow spray and the John Frieda Frizz Ease. This is amazing and then once I blow dry it I use the turnip, the heat heat protectant and I just use the wax stick for flyaways so enjoy me styling this u-part wig. I went ahead and added layers curls and I showed you my routine on how to get a silky leave out so enjoy the rest of the video tonight. Yes, all you got ta do is say yes, Christmas, foreign. Sometimes it's hard to dance through foreign. What you feel it's hard for me to understand, so many things have taken place. There are times here's the finished result of this u-part wig. I hope you enjoyed this full tutorial of how we outline threaded and style this. You part wig. If you did give this video a thumbs up, go ahead and leave a comment for me down below, if you guys know, I love talking to you guys and make sure you are subscribed if you're not already, then go ahead and hit that subscribe button, and I Will see you guys in my next video bye

Comments
maya kennedy: Oh this is cute I would totally try this because it seemed like a pretty convenient install process!!
Lisa Michelle: The hair is beautiful!!! I love the way it turned out on you ❤
bri journal: Hi lovely! Today I’m excited to give you a fully detailed beginner friendly u part wig tutorial. I’m showing you how to create , install , & style a u part wig. I hope you enjoy the video and leave a comment for me down below. What protective style are you loving right now? ❤️
Ahdriey Lynn: Okaaay! I love the excitement when you curled the bang so cute!!
Daejha Na’Cheryl:
jerzgirl908: Raw hair will never come in that s-shape pattern. Thats is a dead give away that the hair has been processed. And you also mentioned that it had a slight smell.
Jayla Nielle: I neeedd that wig how do you like their hair ?