How To: From Black To Red | Bleach Bath | Ft. Alipearl Hair
- Posted on 02 August, 2021
- U Part Wig
- By Anonymous
Hey Mama
I am back with another HAIR PROJECT! Todays project is turning this black wig into a deep red wig! Its giving red wine child! This was hard af! I originally wanted to go with a pink color & the wig would not lift high enough for me soo we went with this deep red color❤️ Its still cute! If you guys have any suggestions for hair projects or for other colors yall want me to try comment down below Give this video a thumbs up for more hair projects! Be sure to SUBSCRIBE soo you don't miss any of my videos!
#wig #red #black #redwig #blackwig #lace #lacewig #lacefront #lacefrontwig #hair #hairproject
PROJECT DEETS:
Kaleidoscolors Violet Bleach - For Dark Hair
Adore Semi-Permanent Hair Color (2 Ragging Red / 1 Intense Red)
HAIR DEETS:
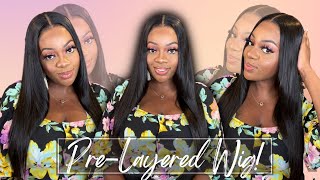
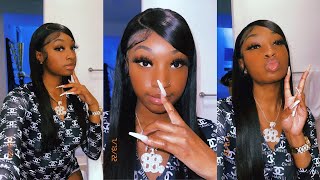
air I’m wearing: 22’’ body wave 13*4HD lace frontal wig 180% density
Shop Now➤https://bit.ly/3xhpgpM
Lace Front Wigs for Sale!➤https://bit.ly/3hdtPMj
❤#AlipearlHair Official Store:➤https://bit.ly/3wf9jiA
❤Invisible HD Swiss Lace Wigs:➤https://bit.ly/3wiYsEq
❤Glueless 5*5 Lace Closure Wig➤https://bit.ly/2SIXinY
Use code “alipearlyoutb”to save $10!
#alipearlhairwig #alipearlbodywavehair #alipearlHDlacewig
Instagram @alipearl_hair: https://bit.ly/34I3Oyd
Youtube @Ali Pearl Hair: http://bit.ly/2H0Gmmc
Facebook @Ali Pearl Hair: https://bit.ly/3aKwxX3
WhatsApp: +86 15890076489 E-mail: [email protected]
WANNA COLLAB? BUSINESS INQUIRES?!
-----------------------------------------------------------------------
KEEP UP W TAI:
IG: @ItsGlamByTai
Twitter: @GlamByTai
SnapChat: @SnapGlamByTai
TikTok: @GlamByTai
-----------------------------------------------------------------------
Hey youtube: i am back with another video and today is on another hair project that i literally was doing for days. It took me days to do this hair project and i'm gon na explain everything in this video. But, first and foremost the hair is from ali pearl hair um. They were kind enough to send me a head, wrap a scarf chop, an adjustable band and a bag to actually store the wig in oh and an edge brush, because y'all know we need them. We can never have enough edge brushes child. We always gon na need them. Okay, all right child. Now, it's time to get into this wig, so they sent me a 22 inch body wave wig um. Now the lace is 13 by four and it is the hd lace. So this is what it looks like freshly at the packaging and yes, i smelt it. You want to know why, because when i get a wig, i go into depth about how this wig is. I need to know how the packaging is, how does it feel? Does it have a curl pad and when it changes when it gets washed, how does it bleach? How does it how to do not speech? How is it when i'm plucking child? I get into detail okay, so for this wig it has three combs the adjustable straps um and, of course they sent me the ones that i can um attach myself but y'all. This hd lace is the truth. I was like um i like. Of course i had to go in bleach the knots pluck all that stuff. Well necessarily, i didn't bleach the knots i did a bleach bath which handled that for me anyway, but this is what it looks like just freshly on my head, um fresh out of the pack for somebody who's just buying it and hasn't you know, customized it their Selves, yet this is what it would look like child customize, your wigs, just just do it just do it just give it a shot. You may not do perfect on your first time, but at least try okay, because right now this is looking very much stickyanna on the hairline um. Even when i part it, it's very thick ianna on the we got ta do better. Okay, ladies, we got ta. Do better ghcv all right so boom? I got my bowl y'all know when y'all seen this green ball. Y'All know what it is um. This is the collido scoops claro collider scoop. I think that's how you say it. Oh collider, colors girl. What the am i talking about, the collider colors, it's for dark hair, so it's their blue one blue purple, whatever the you want to call it and i'm just taking a few scoops of day. I think in total i'd be like four ego: five, oh yeah. I did five scoops okay, i did five scoops and then i took 50 volume. Volume developer now, keep in mind with developer the higher. The number is just as fast as it's gon na lift. It doesn't lift it any higher. It just lifts it faster. So if you have 30 volume developer, it's going to do it a little bit slower, but it still won't get there. Okay, so boom you mix and mix it mix. It mix it until you get like not pancake consistency, but a little bit runnier than pancake consistency. If that makes sense in it - and it really don't matter anyway, because y'all know we're gon na add water to it, but you definitely want it to be a little bit runnier than um. If you were to use the bleach to go on ahead and bleach the knots so make it a little bit runny mix and mix it, you see, i'm checking it out making sure if i need more developer, i'm adding more developer, mixing it all completely in there And then it's time for us to add our water hcc. So once we add our water in there, i'm mixing it completely just breaking up any little particles that might have been still in there and i'm gon na go on ahead and add my hair y'all know when i do my beach baths. When i do any type of watercolor and i'm adding my hair you'll know, i'm gon na hit my comb because i comb the hair out, as i am doing this. The reason why is because i want every strand to be coated by the bleach by the hair dye, like whatever i'm dipping. I definitely want it to be completely coated. Now here are my little sticker for y'all, because child this wig did not lift as high as i thought that it would so um. I i literally bleached bath this wig twice. Okay, so think about that. I bleach bathed. It twice still was almost kind of like a caramel honey blonde ish, i'm like nah. I need a lighter, because i knew that i wanted to throw. Actually, i wanted to throw pink on it, but it would not lift high enough for me to throw the pink like to a platinum. So i eventually just was like just do red, but you know i kept it covered because you know you want the heat in there for blonde and everything like that and when i took it off it just still wasn't so i did it twice and then i Went on ahead and just applied bleach directly to the wig, i did not record the process of this because child this was like day three of this week and i was already struggling. Okay, i was annoyed. I was tired. I was over it. I was like yeah that color pink we just gon na do red, so this is what it look like and y'all got ta have patience with bleach baths. The longer you leave it in there, though, you know the higher it's gon na live just make sure. It'S not damaging the hair because, like i said, every hair company is different. You might do this to this wig and it'd be good. You might do it to another wig, and that should just be so. Keep that in mind and, however light you want to go, keep that in mind as well all right so boom when it comes to coloring. I'M using two bottles of the adore raging red and one bottle of the adore, intense red, make sure y'all check out the description, because i'm gon na have all that link down there below. So y'all can check that out. But here i just got some hot water boiling boiling. I'M lying my ass off again. Look at me. I got some hot water in my bowl, okay and i started with the raging red. You know just pouring it all in now mind you intense red is more like a burgundy raging. Red is definitely like a higher red, but it's not ronald mcdonald, red. Okay, it's a little bit darker than ronald mcdonald red all right, so i used a whole bottle for that and then i know i said i wasn't going to use a door hair color because child last time i did it was it. The particles was not breaking up, but this time i literally like mixed it make sure i add more water, this time um, so the the hair particles can break up really really good. So after i do that, i did go ahead and add like a half a bottle of the intense red as y'all can see um. Is it a half a bottle? It might have been like a quarter child. I am not good with measurements. I literally eyeball all the hair projects that i do, but i knew i wanted it to be a little bit darker and it was given ronald mcdonald red right now. But overall it wasn't ryan mcdonald red. But as you can see, the intense red is more like a wine like a wine color yeah. So i'm going ahead and mix all of that up just break up all the particles before i go ahead and add the wig and then i'm gon na. Let the wig, you know just marinate period like chicken child, let that sit, and this is what it looks like. Oh another thing, um i added free spray onto the lace like i freeze, sprayed the lace waited completely into the free spray was dry. That way, when i dip the wig in the lace doesn't um turn red like it doesn't tint the lace. You can use vaseline well yeah vaseline, but i use freeze spray. I just completely coat the inside of the wig of the lace with freeze spray. Then i dip it and wash it out and the freeze spray protects the leaves from turning colors for a that wanted pink and got red. I'M pretty happy about this. Okay, look at that yeah yeah and that's somewhat that's on period um. I think i dipped this hair, like i think i did the watercolor twice, which is why the lace kind of looked like pinkish. I think i did do it twice. I think the first time i did it. It was still too round on mcdonald red. So i did it again, just adding more of the intense red, but now child, let's just get into this install cause. I feel, like i've been working on this project for two goddamn long and it's time to install and really get cute. Okay, first things. First, we're going to measure the wig on our head. I'M going to cut the ear tabs off my goddamn ears, pluck a little bit of the wig ball cap and take that off too, because if it could see through the lace, i don't want it. Alright, making sure that i'm very picky about my lace, plus i have a tattoo there, so i want my tattoo to show. I don't want the lace to sit too much on my tattoo y'all know: y'all get the point jhcps all right so boom with this install. I definitely did something a little bit different, so i cut my hair into three sections. How i used to be if you watch my old videos, um and then i cut the leaves from one part of the section, only okay, the other sections, we're gon na work. In later, but i cut the lace off all right now, i'm gon na flip it up and basically well no i'm lying, i'm not going to flip it up just yet i'm going to go ahead and outline where this middle section is on my head, yup yup. Just so, i know exactly where to lay this wig once i apply the glue plus that'll tell me like where the glue can stop um so yeah. Now i'm going to flip it up and now i'm going to apply my glue so for the lace glue that i'm using it is the bow hold extreme lace glue or the boho yeah, no yeah, you guys the boho extreme cream child. What am i talking about? Um and once again, i'm using the red tail comb and i'm literally following that line like the line that i had created from where our wig is going to lay i'm making sure. I do not go past. That line i'm making sure that i'm doing a thin layer, if i'm not mistaken, i did three layers in all of this. Um lace lip, oh child. Let me just bring up a little little situation, do not mind my eyelashes. My lash tag is on vacay and by the time you guys see this video. I already took these off. Okay, they was like falling off. I got a big ass gap in one eye. Just just ignore that. Okay, we here for the wig we ain't here for the last job, all right, so just like normal once the lace i mean once the glue is completely clear and i don't mean white, i mean clear, like transparent, okay, i'm gon na go ahead and um move That front part back up and lay it down, then i'm taking my comb running through it, making sure everything is good and then boom. Moving on to the next section, i feel like this is a really good, beginner friendly way to do it, just because you got literally you're, literally working from section to section instead of doing like one half of the head and then the other half you know um, I don't know if i'm gon na you know do all my wigs this way, but for you know a side part for me, this kind of helped um, not necessarily saying you got to do it with just a sidebar child, because you know you do it with Anything, but if you do realize, i did not measure where this wig is going to go. Um like how i did i didn't mark where the wig is going to go. I just kind of winged it on the sides, because once you have that middle part down, you can kind of tell where the other part is going to lay at least i can. But if you're a beginner or somebody that's like not used to doing a wigs. I definitely would say mark it before you're going ahead and lay it down boom, get it nice and clear nice and tacky lay my wig down, definitely hold that corner and because y'all know, that is where we get the most the lifting in our wigs. It'S definitely always either the top front or the corners right by our ears for some odd reason, if you know you know child, but now working on my other side already boom cut the leaves measuring it yeah using my bowl boom, i'm crying at myself. In my little air loops, i'm dead but yeah y'all y'all get the point. Y'All know how i install my wigs and if you're new to my channel hit that subscribe button. So you can learn your wigs just how i lay mine okay, so i also want to take this opportunity to just mention that i will be releasing my website august 1st august 1st, yes august, 1st 2020, i'm going to be releasing my website where you guys can Buy my wig so any of my wigs that you guys see me finessing, they will be sold on my website. Y'All know i don't keep here in long. I literally just throw away one, take it off and get it prepped and ready to sell. So make sure you guys are staying tuned for that, i'm going to put everything in the description updates and everything like that, but yeah make sure y'all go ahead and check that out, so y'all can shop with ty all right. So what y'all see me doing right now is i'm taking out pieces of hair that is going to be our baby hairs. Everybody does this differently, some people do it before they lay the wig down. Um. Excuse me, i prefer to lay the wig and then um, you know, put my baby hairs and yes, i just lick my finger and wipe that off my forehead. I don't give a anyway yo i'm on a roll today, it's too early, i'm too tired, but yeah. I'M taking my baby hairs out and then i'm going to tie the rest of the hair back, put a scarf on to actually lay the lace down yep there. You go all right. So now it's time to get into the baby hairs um. I did not do anything od anything extreme, i'm using a eyebrow razor and my gorilla snap gel and i'm just going to cut my baby hairs yep to the side. I didn't curl them prior to doing this. I basically didn't do, but i'm taking a little bit of the gorilla snap, wiping it down on the um hair and then i'm going back in with my razor comb, because i kind of wanted, like a you, know, a gradient effect and yeah. I cut it to make it look like that, so i'm swooping swooping boom nice blending back into the rest of the wig, and i just continue to do that. You guys have seen um in my video, where it's like a detailed hair tutorial on how i do my baby hairs. Make sure y'all check that out. It'S on my channel um but yeah. I think it's it's pretty easy to do baby hairs if you're doing them very simple. Now, when we get into swoops and flips and turns and that's when it starts to get a little bit hard, but i kept it really simple for this red wig, i feel like the red itself speaks volumes. Okay, oh yo, and let's get into the fact that if you have a colored wig mama do your eyebrows with it do your eyebrows with it. It will literally make a hundred percent difference like yeah, just just the eyebrows. If you got a color wig, whether it be red blue, green, whatever do your eyebrows with it and i'm telling you it will complete the look. Hcc yo, i'm really weak right now, because i literally just say: oh yeah, i kept my baby here. It'S all simple and then look at me right now trying to do it upside down, flip girl, if you don't cut it and just flip that down back, i really tried to like that's crazy. That'S that's! Really crazy, like i'm so funny with struggling and everything, and eventually you know what the i said. I just say yeah this i said whatever i'ma just put it the back and, i sure didn't swoop it right back, called it a day. So after i get my baby hairs delay how i want to i'm just going ahead, put my scarf on wait like 10-15 minutes and then come back with the finished result, all right youtube. So this is the finished result so cute. I just went with like a nice side swoop with some um flipped and curled ends whatever you want to call it, but yes literally, went from black to this, and even though it wasn't the color that i wanted. I think i i delivered period. Okay, um make sure you guys check out the description i'll, have all the details in there below. Thank you guys so much for watching hit that, like button hit that subscribe button, so you don't miss none of my hair projects because y'all know i'm coming with a lot of them. Just wait till y'all see my next one yeah, i'm being yeah yeah. I'M like that thanks you guys for watching bye.


Comments
Stephan1e: This is the perfect red I’ve been looking for
Leti Bee: wow! this is the exact look im going for and i went thru (still going thru) hell to reach this color. colored 3x with loreal hicolor and the closure still dark asl! gotta slap some bleach on it but at least i know what rinses to use Thanx Beautiful
Ali Pearl Hair: WOWWW~Your hair dyeing technique is really top-notch .
Kashonesty Alexis: Bro I FELT the lashes part. My tech always on vacation be leavin me a messsss
Rocio Sosa: Love it
Rocio Sosa: ❤️ it a lot
Strawberry Newberry: What did you use for your eyebrows???
Lovelysoul92: ❤️❤️❤️❤️❤️
Allysa M.: How much water and do you use hot water?
cookie Oliver: How did you color your eyebrows?
loudjy beauvil: How many min u let it