How To: Style A U- Part Wig(With Relaxed 4C Hair) Ft. Natural Girl Wigs
- Posted on 13 June, 2020
- U Part Wig
- By Anonymous
Hi guys!
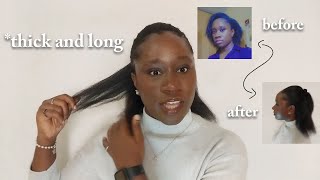
Today’s video is a hair video on how to style this curly U- part wig I was gifted from Natural Girl Wigs and showing how I blended it with my relaxed hair.
I hope you find this video helpful!
Wig Details
@naturalgirlwigs on Instagram
Website: https://naturalgirlwigs.com/collection...
Products needed
Got to be glued(yellow tube)
Parting comb
Firm Toothbrush
Have you tried any u-part wig before? Did you find this video helpful?
I’d love to hear from you guys!
“Courage doesn’t always roar. Sometimes courage is the little voice at the end of the day that says I’ll try again tomorrow” -Mary Anne Radmacher
I hope you find helpful...If you do, please let me know in the comments section.
Please Don’t forget to SUSBCRIBE and SHARE to your loved ones!
Ifedayo xx
Hi guys, my name is Fernanda. Welcome back to my channel in today's video I'll, be showing you how I styled these lovely you passed away from natural girl, wigs I'll, be leaving the details of the wigs and all the products I use in the description box below. So please make sure you check that I also leave the link to the websites where you can purchase this week from, and I love to just show you guys how I rock and style this week with my relaxed hair so stay tuned. So I'm going to start off by showing you guys the hair. It came in a nice lovely bag and he also came with a maintenance guide, which is what I'm showing in these clips and the hair came in a ziplock bag. And now I'm going to start off with my hair, I have plotted about 3/4 of my hair and I've left my and I had a leave outs and I'm now applying edge control to seal my edges and lay my edges. I'M using the goats be glued. The yellow tube and the console edge control and I'm just using that to make sure that my edges are laid as much as possible and forgive my plots. I know my black ass about old one of my plants after death unravels. I just forgive me trust the process trust the process. So, after laying my AG's, I went ahead to use a parting comb to making nice side paths in my leave out, and this is the pots I will be blending with the. U part wig, you can make his scythe sends out and inside you once y. Once I decide first cuz, I think it's more flattering for my face shape, so I'm just parting, my hair, I'm trying to make a line as straight as possible in my hair. After that, I went ahead to apply a little bit of that edge control. They got to be glued and they can't see edge control in soon my pots make it lay down as flat as possible. So that's what I'm doing in this clip I'm just making sure that everything leaves as flat as possible, especially because my relaxed hair is due for relaxing. I haven't relaxed in quite a while, so my hair was very thick at the roots and then let's make sure that it was looking as neat as possible when I put on the wig. So I I'm going to go ahead to bring out the weak from the Ziploc packaging and we're going to a machine. Show you guys what we get like so any King newly it had his band Sony, so I had to cut them off with a pair of scissors to reveal the you parts itself. So I could place that's on my head and, as you can see, the you part has um clip ins. It'S actually true, sorry little combs that you can use to attach into your hair and I'm showing you guys what that looks like what I did was that I made sure that the plots closes through my leave out the parts where the comb would enter that the Plaque they were tighter than the Plus all over my head, because I wanted to secure those combs as tightly as possible, so I'm going, I had to wear the wig now and fitting in the combs into the plots as you as I go along. It also has some straps at the back to make sure that yo we don't go nowhere, so it keeps the wig really really snug and it was not uncomfortable. The combs were not picking my scalp, which is something I watch out for when I wear wigs and was really comfortable and easy to wear. So I'm just going. I had to talking those combs into my hair and my plots all through and then I'm sitting it's properly on my head. So I'm starting to blend my leave outs with the week and what I did was that I took a portion of my leave out and twisted it in into a portion of the you past week, because my hats extra and my hair consistency is the very different From the - u part, wig Scindia part is really realistic. On curling I decide to do it this way to UM prevents any clay difference between my hand and the week. So I took a section my section, I think I split my hair into about six seconds. Five or six extra sections sections in all and just did that throughout the throughout my leave out and kept some blending its in and blending it in and wrapping around the curly wig. So if the the fewer sections and the thinner, your sections are the section of your Olivos, they wrap around the oily parts week. The unit sites will look, I think I could have done. I could have made it in a graphic and slimmer portions of both the wig and my hair to make him look much more natural, both yeah. This is how I did it and I'm just doing that all round. So I did this in five parts and just kept on wrapping it around like that. So this way it looks like after I have them, wrapped it around the hair, still looking not so good. So what I did was that I applied more edge control to the edges, and so my parts and I tied it tight scuff on it, and I went on to do my makeup so after I did my my makeup. This is how the hair was looking. I think it was it's not blended in well, because I apply this car for needs. This is how seen what the finished look was like. He can apply a little bit more edge, control and gel to the edges to make it appear Nitze if he wants, and of course you can make your sections tiny odds, make it look less obvious, but this is what the end looks like. I really really like the system, and I rocked it to work for quite a while, and I liked how it looked like it was really really nice. It was in person and pictures and yeah, I really can say, I'm really enjoying it. Yes, I really like these turned out. If you like for the makeup for this look, I put it on my Instagram page on my Instagram page and, of course, I'm showing you guys how to also rock this. This hair and this you parts wig with a hair Tobin. This is a bun headband, and this is how it looks when you put your headband on it as well, so you can work it either way and any way you like, which i think is really good. Vests out and yeah, I just like the way everything came out and looked really really good. Just thank you so much for watching this video. If you like this video, don't forget to give this video a thumbs up, don't forget to subscribe to my channel. If you like this video - and I will see you in my next one - bye

Comments
Ads Addict: The wig looks so gorgeous and natural. I've been contemplating getting some wigs from them but I like low maintenance wigs so I'm taking my time to make a choice. More hair videos pls lol
NoeleenSaid: I looove this wig ❤️ I’m definitely gonna look for it. Thanks for the plug sis
Khomotso Makhura: I’ve been looking for this type of wig for the longest time. Thank you for the plus. I’m so excited
Skin First Daily: love the fact the wig looks soooooo natural! yes girlll! GO OFF!
MYSRANNE: I love the wig, looks very 4c friendly would match my natural hair pattern. Welldone Ife!
Nathanie Swartz: The wig is gorgeous - the evolution of wigs wow! Girl your makeup is beautiful
TOKEN4NAIJA TV: Thank you for sharing your knowledge on how to do this
Celine Okereke: It looks so nice, and rhymed with your hair. Thanks for sharing
Kalenga Kapolyo: Wow it really looks like your hair! Nice! I love the makeup
The Natalie Kate: Looks so natural
khanyi msomi: Firstly it looks so natural