How To Make A Lace Closure Wig On A Sewing Machine Easy & Beginner Friendly | Barbara Atewe
- Posted on 13 October, 2020
- Lace Closure
- By Anonymous
BE SURE TO LIKE, COMMENT, SHARE & SUBSCRIBE!!!
Wassup y'all! In today's video, I'm showing y'all how to make your own lace closure wig on a sewing machine! This tutorial is super easy, DETAILED & beginner-friendly! You can even use this tutorial to make your wig with a lace frontal. So I hope y'all find this video helpful to make your lace wigs using the sewing machine method! Enjoy!
#howtomakealacewig #sewingmachinemethod #wigtutorial
⇣ I T E M S N E E D E D ⇣
Sewing Machine [SINGER Promise 2 (1512)] ⇢ https://bit.ly/3iR906S
Nylon Thread ⇢ https://amzn.to/32fQnnN
Your Bundles & Closure (find out how you can purchase some from me down below!)
T-Pins ⇢ https://amzn.to/2JEcNsl
Dome Mesh Cap (that is one size up from your usual size) ⇢ https://amzn.to/3556nLj
Canvas Block Head in your size ⇢ https://amzn.to/32h7Xb2
Silver/white Permanent Marker ⇢ https://amzn.to/36cDEDx
_____________________________________________
FOR ANY BUSINESS INQUIRIES (NO PERSONAL EMAILS PLEASE): [email protected]
CONNECT WITH ME!! ⇣
Subscribe http://bit.ly/subscribebarbara
Instagram ⇢ @BarbaraAtewe
Twitter ⇢ @BarbaraAtewe
Snapchat ⇢ @BarbaraAtewe
_____________________________________________
MY HAIR JOURNEY:
MY RELAXER TOUCH-UP TUTORIAL ⇢ http://bit.ly/2DWE82Y
MY BIG CHOP ⇢ http://bit.ly/2RvGuh8
I LEFT A RELAXER IN MY HAIR FOR 3 HOURS ⇢ http://bit.ly/355kPAi
I RELAXED MY HAIR TWICE IN ONE WEEK ⇢ http://bit.ly/2LASASu
MY LACE WIG SERIES ⇢ http://bit.ly/33uaWME
_____________________________________________
HAIR INFO:
Editorial Looks Hair Company
TEXTURE & LENGTH⇢ "Farrah Wave" Platinum Edition in 16"
IG⇢ @editoriallookshairco
Email⇢ [email protected]
ORDER YOUR CUSTOM WIGS & EXTENSIONS @editoriallookshairco on Instagram!
_____________________________________________
Location⇢ Austin, TX (Toronto, Canada)
Camera⇢ Canon m100
Lenses: Canon EF-M 55-200mm Lens & Canon EF-M 15-45mm Lens
Age & Ethnicity⇢ 25 & Nigerian
barbara atewe,sewing machine method,how to make a frontal wig on a sewing machine,how to make a wig on a sewing machine,sewing machine wig,easy wig making,hand sewn full wig,how to make a lace front wig,how to make a wig,how to make a wig under 30 minutes,lace closure wig,make a wig in minutes,wig making,wig tutorial,sewing machine,singer sewing machine,wig making tutorial,easiest way to make a wig,closure wig tutorial,closure wig sewing machine
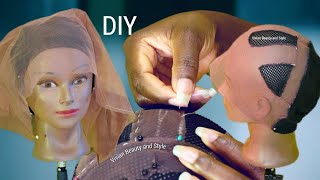
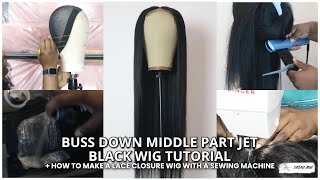
We interrupt this program for an important news announcement all right. What'S up y'all um, i'm just showing y'all the um settings. I have my sewing machine on for my wigs. So i use this zigzag pattern right here, the tightest one so that it's um tight and then i don't understand what that meant. I don't know um. This is the stitch length. I have it at two. Okay, so yeah i'm just going to we're just going to set it up. I have um my sewing machine threaded. As you can see, we are using white thread because this is a 613 hair right here. Oh, let's zoom out, i'm using my um, my camcorder, i'm using white thread right here, as you can see so yeah, let's begin okay, so i have my my bundle here. I have my bundle here, i'm just gon na unravel it, but since it's already like folded and doubled up sorry for my nails, i just finished filming a makeup video. So i have eyeliner all up under my nails: um um yeah. So, as you can see when you unravel the bundle, it's already doubled up for you, so you don't have to do too much work into matching it on each side and everything like that. Okay, so we're just gon na unravel her all the way through okay. So the bundle is already folded in half, as you can see. Okay, so i'm going to take the side, that's already folded, the the folded side, not the side that has ended with the doubles, because girl trying to match that up under a sewing machine is a lot of work. So uh we're going to take the folded side and i'm going to pull my thread. Oh wait. Let me just turn there. We go, i'm going to pull my thread far out just so it doesn't get pulled back in. While i am sewing, you don't want to put it up like this. You want to stack it like that, so it be so it's flatter when you sew it on to your um wig cap. You never want to leave it like that doubled up like that, because girl it's going to be bulky, and you don't want that. You want your thing to you. Want your wig to be flat as hell. Okay, you want to be stacked like that. You'Ll see that cool i'm just going to keep it stacked under the presser foot press it down, i'm holding the hair right and i'm also holding my string, my thread, sorry and i'm just going to hold the bundle under the presser foot and then just press it. So there's like a bit of bulking with the thread so that i don't really have to use my um, my reverse pedal to um seal it or whatever. Okay. So now we are going to sew our bundles so that it's easier for application. I mean to construct our wigs okay cool all right, so i'm just going to press my um foot pedal and i'm holding again i'm holding the thread and the hair and we're just going to begin sewing. Okay, all right, and then you also want to take breaks in between just to make sure that everything is staying together and those tracks aren't separating like that. You don't want that. Okay, okay, so i'm just going to pull the track out and fix it back to the stacked position that i want okay and then we're going to continue. And then, since i have my two fingers here, they're holding the tracks together. So they don't separate as it's going under this presser foot and then for extra security. There will be times where i just hold the bundle still under the presser foot so that it's reinforced because again, i'm not really focused. I don't have enough hands to keep switching between um, holding down the bundles and pressing down on my reverse pedal, so just for um just for easy to make it easy to make the process more simple, yeah, okay! So i'm going to pull my bundle through for just regular sewing and then, as you can see, my hand, is free, sewing it down, and so it's reinforced at the uh part that i didn't pull through. That way. The bundles don't unravel as uh time goes on when it's in the wig, okay, okay, so we're going to continue with the stacked position, uh all right! So now we are going to um, create the layout to sew down your wigs, i'm going to be using a black cap simply because my blonde mesh dome caps haven't come in yet the ones i ordered from my dad um. I have like the regular sized ones, but those ones are too small for my head because i use a 24 inch canvas block head. Okay, so um i have to switch. I i switch between either jumbo for black or xl for um, my blonde ones, but since this wig isn't going to stay blonde, i don't really have to worry about the black cap, showing through it's just going to stay blonde for one video and then we are Swiftly dyeing it afterwards, okay, so um. This is the back of the cap. As you all can see. Let'S see, it'll show on camera. The v is where you want it to line up with the middle of the canvas block: hey you don't want it to be off centered, or else it's going to feel weird when the wig is done, and you put it on your head. Okay. So this is the front of the canvas dome head again: i'm using size 24 inches okay. So we are going to put this um dome mesh cap on the canvas block head. Okay, so i am just centering it now making sure that all the edges are flush and not wrinkled or bumped up okay and then we're just going to pull it down. I like to pull it down, so it could like replicate my head in a sense like y'all see right here. I don't know if y'all can see, but the two lines they're not like, even on either side. So i'm just going to pull it on this side and just straighten everything out to make sure that it's all equal, okay, all right so she's aligned. As you can see, the v goes down and meets the uh middle line of the canvas block head. Okay, cool! So now i have my closure and we're going to pop it on to the canvas blockhead onto the mesh dome cap. I mean and we're going to outline the perimeter of the closure so that we know where we're going to stop sewing okay. So i'm just going to lay it out on the mesh dome cap, making sure that i am bringing it a little bit forward. You don't want to line it right at the end of the let me zoom in for y'all, okay, so again, uh as i was saying, you don't want to just put the closure where the hairline ends. You want to bring it out just a little bit forward. So about like a centimeter in front of the where the the wig cap ends, so i'm just going to make sure that this perimeter is laying flat against the wig cap and then i'm going to pin it down and then outline it with either. You can either use a metallic permanent marker or a chalk marker, whatever is bright enough to show up on um the wig cap. Now, if i was doing my blonde, if i had my blonde mesh dome caps on hand, i would just use a regular black permanent marker, so i can see it okay, so i'm going to pin this down again, bringing it a little bit forward and then grabbing. My t-pins and pinning it on both sides: okay and then, as you can see, it's a there's like a gap here and that's the gap. I want just know where the hairline is in front of the mesh dome cap. Okay, so i'm going to pull the closure back, making sure that is flush against the wig cap, okay, just bringing it not pulling it too hard. I just want to make sure that is completely flat, making sure that the back is flat as well pulling it back and y'all will see when i push it down. It'S completely flat against the wig cap. Do y'all see that right there cool all right grabbing. My t-pin and pinning her down and then we're going to pin down the other side, making sure she's flat and you'll see there's no ripples or bumps and she is secure. Okay. So now i'm going to take my permanent marker, let me zoom out. Let me zoom out a little bit and i am going to outline where the um closure is okay. So taking my permanent marker going around okay going around okay and now i can remove my closure because i'm not sewing that until the end oh drop, the t pin now i'm going to take my now. I'M going to take my white marker and i am going to do another line close to the edge of the line of the closure, but not right on top of it. That is where i'm going to stop sewing my bundles, because i don't want it to sew on top of the frontal. Nor do i want to sew my frontal on top of the bundle, because you want to make sure that the weight is as flat as possible. Okay, so you guys see, there's the silver line here and then this is the gold line. The gold line is where i am stopping um from sewing the bundles okay. So i'm just going around the closure outline oops around the closure outline boom. As you all can see, the inner line is where the closure is going to be sewn down, but the outer line is where i'm going to stop sewing my bundles okay, so that there's like it's not going to show up as a gap when i'm done. It'S just for me to know where the closure is going, so i know that it's not going to be bulky when i finally sew the closure on okay cool all right. So now we have our uh mesh dome cap perfectly on our canvas block head. I like to use um again. This is a jumbo size, uh mesh, dome cap, because when you're sewing it, you don't want it to shrink on you when it's fine, when it's uh completely done okay. So here's what we're going to do um because it stretches. I don't know how to explain it. Okay, so y'all know that the mesh dough cap it stretches this way right. It doesn't stretch out. So you want to make sure that when you're sewing you can sew across the elastic band. You don't want to sew along this way. You want to sew vertically. Okay, i don't know if that exists. If i explain that properly, so i'm going to show y'all with the marker okay, so this is going to be the first line, the first line and then i'm going to sew straight across so y'all see. Does it show up? Oh, i can't see because of the angle of the picture. Okay, so it's going straight across and then i'm going to do it on the other side as well. You don't want to make it go horizontal. You don't want it to go. Okay, you don't want to sew along the stretch pattern. You want to sew across the stretch pattern so that it's um since the so the thread is through vertically it's not interfering with the stretch of the uh mesh dome cap, okay. So what i like to do when i'm sewing my wigs down, is just put about a middle finger in um of space between each row or a thumb. Depending on how dense i want my wig to be - and you all know, i like a lot of hair, but since this is not a short, it's not a long wig i mean i don't need that much hair on it. I'M going to be using about between two and a half to three bundles: that's it okay! So i'm going to apply! I wish this was like a brighter um. Okay, so again a thumb of space you'll see that and then i'm going to go straight across. Okay, a thumb of space going: oh that's too, close straight across, let's zoom in a little bit, okay, a thumb of space in between each line, i'm going to draw a line; and then i'm going to go straight across like that. Okay, i'm showing it on one side. I will um continue the lens on the other side off camera, i'm just showing y'all as i go up. Okay, so again a thumb of space, drawing it on and then continuing the line, oops continuing the line across. So okay. Now i can show you guys, you see how this stretches out. It stretches out so it can conform to the circumference of your head, but since we're showing or um, i keep stumbling over my words i apologize since we're sewing across it's not going to interfere like you'll, see it's not we're not going to interfere with this um. The elasticity of the band okay, cool, that's what i wanted to say. Oh all, right! So now, um, you all see that the line meets the closure all the way through. So now we're going to do um, it's going to go like this. I don't know how to okay. Let me take the canvas block head off. Okay, so you have the lines going across the back. Now we're going to have going line, we're going to have lines going around oops. Sorry we're going to have lines going around the closure. So that it lays flat - because you don't want it bulky - that's going to - because you keep going like that and like that and like that, it's gon na be bulky around here and you don't want that um to be honest with you, okay, so i'm going to Take my thumb around the outer line from the closure. I'M going to take my thumb, i'm going to place it right here and then we're just going to go around the closure. Okay, making sure that line meets right here and then we're going just just continue. Okay, so another line oops. Let me just do it this way line going around and then it meets and then one more line right here, i'm going across there we go and then the last line right here. Okay, so this is so. This is your sewing pattern. Okay, so we have lines going across the back and then we have lines going across the top okay. So let's begin sewing. Okay, we are back at the sewing machine. I um. You also saw that i sew i double wefted um, i sewn down my stacked, bundles. Double wefted with this sewing pattern, but we're going to switch it to this one, to sew it onto the wig cap and then um. My tension is at three we're going to put that at four and then um. That'S basically it that's. Basically, it there's not much to do um not much to it to set up. This um sewing machine, which i really like it's not too complicated, but yeah. So again, it's about it's a bit, looser! It'S not this same one. This is just to make sure that the bundles don't slide apart, while we're uh when they're sewn together and then this is the one that we're going to sew onto the wig cap. The tension right here is at four and yeah okay. So, let's begin okay, so i have my wig cap here and then i also have my bundle. I mean my bundles right here. We are starting with the longest okay. So now i'm going to take my bundle, sorry my bundle and then just align it with the line on the wig cap. Okay, so i'm going to start off. Let me just - and you definitely don't want to rush while you're doing this - i'm not a professional at this, yet i'm just starting out but um. This is my my third wig that i've done with a sewing machine. Like you see a lot of people saying that, oh i did this in like 20 minutes under 20 minutes or under half an hour and everything my first week, it took me almost almost three hours and there's no shame in that. Honestly, you just want to make sure that you're making your wig as perfect as possible. Okay, so yes, i have my thread here. I pulled it out long out, so i don't have to worry about it. Getting pulled back in as i'm sewing. Okay, so i have my bundles lined up with my wig cap, i'm going to put my presser foot down and then i'm going to begin sewing, but at the beginning, i'm going to keep reversing just to make sure that it's sealed and enforced. Okay. Okay, just all right and then you just want to make sure that you're moving it along the outline of your wig cap. Okay, so y'all see me, i'm not pressing too hard. I don't want to go too fast because again, i'm not a professional yet. So i just want to make sure that i am just doing it as perfect as possible and not going too quickly just to clean. Just have a claim that i finished my wig in under 30 minutes. Nobody has time for that. You want to make sure that you're creating a perfect wig, okay, pulling it out. Oh okay, we're just going to cut the thread, and then i'm also going to cut my weft all right. So i'm going to sew my closure down by hand and then after i'm done sewing all the bundles, i'm going to reinforce it afterwards. Okay, all right and then how i like to sew. My closures is, i start from the middle and then i go out to the front start from the middle go out to the front, just to make sure that it is completely flat against the cap uh. So, okay, so all the rows for the back. Oh, i'm, sorry all the rows for the back are done now. We just have to do the rows on the top. This part is difficult because girl, you have to slide okay, so it's this part is hard. Okay, um! This is the part i struggle with the most um i'm going to have to slide my wake under i'm going to slide, i'm going to have to slide the wig cap under not attaching the bundle yet the bundles in my uh in my lap, i'm just going To slide this through all the way until it reaches the part where um the row for the top starts, and then i'm going to grab my bundle and then just making sure that the wig cap is flat. Oh dear, i'm going to slide the bundle under the presser foot pop my presser foot down. Okay and now we are going to sew there. We go she's, reinforced and then making sure that it's not bunching up. You want to keep your um the wig cap flat. Okay and then just sewing straight across. Are we oh we're? Almost there reverse? Okay. Did i sew it through? Ah, i sewed it through. Oh okay. No, i didn't i just sewed hair through, oh, my goodness, okay and then you want to slide the wig cup from under the presser foot. This is where i struggle. Oh, my goodness. What'S going on here, oh whoa, my closure got caught there. We go okay, oh there we go. Thank you so much. You know what actually we're gon na sew the closure down now before i do the last um few rows, just so that i know it's secure and she's safe whoa. Oh, the hair is getting caught in the presser foot - good, okay, so hmm, okay! So the closure is secure, she's, not going anywhere praise god. Okay, so we're doing the next row we're just going to slide the wig under right at the point where that row starts and then i'm going to slide the bundle right there there she's, locked and loaded okay. Now we are going to sew. Oh no! No, are you kidding me, how am i gon na get this out? He got caught, oh dear, oh, dear, okay, sliding her back under making sure that everything is out of the way. Okay. So, oh okay, we're on the second last row now so i don't have to drag the wig cap. That far, i mean too far slide the track under the presser foot, where it meets and then lock her under and then just make sure that she is pulled up right. Okay, i didn't do it properly slide her there we go she's, secure, okay, reinforced, and now we where's the line. I can't see it properly. There we go okay, there we go so all right. So now it's time to sew on the last track and as you all saw earlier, you saw the go the outer gold line. I don't know if you can see it here, but you can see it a little bit. I'M just going to be sewing the track along this line so that it's up against the closure, but it's not on top of the closure. That way, it's not bulky. Okay, cool! Now, let's begin extending my thread. Oh my foot! Oh, i don't want it on top. I want it like literally right beside it. Okay, there we go okay and then i'm just gon na make sure i hold down the hair of the closure, so it doesn't get stuck in the presser foot. Okay. So let's, okay, oh yeah girl! No there we go oops, let me just there, we go okay. I really hope my hand isn't blocking this. Oh, it is okay, that's what i'm gon na do. Okay, so i'm about to finish the track. Finish sewing it, and now there we go. We are done. Your wig is oh, it was a process, but we're here all right. So this is how the inside of the wig looks, i'm just going to cut all of the loose threads out so that they don't get in the way. You all know that the cap is black, but the hair is blonde right, because i mentioned that it's not going to stay this color when i'm done with it. So i don't really care about what color the cap is and also because i didn't have my blonde um mesh dome cap in my head size for this wig right. So look how thick it is. You literally cannot see it. Even when i style it, i will show you all the final product. You won't be able to see the um, the wig cap, because of how thick these bundles are. Okay, so yeah i'm going to style this, and i will show you all the final product. Okay, all right - and this is the final wig as you can see - she is pinned up and dolled up ready to be worn. I will also include a clip of me wearing the wave to show y'all that actually does fit on my head um, because you know we use the jumbo size mesh dome cap to make sure that it's going to fit. Even though um we, this machine sewn it and we and i'll show you also that it's glueless, so i don't really have to like apply any glue onto my head to make sure that it's going to stay on um. I love this method. I really hope my tutorial helped you guys out with creating your wigs. Please forget to like comment, share and subscribe and i'll see you guys next time. Okay, bye, you


Comments
Akontaba LTD: Great teaching Hun
Jaidell Ford: Your method is good what about leaving the closure for last....