Very Detailed! Using The Sewing Machine To Construct A Wig On A Ventilated/Breathable Cap
- Posted on 20 February, 2021
- Lace Closure
- By Anonymous
HEY BESTIES, WELCOME BACK TO MY CHANNEL, AND IF YOU ARE NEW HERE, YOU ARE WELCOME.
IN TODAY'S VIDEO, IM GOING TO BE TEACHING YOU GUYS HOW TO CONSTRUCT A ON A VENTILATED WIG CAP ALSO KNOWN AS BREATHABLE CAP. IF YOU HAVE ANY QUESTIONS, PLEASE FEEL FREE TO ASK IN THE COMMENT DOWN BELOW. I HOPE YOU FIND THIS VIDEO HELPFUL IF YOU DO, PLEASE DONT FORGET TO LIKE, COMMENT, SHARE AND SUBSCRIBE TO MY CHANNEL FOR MORE CONTENT LIKE THIS.
#HOWTOMAKEWIGONVENTILATEDCAP #SLAYEDBYMT #VENTILATEDWIGCAP
HERE ARE THE LINKS TO SOME OTHER VIDEOS YOU MAY LIKE
SIMPLE WAY TO GET THIS TYPE OF HIGHLIGHT
https://www.youtube.com/watch?v=ix9-7Q...
HOW TO MAKE A HEADBAND WIG
https://www.youtube.com/watch?v=7u-qlq...
HOW TO BLEACH A LACE FRONTAL
https://www.youtube.com/watch?v=KXLbWY...
HOW TO DO A QUICK FRONTAL QUICK WEAhttps://www.youtube.com/watch?v=Wbcg40...
HOW TO BLEACH A VIRGIN BUNDhttps://www.youtube.com/watch?v=bW3-VZ... FROM BLACK TO COLOR 613
HAIR- https://www.madamtiticollection.com/
GLUE- https://thehairdiagram.com/
HOTCOMB- https://www.madamtiticollection.com/
my ig- https://www.instagram.com/madamtiticol...
my ig- https://www.instagram.com/slayedbymt/
my website- https://www.madamtiticollection.com/
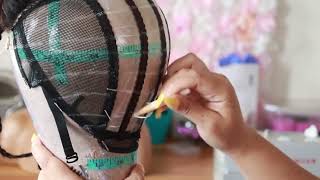
Hey everyone welcome back to my channel. Yes, yes, yes, okay, guys welcome back to my channel if you're new here, you're welcome guys. So you guys back with another video and in this video i'm going to be showing you guys how to make your less frontal on a ventilated car that do let's jump into this video. But before we jump into this video, if you haven't subscribed to my channel already, please don't forget to subscribe, comment share and like this video okay. So let's get started the first thing to take your head measurements or your client's head measurement. So we're going to take mine, so my head measurement is 22., so this canvas cap canvas head is 22 inches as well. I hope you, okay, you guys, can see, but it's 22 inches and i already did um this canvas um measurements head system. I actually saw that video on a lady here on youtube. I can't remember her name right now, but if i do by the time i'm editing this video i'm going to leave a channel right there for you guys to see how she did the this measurement and if you guys actually want me to do a video for You how i make this um measurements with system. Let me know in the comments down below but yeah, so the second price of this canvas head is 22 so and my circumference is 22 as well, and this is the front that's where the hairline is going to be starting. So i'm going to place the cap, i'm going to place the cap right there, so this is indicating to me that the hairline is starting from here. So i'm going to go ahead to pin that down right there, okay, so the next measurements i'm going to do is my front snap, so you're going to place your cap. I mean sorry, your your measuring tape right in front of our mother at right, where your hairline start from then you take it back to the nape of your neck, so right here, so we're gon na see what that is. So mine is 13 inches. Okay, so you're gon na take your you're going to take your calf. You drag it down, so it takes in so right now. I have my second friends my front nib, so i think there's gon na be need for adjustment, so the next measurement i'm going to take is my hair to here across forehead. So mine is 12 inches. Okay, so we're gon na take that measurements right now. So the next measurement i'm going to be taking now is here to here across forehead. So this is how you're going to take that so you're going to put your tip right behind your ears over here. Okay, like that and my is 12 and a half okay. So i'm going to do 12 and a half. Oh sorry, guys you guys were insane, so i did tape it to 12 and a half right. So so the next measurement i'm going to be joining is my temple to temple, which is going to start from here. So here my temple to temple is 13 inches. Okay, so this is the temple to temple i have here already. I do not actually don't need to measure this, but because i'm doing this video for you guys and i'm not ready to explain to go in details how this um measuring tape system works. So that's what i'm still measuring with another tape guys. So my temple to tempo is right here and it's 10. So i'm going to pin it right there. It'S amazing, that's getting right there! So it's perfect! So now my nape, my nip is seven one. Two three: four: five, six seven so anyways sorry guys see you're going to drag your cap down up to seven. So now i'm going to cross check my measurements. Okay, so that's seven! So, as you guys can see, i have this room. Okay, so i have this room, so what i'm going to do is to fold it sorry so fold this you can see. There is one so now everything is perfect. Okay, so this is the hair i'm going to be using i've been using this here for a while now, so i just want to make it into a wig. So this is the type of thing i like to use. I got this from walmart. Okay, sorry guys! So this is the type of paint i like to use. I got it from walmart, so it's a pen with plastic head. Okay, you can get it from any fabric store or dollarama, so you're going to press your front saw okay. So let me keep it right here so to place your front, so you want to make sure you bring your front sew about a few centimeter forward. Then you're going to pin it right here. So if you use this type of pin on your closure, where you have it, it's not going to get stuck, it's really nice. So please take care, take notes, rather so you're going to go to the back, to pin it down as well right here now you're going to come to the side, because this um frontal has been used by me. So it's already my perfect head size. Okay. So if you're working with a new lace front, you have to determine you have to make sure you check very well your you're here to hear size. Okay, so i'm gon na go ahead. Let'S pin it back right here. So if your frontal, if your frontal is looking like this like him, then you did it well, you did it correctly. Otherwise, and the back is laying flat like this. So if your frontier is laying flat like this, that means you did it correctly. Okay. This is slightly flat right here. You see it's really flat right here. That means you did it correctly, and the front is looking like hem just like this. Yes you're good to go so the next thing i'm going to do is to sew down the front. So with needle and thread right here - okay guys, so i'm just gon na go ahead so to sew it with needle and thread i'm using regular weaving thread. I got for my liquid beauty supply okay, you're working with so the first place. I want to start sewing on is going to be right here, so guys i'll be using three bundles of vietnam born straight okay, so we're gon na go over to my sewing machine and let's, let's get this job done guys, let's get it done period, so so At this point i noticed um. If i don't double the weight, i won't be able to fit in all the tracks, so i went ahead to double some of the tracks and you guys are going to see me doing that in a bit so to double my tracks. I change the stitches to zigzag okay, so you always want to backstitch at this twice. You know to lock the stitches in place, so so so do do do so so guys we are done so now, i'm just trying to pull sorry guys. Let'S just stick my leg um, so i'm just gon na start. Sorry guys! My son is back from daycare, so i'm just pulling the plastic. There'S no big deal to this between guys. Do you, like my brows, like i didn't, wear brows from makeup by skulls, like i, don't have to wear makeup to come to youtube video, no makeup in my ass, say: hi guys, say hi, guys, all right say: hi guys he's not having it. Okay! So, like i was saying see my makeup, i mean sorry see my brows they're, so inflate guys, my browser freak. So if you guys want to have your ombre brows done and you're in miss saga, canada, so you know anywhere, i'm going to leave our instagram page down below. Is that makeup, by spares or somewhere thing, i'm going to leave it somewhere there, for you guys make up my spells so go get her to do your brows yummy, brows. Okay, like i love it. Thank you. Thank you. Thank you. Thank you, michael. By spells, i'm loving my brows so guys, i'm just cutting the plastic. You know there's nothing much to that, so i'm just pulling and cutting okay. This is gon na take time, so i'm just showing you guys, so you basically just pull i'm going to do that. Another time be careful not to cut your legs now. All i need is an elastic band. Okay, hmm! It feels so light, i'm loving it already guys. It feels really really light so you're going to put your elastic band. You measure from here to here like from here so yeah right, so i can also have glitters. If i want, i don't want to glue all the time. Okay, so this is where i'm going to be, attaching it so before attaching your plant, you want to make sure you pass the hair okay, and you place your front right here: okay, okay, so, okay, i see so i'm going to go to the other side as Well, right here, don't forget to pass the hair before you start sewing. Do ah so this is it like guys. I really love my brows if you're in mississauga toronto anywhere in canada - and you want to get your brows done, make sure you go follow. My girl make up my spells. Like i love it, i love it. I love it all right guys, so you know she is friend flip fit. Oh something is missing. Comb right here they come. This is how he's looking at the back. So i need a comb guys, um, okay, okay, everything is good, i hope so i believe that's the look i'll be going for guys. Do you guys know sincere lovely? Yes, this is the love i'll be going for. So thank you so much for watching. I hope you liked this video hope you enjoyed it. It'S my first time of making this week as well. So what i would say is everything is fine. I like it, you know it's the first time ever ever, i'm making with this kind of cap. That'S the ventilated cab, it's breathable, i like it. It doesn't even feel like i have anything on my hair. I'M still going to take my time to take off the plastic on the cap. So yes guys and make sure you watch the next video, where i'm showing you how i color this hair. This is supposed to be burgundy, but it's not white anymore. So i'm going to do some highlights. You know it's going to be a bump, so make sure you watch that video, okay and there's going to be another video where i will show you guys how i glue it on my head using bold max, which gives up to six weeks old. I know i'm not going to keep it for six weeks, but maybe i want to try and keep it for like two three weeks. I hope so all right guys bye, love. You
Comments
Maimuna Embalo: So detailed, thanks for this tutorial.
Peta Pann: Great video ! Where did you get that specific cap with the u shape ?
Doja Osho: Thank you my teacher
Lesa w: I don't have a sewing machine, can I see by han