Ywigs - The Best Microlink Hair Extensions For Beginners! *Beginner Friendly*
- Posted on 07 November, 2022
- Lace Frontal
- By Anonymous
Ywigs I Tip Microlink Hair Extensions *BEGINNER FRIENDLY* #microlinks
Subscribe ROAD TO 3k!
Business Email: [email protected]
Our I Tips are pre-beaded, cutting down half down on installation.
The microlinks hair extension I received is from Ywigs
~~~~❤~~~~❤~~~~❤~~~~❤~~~~❤~~~~❤~~~~❤~~~~~
Direct link to the Yaki Straight I Tip Microlink hair extensions:
More I Tip Microlink Hair Extensions:
https://www.ywigs.com/collections/i-ti...
Tape In Hair Extensions:
https://www.ywigs.com/collections/tape...
Ywigs Clip-ins Hair Extensions:
https://www.ywigs.com/collections/clip...
Ywigs U-Part Wigs:
https://www.ywigs.com/collections/u-pa...
Ywigs HD Clear Lace 13x6 Lace Front Wigs:
https://www.ywigs.com/collections/13x6...
❤ Ywigs official website: https://www.ywigs.com
Connect with Ywigs:
http://www.instagram.com/ywigs_officia...
https://www.facebook.com/Ywigstore/
Snapchat: Ywigs Hair
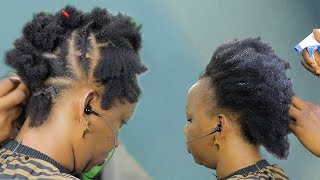
No singing hey, y'all Anthony Shea back with a new install, so why wigs reached out to do a collaboration with me to install the micro loop, um, hair extension. So I did pick out the light. Yaki texture and that's what I'm showing y'all now and the texture is really really nice. Um in the bundles were really thick, so it comes like in each bundle. You get like four little mini bundles. If that makes a little bit of sense, so I picked that texture because you know I normally do wear my hair straight and my hair isn't super duper thick or anything like that. So I just felt like that texture might be best, but I'm just showing y'all. You know like the density of like my natural hair um, I am Tech, slacks and the ends of my hair. It was like a little ugly dirty brown color, but whatever we gon na work with it um but, as you can see like these are pre-looped. So you don't have to um, you know, install a bead and then slide the um, the eye tip through or anything like that. It comes pre-looped. So this is super duper beginner friendly, super easy like At first I was like oh my gosh, like what I'm gon na do, but once I started I started getting the hang of it, so I just um sectioned out a perimeter of my hair that I wanted To leave out um enough to cover you know the extensions, so I did one off camera and then now I'm showing you guys how I did the second one. So you take a tiny section of your hair and you pull it through that little clear Loop part and after you pull that part through there's like a tiny little black bead, that's hanging from like next to the extension you're gon na pull that and it kind Of just like weaves your natural hair through that Loop, so that the extension becomes attached and with that little um and after that, actually like you, can kind of move it up or down. You don't want the bead to be right on your scalp because since that's going to hurt, but you do want it close enough as to whereas, though you know it's on there kind of snug and then you use your pliers and then you're going to go ahead And like squeeze it close, don't get no regular pliers because that's it's a totally different ball game. It'S not going to work! You want to use the pliers that either comes with this or you're going to have to um. You can find one on Amazon, like micro, loop, plier tool, and it should come up. It'S not that expensive and I just did this around my whole head. So I kind of went slow on the first row to kind of show you guys how I got it on there and yeah, so I actually decided to flat iron my hair in between um. As I went along. I know some people install it and then flat iron, their hair at the end, but I find it easier to flat iron, my hair first, because it's much easier to pull the strands of your natural hair through that Loop. Now, if you try to pull too much hair through the loop, your I mean for one: it's not going to go through the loop, because your hair is the piece of hair is going to be too thick. But if you find yourself tugging like trying to pull your hair through then just stops is get a smaller piece and start over, because this will break your hair. If you know you're forcing it so don't force it and just make sure you have really small sections. Um, as you go also, if you don't squeeze that bead tight enough, it's going to slip down and you're going to feel it um. The pro that I do like about this, though, is they are reusable. So when you take them out, you can actually replace the beads and or The Loop pieces to reinstall them. So I really do like that and you can do that by using a crochet hook. So I pretty much did the back of my hair. I use like one bundle and now I'm moving towards the front, so I wanted my hair to kind of hit my face a little bit, so I parted it in like a diagonal section instead of just going straight. You know like straight back, so that's what I'm doing here now. The only con, I would say is if you have a finer, hair, texture or more so like I have a finer hairline. So if you want to wear your hair up in a ponytail, I would recommend like not doing um. I would recommend not adding these so close to your hairline in the front. I did feel as though I left enough out but girl. I know my hair is thinner and that's just my hair's always been that way. So I think, if I do come to a point where I want to like wear it up in a ponytail, I would just have to remove the beads from like the first row or so in the front of my head or wear like a headband and just Finesse it that way, but if you do have a full hairline, then this will work fine for you. When I lifted my hair up into a ponytail - oh my God jaw. It was so so nice so lightweight, and it feels really really natural one of the things about micro Loops is it's more so for it to add length or maybe bodies here a little bit of body to your hair or just a little bit of fullness. So if you're, one of those girls that you enjoy your hair super duper full. I would not recommend that for you, because it's just going to be too much on your hair you're not going to really get that full effect. Unless you get a more coarser, textured, hair or a piece of hair, that's like a lot Fuller, but I absolutely love these so far. Super versatile. The only thing is, you know my hair color is a little off so after I finish, I realized it and I was like oh my God, so I did go in with the hair rinse to try to correct it, but my hair is just so dull. I cannot use a permanent hair dye, so it's but so much I could do and I did use um the Temptation Hairspray, the temporary hairspray color, to try to blend my hairline a little bit that line of demarcation. But if your hair is the same color as your extensions, you should have no problem. You can wear your hair, half up half down a full ponytail. You could even put curls in this hair. I didn't show on camera, but when I first tried it I was like. Let me see if this girl can curl and it definitely does, but I absolutely love these extensions so far, I'm having fun with it, I'm gon na, be you know playing around when you see what I can do, but I absolutely love this install. You guys link to everything down below so make sure you shop with wide wigs and thank you so much for staying tuned in row. Two 3K babes make sure you like comment and subscribe and until then I'll see you next time bye, singing
Comments
There and Back Again A Hermit's Tale: So Pretty. I wanted these in the late 80s. But..I know myself and I'm so claustrophobic I'd rip my own hair out, trying to get them out once I'd had enough of them! When I want a style out, I WANT IT OUT!
iKandi: Wow!!! You did better than some of the "professionals" I see charging $600 & up! I may try these myself!
iKandi: How many pieces did you use all together? Can the hair be colored? Please keep us updated!