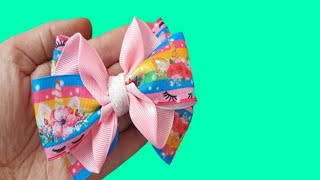
How To Make A Ribbon Hair Bow Holder
- Posted on 03 April, 2014
- Hair Accessories
- By Anonymous
This video will describe how to make a hair bow holder with two ribbons. You can organize your hair bows, barrettes and hair clips on this handy hair bow holder.
Hair Hardware's video on making a Loopy Puff Bow
https://www.youtube.com/watch?v=oQ7pVC...
Supplies needed to make this hair bow holder:
Ribbon, glue gun, glue sticks, craft sticks, plastic rings, markers
http://www.needlepointers.com/ShowArti...
Needlepointers.com
Your One-Stop Crafting Resource Center!
Find us on:
Web Site: http://www.needlepointers.com
Facebook: http://www.facebook.com/Needlepointers...
Google+: https://plus.google.com/u/0/1139921848...
Twitter: http://twitter.com/Needlepointers
Hello, this is neil pointers, comm and today, i'd like to show you how to make this hair bow holder, I'll zoom in a little bit. So you can see so it's got a bit a loopy bow at the top and then two ribbons that you can. Hang your hair bows on. We can make the ribbons pretty much any length you would like. So, let's see how we can make this so to make the ribbon hair bow holder. What you will need is two large popsicle sticks. These are six inches long by 3/4. Inch wide we need ribbon, that is one and a half inch Y 7/8. The 7/8 of an inch wide and um 3/8 of an inch wide you'll need also a one-inch plastic ring and you'll need some sort of decoration for the top. This is a loopy puffed, bow that I've made that I mean um. There'S a complete instructions on how to make this kind of bow. It'S by hair, hair hardware, another YouTube, vert and um. We can put we'll post the link to this to their video on how to make this bow. In the description of our video, you could also purchase some sort of bow or other ribbon or other decoration that you'd like at the top. You also need a hot glue gun and a marker that matches your bows, probably the usually I match it to the larger bow. So what you'll do is you'll make the loopy bow, but what you'll do is you'll you'll stop where they put the clip on it. So you would just don't put the clip for putting it into your hair or whatever so um. So again you can see the video link link to the video to make that so the next step, we're going to do is we're going to glue the two popsicle sticks together so very carefully. Using your hot glue. I just put some hot glue down the popsicle. Stick stack the one on top of the other and then what I'm going to do is I'm going to take this marker, because when you wrap the ribbon around here, the little end, the rounded end of this will show. So what I want to do is just use my marker and just color it in a little bit, and I also put it on the end a little bit just try to make it look more finished. You don't really have to do on both sides, but I'm not sure which side I'm going to end up with is the front so because we will be wrapping the ribbon around a few times so I'll set that aside for now. So then, what you'll need for the ribbon is you'll need to cut one 10-inch piece of the three-eighths inch ribbon and then you'll cut to 30 inch piece. I have two pieces here that are 30 inches long, so two 30 inch pieces of the wider ribbon. The one and a half inch rhythm, and then you also want to cut to 30 inch pieces of the 7/8 inch ribbon. So our first step is to we're going to line up the two ribbons together. So what I want is, I want this ribbon to be kind of laying on top of the of the lighter ribbon, so I'm just going to line it up on there. So then, I'm going to glue one end to the popsicle sticks be very careful not to burn yourself while you're doing this and then you'll have to glue the other ribbon. On top I'm going to glue this other set to the other side, you want it to be close to the edge of the popsicle. Stick we're going to be wrapping this around, so you don't have to get it exactly perfectly glued down. So next I got to turn this over and I'm going to wrap the ribbon around one half turn. So I'm going to put glue on here I'm going to wrap it around and I want to make sure it's smooth. So just I'm holding it a little bit tight and I'm wrapping it around. So then the next step is I'm going to take my smaller ribbon, the last piece of ribbon and I'm going to thread the the ring onto that. And now you want to make sure. I'M going to glue it on like this on each side and you want to make sure you don't have any twists in the in the ribbon before you glue it on so make sure it's it's the same, there's no twisting in the river and for this island A little dab of glue, it's going to be it's going to be wrapped in there anyway, so we'll have to be supportive. So then the next step again is we're going to wrap it one more time. So we're going to glue here and then turn it again. One more time holding it flat and you also have to glue the thinner ribbon down. Otherwise it will puff out just a small amount of glue. I'M going to hold it tight and flat. Just tap it to the glue holds I'm going to do the same on this side again, so we don't work we're closed almost on so now you can see the the ribbons are going to hang down this way, and this is going to be the holder and Hang there, so I just have to glue the holder, one more shot, one once more to make sure it stays up. Put it in you, hello, little pull this up. Okay! So now you can see we have it's sticking to my cable, but this is what it's pretty much looking like. You got your ribbons hanging down and got your hook on the top. So the look this last step is I'm going to glue this loopy hair bow ribbon or whatever decoration you have for in the middle right into the middle, and that covers up the rest of the popsicle stick. So I can fluff a hair bow. So there we have that, and the only less stuff you're going to want to do is you're going to want to heat seal the ends of your ribbons, the very ends of all four and you do that, either with a lighter or some kind of a match Or something you can just run it along there very quickly and it will kind of melt the ends of the ribbon there's also products out there that will let you heat seal the end of the ribbon. Thank you for watching our video. If you've enjoyed the video, please click on the like button and subscribe to our YouTube channel. Use the comments section to leave us a comment on this video or to suggest a video. You would like to see find us on Facebook at needle pointers and share pictures of your projects. You would love to see them also visit us at needlepoint erskine for lots of other free ribbon projects and kids projects.

Comments
Dominga Martinez: Very pretty I will do it! Thanks
Lillian Sanchez: so cute. I'm going to have to try this one out. I like this better then the frame bow holders
RA BOETA: Thank you for sharing. Easy to follow
Slimtend: The best tutorial I've seen.
Madhuparna Basu: very helpful