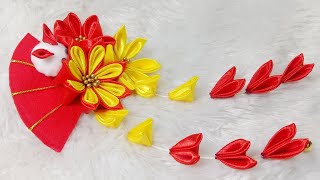
Diy Kanzashi Ribbon Flower Petal #1 Folding Variation Hair Clip Tutorial
- Posted on 07 September, 2017
- Hair Accessories
- By Anonymous
Take your Kanzashi Petal #1 to the next level and learn how to double the layers in each petal and add more color with this new layered petal construction variation. Kanzashi Petals are made with grosgrain ribbon, satin ribbon or gingham ribbon from Really Reasonable Ribbon. In upcoming videos I will introduce additional petal options to add to your creations. For great ribbon, great prices and fast shipping - shop Really Reasonable Ribbon. www.reasonableribbon.com
For more photos and information on the cross action tweezers I use in this video, please visit:
http://maketime2craft.com/2017/09/diy-...
Hi everyone, I'm Bonnie from really reasonable, ribbon and make time to craft, and today I'm back to share a new technique for creating the layered concession paddles, which you see on this pretty hair clip. I had taught a variation of the layered pedal before which I'll link to up above, if you want to take a look at that one, if you haven't seen it, the main difference is the original pedal that I taught the way it was folded. You ended up with a folded like a double layer of each color on one side and just a single fold on the other side, which there's really nothing wrong with. This is a lovely pedal. It makes a gorgeous finished, kanzashi flower and, if you like, making it this way by all means continue to make it this way. I just came across this on Pinterest and I wanted to share in case you hadn't seen it it's just a different way of folding. It so that there's only one fold on each side: it's just a little bit more symmetrical looking, and I like this one, a lot better. So, let's get started, I have one and a half inch squares of grosgrain ribbon. You can use any kind of ribbon. You want as long as it's 100 percent polyester. You can use double faced, set and gingham whatever you want. So I have two a dark and a light or whatever two colors you want to use and I'm gon na fold each one in half on the diagonal to make a triangle and the darker color is going to be on the outside of the petal. So that's going to be on the bottom and I'm gon na layer, the lighter pink on top, and you want the triangles to be facing like that. You take the dark one and fold it down over. You want this point in the bottom corner and then you're gon na take the light pink and fold that down and over and meet up the other corner. Now, because of the bulk and the top color of this, I find it easier to use like a knitting needle anything then that you have just to help bring it around so that you don't get any buckling or weird folds down inside the petal. And I'm going to use my cross action tweezers and we're going to continue with the petal, just like all the other petals that we've done the edge, I'm gon na heat seal this. What the lighter does with a 100 % polyester ribbon. Is it melts the ribbon? A little and as it cools back down that acts as a glue, and it holds the petal the way you want it now, I'm going to make this cut about in the middle of that flat end and I'm gon na shoot for, like a third of the Way up, this just makes the petal when it's sitting on the flower, instead of being a steep angle, it's gon na make it a little flatter. So that is your choice where you can shoot for half way less. It depends on the look that you want for your flower, I'm going with a third of the way for tivity, so I trim that off. I'M gon na use my cross-faction tweezers again heat seal, the bottom just to hold everything together and not have any fraying ribbon. I often come in with my other tweezers just giving a little squeeze and your petal is done. I'Ve got some greens too. These will be leaves on the outer part of the clip today. We'Re just gon na do run through the fold one more time. So the back triangle is gon na face this direction. The front is actually the mirror image and we're lining up that bottom edge fold: the dark green over then the lighter green, take my enemy and I'll just to help me hold it and just try to get that lined up as best I can use my tweezers Point, oh, he only got off set the dog pulls apart. You can just read at all, so that's how you're going to construct the majority of the panels. This is just a single layer, one I made a little bit smaller that will be at the top and now I'm going to try to quickly put the flour together and probably gon na speed this up and I'm using a glue gun for assembly today. So I'm going to start with these, and here we go you and there you have the finished piece. I was hoping for a little bit better turnout than this, but, as you may have noticed, I don't get along with my glue gun and there's almost a comical amount of glue strings like Coopers on this. So I apologize. I often will string the petals with thread which you've seen in the other videos. I thought maybe it would be faster use a glue gun, but considering how frustrating it is to me, I think it might have taken longer anyway. That shows you. The assembly try to do it with a lot less glue, strings and goobers in there thanks so much for stopping by. If you liked the video, please give me a thumbs up and leave a comment. Happy crafting!

Comments
Edwina Brown: So beautiful! I love your flowers. Your hair clip is wonderful! It would make a great gift.
Christine Alaníz Gutiérrez: Love it. It came out beautiful.
Prairie Paper Crafts: Gorgeous! Tfs... you make it look so easy!
Bunny: Absolutely beautiful.
Patty isSpoiled: Beautiful creations!
Maria Vergara: BEAUTIFUL!! TFS
Ari Est: can you do a video on pricing and how much to sell them for please