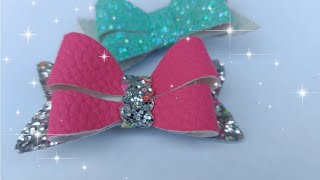
A Guide To Sewing Hair Bows For Beginners! How To Make Hair Bows. Diy Hair Bows Tutorial
- Posted on 08 October, 2020
- 6D Hair Extensions
- By Anonymous
This is a step by step easy to follow tutorial. If you agree, press that like button under the video!
Hit the subscribe button and turn on notifications, so you never miss a new video tutorial!
Follow me on Instagram ♡︎ https://instagram.com/craftymummabowtu...
Like and follow my Facebook page ♡︎ www.facebook.com/craftymummabowtutuful...
Join our Facebook group to see sneak peaks of upcoming videos, help, advice and friendly chat ♡︎ https://www.facebook.com/groups/959716...
Follow on TikTok ♡︎ https://vm.tiktok.com/ZMJh2mLbM/
Buy my bows ♡︎ https://etsy.me/364C8Sj
I also found these great deals on online...
Snap clips various sizes https://s.click.aliexpress.com/e/_ADsi...
Lace print leather fabric www.thepolkadottedpeach.com
Chunky glitter fabric https://s.click.aliexpress.com/e/_d7W1...
Fine glitter fabric https://s.click.aliexpress.com/e/_d8cV...
Felt https://s.click.aliexpress.com/e/_dZOW...
Chunky glitter bow fabric https://s.click.aliexpress.com/e/_ATYf...
Rainbow Glitter fabric https://s.click.aliexpress.com/e/_dYuq...
Glitter fabric https://s.click.aliexpress.com/e/_d7W1...
UHU glue https://s.click.aliexpress.com/e/ https://s.click.aliexpress.com/e/_dUHu...
Snap clips various sizes https://s.click.aliexpress.com/e/_ADsi...
Ribbon https://s.click.aliexpress.com/e/_dUHu...
Ribbons- http://s.click.aliexpress.com/e/_dVeOU...
http://s.click.aliexpress.com/e/_d7xbE...
Alligator clips http://s.click.aliexpress.com/e/_dXqdd...
#hairbows #hairaccesories #hairbowtutorial As I use AliExpress, EBay and Amazon to buy my bow making supplies, I have joined their affiliate programs, so any links you use may result in me earning a commission from your purchases. I will however, only share the links to products I highly recommend!
Hello, everyone. It'S me colleen, aka, crafty, mom, beautiful i'm coming on here today to speak to you a little bit about sewing hair bows. A lot of you would have seen some of my videos and thought. Oh, this looks like an interesting bow how she made that or maybe another tutorial, another video, and you then see me or whoever making this bow fold in the ribbon, putting it in place and then you get out the needle and thread and you're like. Oh god, no that's too complicated. I can't make that no. That is exactly how i was about three four years ago. I'D look at these bows and i'll see them on instagram, facebook and i'd. Think, oh, how do they make that and then i'd find a tutorial for it and i'd start watching this tutorial and i'd be the same. I'D think, oh, i can't do that. That'S too much, but then i kept seeing them and i thought i really want to make one. I just i keep making these glitter bows. I keep making these basic ribbon bows and i just wanted to expand my knowledge further and just make some more different bows. So i went out and i bought some needles and some thread extra strength, bread. I will add, because i do recommend, because at first i did buy basic thread and when i first made a bow, i went to put in the pinch and it snapped and then all that folding and pinning all undone and then i have to start again. So yeah definitely buy extra strength thread if you can but yeah. I i bought these and i had to go and yeah i'd done it and i was like wow that went as bad as i thought it was. Actually some of them are easier than others. Some are a little bit more complicated, but if you start off on the more simpler ones, you'll find that you know it's really, not that bad at all, and once you get used to it, you'll then move on to the more complicated ones and yeah the bows You can make are gorgeous you just it's impossible to make those style bows without sewing them. Unfortunately, you do need to have a go so yeah. Hopefully after you have watched this video today, i can encourage you to just go out there and have a go. So, first of all, i'll show you my needles and my thread, which i use for my bow, making. I use these hand needle sharps by hemline, and they are sizes five to ten. So there's a variety of sizes in here there's these really small ones, which i probably won't ever use and then there's the bigger ones in the middle so yeah these are the needles i use. You can get all different sizes of needles. That'S actually quite surprising when you go into a shop and you go to the sew-in section, how many different needles there are. You don't want one. That'S too thick, even though you might think oh a thicker needle that might be easier to work with, but you can then be left with a big hole in your ribbon and you don't want big holes left in the ribbon, even though you wrap the center. Sometimes you can't see it. I just prefer these more skinnier needles and they also have a really tiny eye at the top. Some have bigger eyes, but with a little bit of practice, threading your needle you will get there. I will show you how to do that today and the thread i use is this one by gutermann. I don't know how you pronounce it, but this was on the shelf marked as an extra strength thread, and that is really good. It is a polyester thread and if i just show you yeah, so i can't even snap that i'm pulling that as hard as i can, and i can't snap it and i can't pull it any harder, because i was going to cut my finger. So this is a really good thread to use on your bow. So when you're pulling in your pinch, you're not likely to snap the thread and then undo all of your work, so i'm going to take a piece of thread off now. I usually take around another length of my board, which is around 43 centimeters, so i take around 43 centimeters of thread off. I don't obviously measure it. I'M just giving you guys a rough idea of how much i take off, and that is usually enough to sew the center of a bow. The two sides together now to thread the needle, as you can see this needle, has got the tiniest eye in it because of the small needle they have the smaller, the needle, the smaller the eye. So they can be very fiddly to thread. You can get tools to thread your needles, but i want to show you today how i do it. I don't use any tools to thread my needle now, an example. I'Ve seen online before is that you take your thread, wrap it around your needle and then grab it close to the top, as you can, so it sits at the top of your fingertips and then, when you pull it out, you're left with the loop to then Place through your eye of your needle, but because these are so small that loop being the thread doubled up is hard to get through that little tiny eye. So i don't do it that way. I'Ll just do it with my normal plain end of the thread make sure that you've cut the end of your thread with a good, sharp pair of scissors. So pop my needle down, i've got my fiskars razor edge scissors and i'm going to cut that end. So, as you can see, there's a slight bit of frying going on so make sure you cut your thread with a pair of nice sharp scissors, so you've got a nice smooth end, and then you want to take that thread between your thumb and finger. Bring it down so it's as close to the top of your finger as you can get it so there's no wiggling, no movement because you're holding it quite close to that tip, and then i take my needle to my thread. Not the thread to the needle. So holding my needle in the other hand, i then place the eye over the thread like that, and then you can see that start to come through and then i grab that end and pull it through, and that is how i thread my needle now. If you've got a bigger eye on your needle, you can do it the way i'll show you before by wrapping it around the needle and then making that little loop to push through. But like i say, because this is extra strength thread. That'S slightly thicker than a standard thread and that just wouldn't work with this tiny eye on this needle. So that is how i thread mine now to knot the end of the thread. You could just take the end and just tie a knot in it like this. Just a basic knot like that, if you wanted, but there is another way of doing it, which i find easier personally it'll take a little bit of practice, but once you get it really clever and easy way and less fiddly in my opinion, so i'm holding my Needle, in my left hand, i don't matter if you want to do it the other way. Around whichever hand you prefer, i am actually right-handed, but i'm holding my needle in my left and then i'm just going to run my finger down to find the end of that thread, keeping it pinched in my finger and then i'm going to bring this needle back. Next to that thread and pinch that in my thumb and finger as well and then taken this end, which is the loose end, so it's like that sorry let go now. The end of the thread is here: the needle is this side taken the loose thread side. I'M going to then wrap that around my needle a few times and then i'm just going to push that down and pinch onto that as well. So i'm pinching now onto the end of the thread, the little coil that i've wrapped around the needle and the needle and then you pull your needle out keeping hold of that tail end and the little coil. And you pull it all the way. And then there you have a knot. I'Ll show you that again just cut that knot off so i've threaded, my needle like this. So i'm going to hold that there so that don't unthread and my needle and then i'm going to find the end of my cotton and when i found the end, i'm going to keep that pinched and i'm going to bring my needle back down and also pinch Hold of that and then taken the loose end, i'm going to wrap that around my needle push that down and grab it and then grab my needle pull it out. Try not to lose your thread out of the needle look all the way down to the end and there's your knot. So that is a good, easy method to get the knot in the end of your thread, our needle threaded and are not in the end and they're going to show you the basic stitches in each different size width of ribbon. So i've done a little sort of chart if you want to call it here, so in a one inch wide ribbon or 22 to 25 millimeter that don't matter the few extra millimeters, whether it's 22 or 25, that won't make any difference. As a rule, we do four stitches on a one and a half inch ribbon or 38 to 40 millimeter wide. We do as a rule six stitches on the two inch wide ribbon or the 50 millimeter wide. We do eight stitches and on a three inch wide ribbon or 75 millimeter as a real. We do ten stitches now, as you can see, they're all even numbers, that's quite important, because if you do an odd number of stitches, that means you'll have one end of your ribbon: folding upwards. When you pull in the pinch and one end folding downwards, that just won't add up that needs to be. Even so, we need an even number of stitches to keep the bow balanced and symmetrical. Now i've got some samples here. I haven't done the one and a half inch wide, because i'm going to show you this one, so i've just done a basic tux bow just to show you what the pinches look like when they're done. So this is the one inch wide ribbon and, as you can see, we did the four stitches. So i went in out in out and then you're left with this kind of pinch, which gives you two hills so we'll call the up parts, hills and and the down pieces valleys. So with the four stitches you end up with two hills and one valley like that, so that is the one inch wide ribbon and then here we've got two inch wide ribbon and we did the eight stitches and with the eight stitches you get one two three Four hills and one two three valleys, so that's a two inch wide ribbon with eight stitches, so that is that one and then, with the three inch wide ribbon, this is with ten stitches. You end up with five hills and four valleys, one two, three, four: five hills and one two, three four valleys. So that is what it looks like with the 10 stitches. Now you can do more or less that's completely up to you, but if you do fewer stitches on these bows, you end up with a more bulkier in the middle. So when you wrap your center, where this is only like around just over half a centimeter tall in the middle there, the less stitches you do, the taller that will be in the middle that won't lay as flat. So that is why we do this number of stitches, depending on the width of the bow, so that is the three inch wide ribbon now. Another important thing to note down is you always go in through the first side, so you put your needle in through the first side, and you will end up coming out through the last side and the reason being is if i was to go this way from The bottom up, when it come to pulling my pinch tight, these outer edges of the bow are going to be upwards instead of downwards, which is a lot neater. So if that was downwards like that, that would be a lot neater than if the finished bow had the outer edges upwards, like that, so always go in through the top first, on your first stitch. So this is the one and a half inch wide ribbon. Six stitches recommended on there, but first of all, i'm going to show you what it would look like if i only done four stitches just you can see why. So, if i did, four stitches like in the smaller ribbon, the one inch wide so i'd go in. First, one two three four: now, as you can see these stitches, the distance between them is a good centimeter to 12 millimeters apart, whereas these ones are around five to six millimeters apart all these stitches, so i'll just show you when i pull this pinch in so I'Ll pull that needle all the way through and pull in the pinch to show you so with doing less stitches than recommended. It looks okay from the top you've got the two hills and one valley, but from the side that's a lot taller than what it would be. This was a good one, centimeter tall which isn't too bad, because obviously this is only a one and a half inch wide ribbon. But if you did that say on a even wider ribbon that would be even taller in the middle, and now i will show you what it looks like i'll. Just pull this back out and i'll show you what it looks like with the correct amount of stitches. So i'll just re-thread, my needle and then we will do six stitches across the middle one. Two three four five: six now, as you can see, they're only around a half a centimeter apart and i've gone in through the first side and i've come out through the last side, because we've got an even number of stitches. So we're going to pull. In that pinch and then, as you can see from the side view, that's a lot more flatter. There'S only around a half a centimeter like tall here in the middle, it's not so bulky and then with that we've got three hills and two valleys. And now i'm going to show you how to tie a bow off so once you've pulled in your pinch like this. As you can see, i've got my thumb here, because if i let go, the pinch is going to go. So i pull in my pinch, keeping my thumb there and then grab it with the other hand like this, and i will wrap this around the center a few times and then turning it over keeping this pull tight. So i don't want it to come loose and then going to grab my needle the other end and i'm going to go through those stitches at the bottom and then on this last one, i'm not going to pull this tight, i'm going to pull it. So i leave a loop here, see this loose loop and then i'm going to take my needle and go through this loop once twice and then, when you pull it tight that forms a knot and that will hold that all in place. So when you cut off your thread, nothing's going to come unraveled so just trim that off - and that is your one and a half inch wide ribbon with the stick. Six stitches like that. I hope this has helped you a little bit and made you a little bit more less scared of having a go at sewing a bow. So, as a rule of thumb, you just need to keep your stitches around six five to six millimeters apart. You don't have to measure as you stitch them, because that would take way too long, but you can just do it by eye and using this chart i'll pop a picture of this in at the end. So you can screenshot it and save it, and then you'll know how many stitches suit each width of ribbon. I hope you've enjoyed this tutorial if you do have a go at it. Let me know how you get on in the comments below also head over to facebook, and you can join my group. It is called hair, bows, tutorials advice and craft chat. I'Ve also got a facebook page, but crafty mama, beautiful i'm also on instagram. All the links are in the description under the video so check that out. Thank you for watching everyone. Bye, bye,


Comments
busyaries: Excellent tutorial! I wish I had seen this when I started making bows
ladonta: I just had my 1st daughter I've been very interested in making her bows