Quickweave Mullet Removable Wig
- Posted on 24 January, 2023
- Clip-in Hair Extensions
- By Anonymous
Scheduling Contact 843-453-6721
Shop With Me www.feliciaslater.com
Lace Wigs www.directorscutstudio.com
Instagram @Feliciainspire_
Facebook @FeliciaInspire
Items Used
Blaze Pack Hair
Velvet Tara 2,4,6 (2 Boxes)
Adore Hair Color
30 Sec Bonding Glue
Mesh Dome Cap
Mannequin Canvas Head
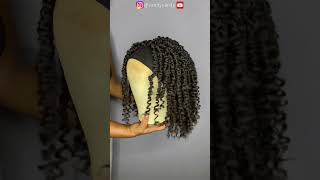
Hey you guys and we are back again with another tutorial today - I'm going to be demonstrating the mullet. Okay, so y'all already know I'm using my mannequin head. So to do this, look I'm going to be using a 14 inch and a 12 inch in the back of the head, and I'm doing this on a mesh Dome cap. I'Ve never used a mesh Dome cap before, but I'm going to be trying it for the first time it is a little bit big, so I just kind of you know: gon na pan it down or either glue it down to the size that I need it To be and like I said, this is the first time I'm using this type of cap, so I'll see what the outcome is. So for this look, all you're going to do is go from side to side and I'm using Blaze 100 human hair. For this look again, this is the first time I'm using this type of hair. I just picked up some hair because I, like um, you know seeing what type of hairs do what I do like Blaze, hair um. This is pretty much it's kind of silky, but it's not Yaki at the same time, but I really really like it um. I think this hair really works for this look and it's not really really expensive either. So all you're going to do is go from side to side and I'm going to speed up this video because I've already done this mullet tutorial one time before. So, if you want to see the full full, you know detail tutorial on this. Look, you can go to my other video for this look, but the only thing different I'm going to be doing and this one is adding a different highlight and I'm going to be curling the back. So I am going to speed this video up. Don'T forget that if you like what you are watching subscribe to, my YouTube channel also feel free to leave your feedback in the comments. I do try to get around to all of my comments. If so many of you and our family is growing so much. Thank you, everybody for supporting. If you would like to connect with me, all you have to do is message me and I always leave my contact information foreign. So I am going to slow down this part and I'm showing you guys how to seal your tracks because of the direction that you laid your tracks. You are going to need to put this track over the other tracks to make sure that they don't come up and to make sure that they don't get in the way foreign. Okay. So right here I'm going to be laying down my sideburns and you are going to want these pieces to be a little bit longer because you are going to tailor them down to your face whenever you're done, it's better, to have them longer and cut them shorter Than to get to the end - and you don't have them long enough, so the hair that I'm using is the Velvet Tara 246 and you will need two boxes. You won't use all of the hair, but you want to have enough hair for the look, and you will do this on. Both sides. Make sure that you're doing it symmetrical - and this is your two inch hair on both sides out of the velvet Tower 246 and I did scratch the tracks before I put them in now. We are moving on to our two inch tracks and this is the two inch out of the velvet 246 and you will only get um six pieces in each box and I'm only and right here you can see the section that I just showed you of how Much hair I'm going to be using so these caps that I'm using they do serve as a good guideline, so I that is definitely a plus. So if you're going to be using these caps, it will be very, very helpful whenever you're sectioning out, where you're going to lay down your tracks - and I am doubling these tracks so that it'll be thick. And I have a lot of you who are constantly asking me where I'm located and I try to put on every post that I do that, I'm in Atlanta and I'm in South Carolina. I always leave my contact information so reach out to me. If you're interested in scheduling your appointments right now, we are going to move on to our six inch hair and again, I'm using the Velvet 246. All you're going to do is go from side to side. All the way until you get to the top, where you're going to close it up foreign. So now I'm going to add in my green, this is a custom color and if you're wondering how I got this color, all I did was get a door temporary color and I put it on six one three Tower of six inch hair. So, are you going to do knives continue in the circular motion with your black and you can customize this. However, you want to add, as many colors as you want, just make it your own, and this is how I'm laying down the tracks and make sure that you kind of eyeball, where you want to close it up and make sure that you dry it as well. Because sometimes the tracks can slip so make sure you add enough glue so that it don't come loose for this look, I am using the closure that came in the pack, like I tell y'all all the time, I'm just using this because it looked good. If you want to do your own, you can, but when you, if you're gon na use the one that comes in the Box, make sure that you trim off all of the lace that they use on this. Because if you don't it'll, just be looking weird. So just go ahead and trim that off and glue it down. Thank you. Now, I'm going to use my razor comb to trim it down, make sure that you are really really careful when you're doing this. This won't be your final cut. You will have to do you know, trim UPS or, however, you do them, but just cut just enough, so that you can have a good foundation of where you want everything to be and be reminded that, after this is actually a temple area. But I am going to put this on and do my Finishing Touches, make sure that you're careful when you are using this razor now that I do this a lot. I take the back. Well, the guard off of the razor because it gets a closer cut and you have more you get more use out of your blade whenever you do this method. But you have to be careful when you're doing this right. Now I'm going to be adding in just a couple layers and you don't have to do a whole lot of layers, but I'm going to add a few layers back here in the back, so that I can go ahead and curl. It give it a little bit of fluff, because if the hair is really really long, what's going to happen, is you're going to have a gap, if you don't add in the layers, okay, so use your crop clip. So, whatever clips that you like, I love Croc Clips because they just like do the job and all I'm doing is painting back the hair so that I can get ready to curl it. And I will be using my ion one stroke. One inch flat irons to do this, uh, like I just like using the flat eyes to curl the hair, but if you want a more defined curl or if you you know, don't know how to curl with your flat irons, you can get a one inch. Curling iron and that'll get the job done as well, and you will have beautiful curls if you use a curling iron or if you use a flat iron, either way it'll be beautiful foreign. This is how it's looking yes, so now that I have it on I'm going to do my finishing touches. You will have to shave this down some more and when I get people who asked me you know, can they get this? I don't mind doing it, but I know what size my head is and, as you can see, when you're doing this, you have to make sure that this is tailored to your client's face or either your face and right here, I'm fitting it to my face so That I know what needs to be what what needs to be cut, because I know the look that I'm going for. So if you are doing this, take your time and do it, you can do this on a mannequin the whole way through. But for me I want it to look, look good, but not look like a wig, either foreign, yes to soften up some of the layers in here thin it out, so that the bang isn't so heavy and you can get these shears from Felicia slater.com. And I will link that information for you guys in the description box. Okay, so all you're gon na do now is get your comb and you're going to kind of Comb it out and see where everything is laying - and I can say this cap feels much much better than the other Dome cap that I generally use. It isn't as tight as the other Dome cap. So all I'm going to do now is take my trimmers, my handy dandy, tea outliners, and I will link all of that information as well. And you can do this, how you want to I kind of sort of wanted to wave up the size, but I say now: I'm just gon na. Do it this way so maybe later on I'll? Do me one and wave up the sides, or maybe even add lace, but all I'm going to do is just trim it up like this, don't forget to like comment share and subscribe and, like I said you can always contact me. If you have any questions, I do offer one-on-one classes, so all you have to do is just reach out. I will leave all of the information in the detail box. Thank you guys so much for watching, and this is pretty much the finished look a and dead. It'S so cute, like I love it.


Comments
YoVogue: I did, one of my best quick weaves following one of your older videos. (It's on repeat lol)I am obsessed with your channel. You are an excellent teacher. Give all details and extremely talented!! one of these days. I'm going to invest in a 101 class. Thank you for sharing your talent with us!!!!
Suddenly T: Yess I love this I will absolutely rock this look wit a badd outfit ,and my lip gloss popping when I walk thruuuu
Kingdomwarrior: Wow how much do you charge to make a wig just like this
Meme B: This is soo pretty!
Michelle: Love it! Do you use any oil sheen on the hair?
Cutie Pie: U go girl, yasss honey. Looking like a baddie
Beauty Makeovers: Nice love it❤❤❤❤
MIZ UNIQUE B: Love it
Alana King: My family is from bishopville but I am a licensed cosmetologist in Florence
Jackie Williams: Too cute
tamasha williams: Gourgous❤❤❤
Diamond Pearl: Can I request a style for u to recreate?
jerri richardson: Do u sell wigs
Asia NOT Asia: ❤❤❤❤❤❤❤