Replacing Hair Topper Clips
- Posted on 31 January, 2023
- Clip-in Hair Extensions
- By Anonymous
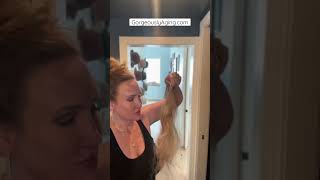
Knowing how to maintain your investment is the key to long wear and a great experience! 60 Second Clip N Go Hair Topper™️
The Carissa Hair Topper is available @www.stylesontopbeauty.com
Hi guys welcome back to my channel today's video, I'm gon na do a quick, little demo and show you how to repair a hair topper when the clip has come off. So you know those clips are attached by being sewn on with thread, and sometimes they get a little loose when you're wearing the hair unit every single day. So there might be a time when you might need to repair or replace the clip on the base of the hair unit. This is the Carissa hair, topper she's, the Bohemian curly unit, all human hair and she's wonderful, there's a video of Carissa on my channel feel free to watch. So here's the hair topper and you can see from the bottom of the base. There are wig clips attached. You'Ll notice that there is one clip missing, they come standard with five six clips and we're gon na go ahead and add the Six Clip back, because one is missing: you'll need scissors, a needle and thread and a wig clip to get started. So the first thing we want to do is make sure that we have the wick clip placed in the proper position, you'll notice here again that you'll see six clips belong on the bottom of this topper. There are currently only five, so we're gon na go ahead and replace or add a wig clip on the side of the hair unit. They are very important because the clips are what keeps the hair topper in place, makes it stable and durable and make sure that your unit doesn't slide or shift so we're going to go ahead and place the unit on the base, with the teeth of the unit Facing inward, the teeth are facing inward, because that's how you're going to install the unit on your hair you're, going to clip the wig clips to your hair and you'll need those teeth facing inwards so that you can slide those teeth from the clip onto your braid Or your hair, so I'm going to start by taking my needle in the bottom corner of the wig clip and I'm going to pull it through going upward first. So I'm going to take the needle and go through the base material and go through the hole on the hair, topper, so they're about eight or nine holes on there on the wig clip. And you want to make sure that you run that needle through all of the holes on the wig clip because again the wig clip is what secures the unit to your head. So you want to make sure that you uh pull the the thread. Nice and tight. Not too tight but make sure it's nice and firm and that clip is not shifting or sliding and you're just going to go around the wig clip going in underneath because we don't want all of the thread on top of the wig clip. And you don't want the thread to get tangled in the teeth of the wig clip, so you're just going to go underneath all the way around the unit. And if you do it neatly, you won't see any thread on top of your wig clip. So I'm just taking my time here and going around the unit underneath pulling that thread through and making sure it's nice and snug so that our wig clip does not become unfastened or the unit starts to slide or shift, because the clip is not installed or sewn Down tightly so I'm just going around and you can see I'm already on the other side, it takes literally no time so if your clip starts to loosen, you can just get some thread a sewing needle and go through and reattach the clip. It'S so simple. It'S a common question that I get from people. What should I do? But it's really really a simple fix: get a very portable sewing kit and with the needle and thread and go through from one side to the other going underneath and it's that easy and voila we're all done. You can see the clips are attached and you should be good to go any questions leave them in my comments. Thanks for watching foreign foreign foreign
Comments
Gwen Lightfoot: Where to buy that?