How To Highlight And Lowlight Hair By Mirella Manelli | Kenra Professional
- Posted on 21 July, 2020
- Fusion Hair Extensions
- By Anonymous
Learn how to do highlights and lowlights together with Mirella Manelli. She'll also show how to add in lowlights in a quick manner so make sure to watch until the end!
00:00 Intro
00:23 Sectioning
1:29 Highlights
5:20 Lowlights
6:46 Styling
8:00 Final look + color formula & styling product recap
If you enjoyed this video, make sure to give it a thumbs up and tell us in the comments below what you'd like to learn next!
Learn more about:
Studio Stylist Express https://www.kenraprofessional.com/prod...
Signature Style Collection: https://www.kenraprofessional.com/prod...
WANT TO WATCH MORE TUTORIALS?
HOW TO add highlights and blend gray on curly hair: https://youtu.be/B01SIpo2FwE
Watch HOW TO: Babylight Level 1 Hair: https://youtu.be/pCd-QpgVBic
SUBSCRIBE NOW: http://bit.ly/KenraProfessionalSubscri...
VISIT OUR WEBSITE: https://www.kenraprofessional.com
About Kenra Professional
We are a purely professional brand dedicated to understanding and serving today’s stylists. Our passion is developing best-in-class innovations, delivering superior and reliable results. Kenra Professional strives to elevate the stylists’ artistry and craft.
CONNECT with US
FACEBOOK: https://www.facebook.com/KenraProfessi...
INSTAGRAM: https://www.instagram.com/kenraprofess...
TWITTER: https://twitter.com/Kenra_Haircare
How To Highlight and Lowlight Hair by Mirella Manelli | Kenra Professional
#hairhighlights #haircolortutorial #naturalhaircolor
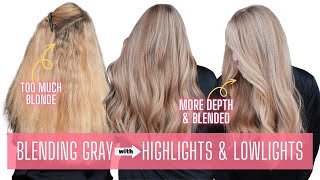
Hey everyone, its Marella manelli, and today I'm going to show you how to do highlights and lowlights using all camera professional color. I'M even going to show you how to add, in some low lights and a really quick pinch using Studio, stylus Express so stay tuned and check it out to get started on our highlight and low-light application. I'M going to section my mannequin first and I'm gon na. Do this by creating a standard, mohawk section and then parting, the section right behind the ear and then finishing off with a v-shaped section right in the back now. The reason why we have a V section in the very very back is so that way when you get ready to put in these highlights they're actually gon na veil over nice and seamlessly without it having a stopping point. So that way we get a nice blend and it's gon na be perfect, especially to add on. If you have a client that wants a partial highlight, but also has lots of layers for this project. I'M going to be using simply blonde blue powder Lightner and I'm gon na be mixing this out a 1/2 to mixing ratio with 20 volume developer, and I always use a scale when I'm measuring. So that way. I get a nice consistency with the lightener that I'm working with I'm starting out by applying my baby lights in the back. I do this by taking a thin slice that I can still see through and then weave out the section that I would like to highlight. The overall look that I'm trying to achieve is modern and low-maintenance. I'M gon na achieve this by keeping my highlights rooted and not taking the lightener all the way to the roots, I simply apply the lightener on the mids first and while holding the ends of the hair with tension, I stroke the lightener up with my color brush In a quick Swift of motion, I typically try fold my foils because it doesn't allow the lightener at the bottom to touch the rooted area and it also helps prevent oversaturation and bleeding onto the roots once I'm done applying the V section in the back. I take horizontal sections in the back that has about an inch wide of depth. You will want to keep this in mind because we're going to add a low light in between each of these foils, which will add additional depth that we want to create, adding depth or lowlights will help your highlights pop and appear more brighter and overall, at additional Dimension then just applying highlights would offer I continued on throughout the back and the top with horizontal highlights. This placement is going to give me contrast, especially if the hair is parted down the middle or even on the side. For the very front, I want the highlights to really stand out, so I'm applying two back-to-back baby lights with no subsection in between my favorite way to add in these highlights is to comb the entire section back and weave the hair towards me, and this gives me A really clean section to work with and a tip is to apply enough product so that the hair sticks to your foil and, if not, no worries you can always reposition. Your foil, like I did here by placing my comb back in my foil and adding tension at the bottom and reapplying. I continued with my second baby light right behind the last foil by using the same technique: combing the hair back and leaving out my highlights towards me, because clients really love their hair line to be bright. I usually take the lightener all the way up to the roots, but definitely consult with your clients, so you know what they like best once this foil is in. I continue throughout the top in the same horizontal placement, with one-inch subsections, allowing for room for my low lights for the sides. I start by baby lighting. The hairline a tip is to customize this for each client. Everyone has a unique hairline, so you may need to break this placement up into a couple foils. If you ever have trouble getting really close to the hairline. I highly suggest applying your product in the opposite direction, like I did here over the ear. It'S usually a more narrow section of hair, and once I fold the foil and bring it down, you will see how the roots are exposed. But what I love to do to remedy this is to fold the sides in to cover it right back up to finish off the sides. I place two more baby lights in a diagonal forward section. This is gon na give me contrast when the hair is styled forward and a more blended feel when styled back. I'M gon na allow for this light nur to process for about 20 minutes before adding in my low lights, because I'm going to be using Studio, stylist Express, which is a 10-minute coloring system. This is a perfect color line to use for low lights, especially if you're a slow, foiler, or maybe you decided last minute that you needed to add in more low lights or dimension, but your Lightner is almost done. Processing for her low lights, I'm using Studio, stylist Xpress 6b at a one-to-one mixing ratio with its dedicated 20 volume developer, to apply this quickly without any additional foils. I'M simply gon na paint this onto baby lights that I weaved out with my comb. If you want maximum depth, you can also take a slice. I simply paint this right on and making sure to saturate the entire section starting a few inches away from the roots and then bring it down to the ends. Once the section is saturated. I further blend the part towards the top with my hands and then using my fingers. I scissor the hair to remove any excess color and lightly place it on the side. I'M not worried about color transfer as long as I'm wiping the hair from over saturation make sure you have a towel handy, so you can wipe your gloves clean before moving on to the next section, I allow this to process for about 10 minutes and then apply My final glaze with VP Rapid toner at a 1/2 mixing ratio with 9-ball and process for five minutes to prep my style. I used prime shampoo conditioner and followed up with transforming texturizing cream. This provides a volume, texture and definition by transforming from an ultra rich thermal. Protecting cream to a fine textured powder which provides tension while blow-drying. This is perfect for smoothing, frizz and curls, but giving lots of volume. It is heat activated and it works great, while blow-drying with a round brush once the hair is 100 % dry. I apply heat cast spray for a medium hold and thermal protection. This has quickly become one of my favorite products because it helps smooth the hair while holding my curls in place and it's flexible without that crunchy feel and as a stylist. I love that it has a clean release from my Hot Tools, so it won't stick just shake spray, your section and curl to finish my style, I'm using dry setting spray. This is also a thermal styling spray, but I'm using it as a finishing spray, since it's adjustable in its hold simply twist the nozzle to the right or the left, depending if you want medium or a high hold and here's the final result on how to do Highlights and lowlights using all Kenner professional color, so just to recap, I went in with simply blonde blue powder. Lightner, add a 1 to 2 mixing ratio with 20 volume developer and then processed her for about 20 minutes. Before going in with her low lights, with Studio. Stylus Express 6b equal parts with 20 volume developer and then processed for an additional 10 minutes once she was done processing. I went in with her final glaze, which was VP Rapid toner at a 1/2 mixing ratio with 9 volume, developer and processed for 5 minutes and for her final style. I went in with kenra platinum, signature, style, collection, transforming texturizing cream on damp hair and then did a really quick blowout with a round brush and for her thermal styling. I went in with heat cast spray and did some curls with a 1 in 1/4 inch iron and then for her final spray. We went in with dry setting spray, so I really hope you enjoyed this hair tutorial and if you did give this video a thumbs up subscribe and I hope to see you guys next time -
![Hair Colour Highlights For Thin Hair [English Subtitles] | Hair Highlights Experience @Priyasnest](https://static.hairurl.com/p/2023/02-16/21f04a2883a6daafbdd09adda8003ba0.jpg)
Comments
Angela Hagood: Great job! Love the light around the face. Can’t wait to try!
Starmane: Stunning I always love your work!
Nicole Aviles: Hi this looks beautiful! Question for you when you do highlights and lowlights at the same time after done processing can you wash both out at the same time at the bowl or should we do the low lights first then the highlights and then tone?
Savage Gordita: Learned a lot thank you
Jenna Ross: Learned so much. Thank you!
Carrie Saquing: will try this this week!
Earl Rodrigueza: New subscriber! I love your videos.
Callie Hoyles: Do I tone the whole head or just the highlights?
Michael Max Gierl: Thanks for the video! What salon cart is that? Looking for something like that in my studio.
Erica Rae's Way:
MrsL: Pretty. She looks like a “mini me”. You both look gorgeous
Tony Bhosle: You are amazing mam very clean work.
Cynthia Argueta: If u were adding lowlights to a heavily highlighted/balayaged hair... would u bring the lowlight color all the way thru the strand?
Anjana Patel: Awesome
brenda hernandez: how long do you let it sit?
Lucia Hundelshausen: Bello mil gracias
Nallely __: Sorry what it’s the base color ?? please answer it’s so pretty
Leila Oliveira:
Tanveer Ahmad: Nice video and please hair spa teach us ❤️pakistan
Bhavesh Valand: Super♀️
Dolsie Mercado: Very nice.
Caroline Bonini: LOVE
Fashionwork12: I love kenra
Simran: Thanks dear
Simran: Wow factor