Highlights Without Chemicals!!! // Wholy Hair
- Posted on 05 October, 2022
- Sew-In Hair Extensions
- By Anonymous
Go to wholyhair.com to get on the waiting list for my classes!
NO CHEMICALS OR COLOR were used for this process!
Can you believe I got these amazing results using extensions?!
Extensions aren’t just used for added volume & length, they can also be added to create dimensional color
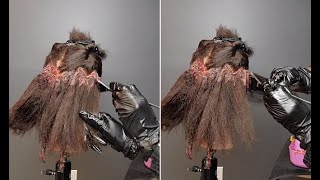
My client had virgin hair and did not want to chemically process her hair BUT she wanted some dimensional color, so we decided on two rows of Wholy Sewn™ extensions using Hotheads hair extensions hair the dream combo leave a comment and let me know what you think of using extensions instead of coloring/highlighting
Follow me on social for daily updates & BTS stories: @wholy.hair
email for business inquiries ONLY ↠ [email protected]
To order the extensions hair go to www.hotheads.com and make a stylist account!
I'M especially excited to share this extension transformation, video with you Beauties, because we did extensions for a different reason today for color. So, as you can see, she started before with just one solid color. She was a natural virgin, hair brunette and she didn't want to chemically alter her hair. So we decided to go with extensions for this transformation instead of bleaching, her hair toning and then worrying about her highlights going brassy over time, because we all know with brunettes. It ends up being harder to keep that hair tone. Looking really good, we decided to go with extensions, so, as you can see, we added some fullness a little bit of length and a lot of color dimension on her hair today and I'm so excited to share and break down all the details. From start to finish. For this gorgeous transformation so hit that subscribe, button grab a snack and stay tuned and for this entire video, because you're not going to want to miss all the details breaking down color without chemicals, let's go. Let'S go so for her hair colors, I'm going to break down what I'm using. I have Hot Heads Hair, I'm using a hand-tied weft, which comes with two pieces and the Machine. Weft comes with one piece, but it is a piece that is 30 inches wide and can be cut anywhere on the seam. So this is two separate colors. Obviously the darker color is color number four slash. Five. The lighter color is color number five slash eight. It is a color melt, so the first six inches are the darker color number five and then the rest of the hair is the lighter color number eight. So I'm going to show you exactly how I'm going to be layering these in in order to get that highlighted appearance, I'm going to be doing two rows for her look, so I'm going to be measuring out the hair for each row, starting with the bottom row. I'M using one of those hand tied pieces and I have it folded in half and then I'm taking my machine weft and I'm lining it up to be the size of half the hand tied. So then there we go. I cut it right on the seam and then I'm going to cut another one. That'S exactly that size, so I'm just going to line that up on the machine weft and cut that one as well and an easy way to cut your wefts. Just like this is I'm going to use a clip to clamp that down first, so I'm going to have two pieces of the machine weft in the lighter color and then I'm going to have one hand tied weft, that's going to be folded in half, then I'm Going to go into laying down her bead Foundation, I've got my Clips on the sides there to. Let me know where to start and finish my b Foundation, so I'm going in to doing her bead Foundation. Like I said this is my holy sewn method. I do not have this method released to the public, yet this is something that I have designed myself. This is a method I came up with in the salon working Behind the Chair, just figuring out the most comfortable way to wear extensions, and this is the way that I have been doing extensions now for over a year. It took me about two years to come up with this method, but it is proven to hold up in the hair for up to six weeks before you have to do a move up, you can do mini move ups with this method, which means you don't have To do a full removal and reinstall, and I have some details coming soon of how you can learn how to do my method, I'm going to be releasing some things soon. So, if you're interested in learning my wholly sewn method leave me a comment on this video and I will be sure to comment back with instructions on how to be the first to know when I release my holy sewn method to the public after I have her Bead Foundation all ready, I'm going to layer on her wefts, so I'm layering on that machine weft first and I'm going to make sure I clip it down on either side. Then I'm going to be layering that hand tied weft in between here right. On top of this machine weft and I'm going to clip that in place as well and again this hand, tied weft, is folded in half. And then I'm going to take my other piece of the machine weft and I'm going to layer that on top as well. So we're going to have some of those dark pieces in between the lighter pieces to make her have a highlighted appearance and after I get this all clipped we'll be ready to sew foreign foreign foreign. Moving on to her second row, this is going to be a lot wider of a row than our first one here, so I'm going to go ahead and measure with my hand tied and I'm measuring all the way around her hairline here. So I've sectioned her out a horseshoe type section. I have it going a little bit up higher around her face frame and then dropped a little lower in the back, so that we do not run into any cowlicks back there. We want to be lower than the calyx of the hair. Everybody'S head shape is going to be a little bit different. So now that I have the width measured of my section that I'm going to be sewing on her head, I'm going to go ahead and measure out my machine wefts. So like I said we're going, the full width of the hand tied weft. So I'm just going to clip on my hand, tied weft onto the machine weft, and this is going to make it a lot easier to measure and cut the machine weft to the same width of the hand tied. So I'm taking my clip and I'm just going to clip either end in place and I'm going to cut two wefts, the same width of the machine weft and that's going to make two machine wefts and one hand tied weft for this top row and how I'm Going to layer these on is I'm going to actually layer the hand tied weft on the top of the two machine. Wefts since the hand, tied weft, is the darker of the two colors. We want that to be on top here so that you will not be able to tell she has extensions in. So that's just going to be the most seamless blend for her install here. So after I get all of her wefts measured out and cut, I'm going to keep them clipped in place and it'll make it easy for after I finish her bead Foundation, I can just take these same clips and clip them on her hair to sew them in Going on to doing my holy sewn bead Foundation, I'm doing this Foundation from the start of my clip to the other end, and this is going all the way around her hair. And we just want to make sure that this is very precise. And I like to spend a good amount of time on this bead Foundation, because we want to make sure this is going to be really really comfortable for the client. We don't want anything to be uncomfortable and we want to make sure that everything is laying perfectly and there's no little strands pulling on their hair at all and just make sure that it is comfortable and perfectly placed. Thank you foreign. So here is gon na, be her holy sewn finished bead Foundation, as you can see how flat the beads lay against her scalp. This makes her extension install extremely comfortable and she's, not even able to feel that she has extensions in so now. Here I have her wefts layered on, like I said earlier, I have the two machine, wefts layered underneath and then on top I have the darker color, which is going to be our hand tied weft. So those highlights are going to peek through and they're going to look so gorgeous, and then here is her finished row all sewn in she is Holy sewn and gorgeous. This is a big width of a row going all the way around her head. So leave me a comment and let me know what you think of my holy sewn technique here. I know I didn't go into all the details tail, but I will be posting some details soon on how you can learn my holy sewn extension method. If you are interested in learning, My Method feel free to leave me a comment below, and I will be sharing all of the details of how you can be the first to know about my holy sewn method when it becomes released to the public. Thank you for watching, as always, I'm so thankful for all of you Beauties, don't forget to hit that subscribe button and I'll see you in my next video bye. Let'S go
Comments
Amanda Johnson: Love this girl!!! Can’t wait to learn! I’m going to be the only one in my salon offering extensions and I’ve been studying your method for a few weeks now. I’m SO excited that this is gonna be official! You are like a fairy godmother to me down here in Florida. Keep up the AMAZING work and inspirational ideas! Love, hugs and blessings from your Florida friend!
Delinda Henderson: Very clever and so pretty! I like that it gave her such a natural look. Well done!
O&N ROMANCHUK: You are so gorgeous! Thanks for your video! Great job!
Jennifer Jaramillo: Beautiful! Please let me know how I can learn more, amazingly done
Tracy D: Oh I want this. This is amazing. Now to find a stylist.
kathy jefferson: I’m interested in your method!!
Sierra Corthell: I’m interested in your method!!!
Jacklyn Lane: Interested in learning!!!
Amanda Johnson: I’m interested!!!!
Lina Madison: I’m interested too!!!
miraquarius: interested!!