Diy Hair Tape In Extensions:How To Install Tape In Extensions At Home Irresistible Me
- Posted on 07 July, 2022
- Tape-In Hair Extensions
- By Anonymous
Hi loves welcome to my channel! In this video I'll walk you through step by step how to apply your own tape in hair extension at home.
I am a Beauty lover, and I love to create how-to beauty tutorials for hairstyles, Fashion, and skincare. I try to make my videos informative, creative and most importantly entertaining.
I love interacting with my viewers. Let's get to know each other.
Love, Paula AKA Fitfashionistarocks
I am wearing a one pack of 22 inches tape in hair extensions and 2 packages of 20"
Products Mentioned //
Hair Extensions:
Irresistible Me tape-in hair extensions #2-6 light ombre.20"
save money with my personalized 5% discount code: IrresistibleMe_Paula.
shop here: https://www.irresistibleme.com/blogs/n...
@Irresistible Me - Hair Extensions,
#irresistiblemehairextensions, #irresistiblemehair, #hairextensions,#Hair #summerhairstyle,#tapeins
www.facebook.com/irresistiblemehair
https://www.instagram.com/irresistible...
https://www.pinterest.com/Irresistible...
https://www.tiktok.com/@irresistible
COME SAY HELLO!
=========================== Don’t forget to Like | Comment | ✏️ Subscribe https://www.youtube.com/Fitfashionista... =========================== Lets connect find me here: Instagram:https://www.instagram.com/Fitfashionis...
Tiktok:https://www.tiktok.com/@Fitfashionista...
❤️BUSINESS❤️
→ Business Inquiries email me. [email protected]
FTC. . DISCLOSURE: SOME LINKS MAY BE AFFILIATE My opinions and thoughts are completely my own and are not influenced by anyone else.,*Some links above are affiliate links. If you purchase, I will make a very small commission. Your price will not increase.
Thank you for supporting what I do on this channel.
ALL CONTENT IS NOT AUTHORIZED TO BE DUPLICATED WITHOUT WRITTEN CONSENT FROM THE Fitfashionistarocks
THIS CONTENT IS CREATED FOR MATURE AUDIENCES ONLY.
ALL RIGHTS RESERVED
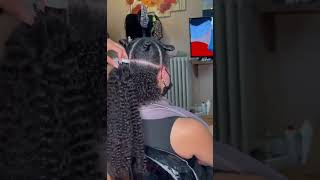
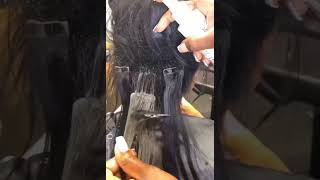
Hi guys welcome back to my channel if you're new here hi my name is paul, and this is a little corner of the internet. Here we do everything. Beauty reveals house makeup, hair skincare, you name it so, with this kind of video you like to watch, i invite you subscribe and stay enjoy the family join us. I, like you, thank you so much. American supporters love you guys. Uh we're gon na. Have the description of this video, my instagram and my tech talk because i decided to check me out there and catch comments in one of my voice, so i can follow back if you follow me um, so i'm talking to them much. So today's video i'm going to be attempting to install my taping extension myself, so god help me because i don't know, i think we're gon na be able to do it. So my extension is for irreducible me. This is um two pack of a 20 inch and a one pack of uh. I think it's 22 inch, so i put it like the two shorter package like uh around the face, and then i put the longer one more in the back, so give you like a little bit more of um layer. I guess i just i like the way. Um so yeah, so this is a hundred percent of the human hair remy hair and the color is ombre brown, if i'm not mistaken, but i'm gon na have a description of this video for you guys all the info about the hair. The link fully resists with me and don't forget to check them out. They have a great um sales going on all the time so and the hair is pure color quality. I'Ve been using them for years and never there's a point to me. They have a bunch of um taping clipping ponytails and some tools, so they have amazing hair. So i'm talking to them much and this video, i hope, don't get so long. Let'S attempt to install now alright. So let's do this! Thank you so much for watching. So this is the hair before the taping extension and so we're going to need for today's video diy taping extension. So i wish i had a better background for you guys, but this is the only like a best placement that i found for the camera, because my big uh floor mirror is right here behind me. So i need to have that for see. My back and i have a small mirror in front of me so sorry about the background a little bit, but i could not move this huge mirror elsewhere for give you a better background, so bear with me so we're going to need the hair here. I have a three package of irresistible me extension. There we have it box and here is how the hex station come. Each package come in this little package, and here you have a little um testing, um piece. So before you open this space, you open this one make sure the color and the texture is what you want and if you don't want to don't open this, you just sit back and get a refund or exchange for the hair, so yeah, that's the packaging. Okay. So here is the hair. This hair is gorgeous is the same one that i've been using. This is a like um, ombre kind of color, so you have a darker in the roots and then light on the bottom, and here i have three um sets of 20. So - and i have one this - one is 24 inch, i'm gon na put um like on the back, so i can have a longer i'm gon na try to make like a kind of v shape. So i can put the two smaller and like this sides and put the uh the longer one in the back, so i have two sets of 20 and uh one set of 24 or 22. I have to check and i'll, let you guys know, but the hair is gorgeous super beautiful, super healthy love, this hair love the texture and this. This hair extension actually is one of the extensions that never slip out. Like all the brands that i used, i was like a one or two hair extension: the tape they slip out this one actually never slips out it's hours in place and the hair is full all the way to the end. They are gorgeous these 100 human brainy hair very resist for me, so i'm gon na have the link for them down below. If you guys decide to give them a try or check them out. I love the hair extension. They always look amazing and it's super soft. Does not smell like chemical or nothing love it, so this is what we're gon na need for today's video, i'm already talking too much. Let'S get into this video, so don't get so long, so you're gon na need the taping extension. I have my here. I'M gon na put it here in the box and you're gon na need some hair clips, so i have some of these hair clips here. I probably need more. I just have two here, but i'm gon na try to do two. If i don't care and i'm gon na get more so hair clips and then you're gon na need a comb of some sort, this is a red contour. First thing you're gon na do is so my hair is washed and clean and just dried. I just straighten a little bit because my hair is actually curly wavy, so i'm gon na turn around. So you guys can see what i'm doing at the back all right guys. So i separate the hair. I have like the sides, part a recipe that we're going to start installing bear with me alright. So this is pretty simple here. You just want to get your tape and put this i try to put as close to the root as i can, but you shouldn't do that because you actually can pull out your hair, but i feel, like the tape lights me longer, the puru will close the Root - i don't know - maybe it's just think of my head, but when i have somebody stall them, they actually put a little bit lower than where i'm putting today um and that's it you just glue on your hair. You separate the hair, you take the excess hair out and then you just glue the second tape on the top of the voice tape. Then you get your flat iron and just tap a little bit. So you help that glue to melt a little bit and the toothpick to stick together. That'S gon na make um your taping extensions stay in place longer so make sure that is not so hot. It'S like a 120 or 150 for the height and that's pretty much it so we're just going to repeat the same process all over and i try to put them uh close to one and load it. So i don't have any gaps on my hair, so they just make um, you know easier and then - and so that's pretty much it so just separate hair and go section by section um. I don't like to part like the hair exactly the way everybody else does and just go fill it in where i think that's needs hair and that's it. So. Thank you so much for watching, i hope, you're enjoying this tutorial. Let me know in the comments below what you think of this. It was hard, but i did. I did done all right, so one more so that's it for this side, all right, so i don't want to straight anymore, because later i'm planning to do like um, a heat, less wave thing like overnight. You know the thing that you put and you wrap your hair. So let's see if it works, so i'm going to do a video on that too, for you guys. So, that's why i don't let you straight really straight because i'm gon na curl it anyway. So but this side, it's done so i did it. I did it. I applied my dipping all by myself, so i'm gon na go out out of camera. Do this side and then i'll be right back to you guys, because i just have like three trees left here so see all right guys. So this is the final results. I put a little clip here with the before and after so you guys can see, and i did it was hard, but we did it. So thank you so much for watching. I hope you enjoyed this tutorial i'll see you later bye, all right guys. So this is all for this video i hope you guys enjoy and the hair is gorgeous so info for the hair and for your resistance is going to be on description of this video thanks so much for watching. I see you guys next, video
Comments
Tatiana Collins: This looks easy love the hair
Kev Gaming XP: Amazing hair extensions honey looking very beautiful
Pamela Foster: YOU look So beautiful LOVE the transformation
Briana Forrest: Looks hard, you did great
VENKATARAMAN GOVINDA Rajan: Excellent upload! Big thumbs up No.528!
Intermittenttent Fasting / Low Carb: Good job
bruna fuller: You did it girl