How I Cut And Layer My Hair At Home! Long Layers >> Diy Long Layers Haircut
- Posted on 08 March, 2021
- Long Hair
- By Anonymous
Hello everyone,
I have been stuck at home during the pandemic and finally got around to cutting my hair so I thought I would share how I do it with you guys. I've been doing this for the past several years and I am so pleased with the results each time! My hair always looks more voluminous and feels healthier/less heavy afterwards. This is a very straight forward, easy way to cut and layer your hair at home. If you're looking for a great diy long layer haircut, then this is the one for you!
Revlon Hair Dryer:
Hair Cutting Sheers Link:
Leave in conditioner:
STAY CONNECTED ♀️
Instagram: https://www.instagram.com/olive.dreams...
TikTok: https://www.tiktok.com/@olive..dreams
» Music "She Dreams in Blue. (acoustic)" by Josh Woodward. Free download: http://joshwoodward.com
» Music " Eastern Space" by Stoneocean.
Youtube: https://www.youtube.com/watch?v=EtFOWS...
❤Wishing you health and happiness always,
Nida
This YouTube channel will occasionally contain affiliate links, which means I receive a small commission on a purchase without additional cost to you, if you buy something through my links
I do believe in the products I mention and have experience with them. I will never promote a product I have’t tried or think you’ll benefit from.
If you do purchase through my affiliate link, thank you so much for your support!
#layeredhaircut #cutyourhairathome #longlayeredhaircut #longlayers #diyhaircut #diylayeredhaircut
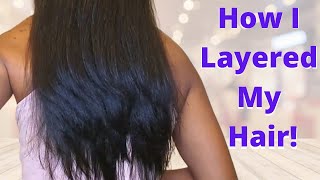
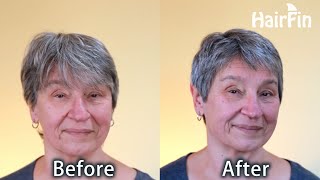
Hello, everyone welcome to olive dreams. My name is today i'm going to share with you how i cut my own hair, dome, we're currently on lockdown, where i live. So all non-essential businesses, including salons, are closed. So i thought there's no better time than now to share with you how i cut my hair at home. I'Ve been doing this for the past six years and i'm honestly so pleased with the results. Each time i actually learned how to cut my hair here on youtube. I took a few different techniques from several tutorials and combined them to create this particular layered haircut. Initially, i was surprised by how easy it is to cut your own hair at home. However, i like to preface this by saying: i'm not a hair stylist. This is just a haircutting technique that has worked for me, but if you feel like this isn't a cut that would suit you or the look that you're going for, then you can most definitely disregard this video. But if you're looking to trim away some dead ends, add some long layers as well as some face framing layers, then i hope that you find this video helpful now. This is what my hair looks like after i've cut it. Let me show you what it looked like before. As you can see, my hair looks really heavy and weighed down all my layers have grown out and i have no volume whatsoever. Here'S what it looks like curled. My ends are really damaged and in desperate need of a trim. Here'S what you're going to need for this tutorial, a pair of scissors. I bought these off of amazon. I would highly recommend investing in a pair of hair cutting shears if you're going to be cutting your hair at home, you're going to need a brush as well as a comb, and some hair ties to section off your hair as well as i use a little Bit of leave-in conditioner, it just makes my hair more easy to cut and more manageable, as well as a spray bottle. If you're going to be cutting your hair wet, if you're going to be cutting it dry, then i would highly recommend straightening it beforehand, all right. So that's it! Let'S jump right into the tutorial! First, i'm going to spray a little leave-in conditioner to the length of my hair and brush it through, so it's evenly dispersed. This is how long my hair was before i cut it. Then i tossed back my hair. So that i can section it off, imagine that you are drawing a line from the top of one ear to the top of your other ear, tie away the rest of your hair. We are going to work with this section first, this is going to be the length of your hair divide, the hair into two and bring it forward now. Take the hair on one side and divide that into two as well. I then comb through the hair. Now we are going to determine how long we want the bottom most layer of the hair to be here. I'M deciding just how much i want to cut off, raise the hair slightly on an angle like so and cut it straight across and with the tip of your scissors point cut inward. As you can see when you release the hair, subtle layers are already forming. Take the other half of the section and bring it forward as well brush through the hair and raise the hair again slightly on an angle. As you can see, the hair that you just cut is clearly visible, underneath cut the hair straight across, so that it's in line with the hair that you just cut and we're going to point cut inwards again now i'm going to take a small section of the Hair that we just cut and bring it to the other side that we will be working on this will help determine how much needs to be cut. On the other side, i respray my hair and divide this section into two like we did on the other side. I'Ll comb through my hair and raise it upwards so that it's on a slight angle here you can see the small piece of hair right here determines how much hair needs to be cut off. On this side, i'm going to cut the hair straight across to the guide and point cut inwards, i'll bring the other half of this section forward and do the same thing that we did on the other side, i cut the remaining hair straight across and point cut Inwards to meet the guide, as you can see, the hair is even on both sides. Here'S what it looks like from the back. You can see that cutting it. This way has given it a nice, u shape. I then let the top section of my hair down. I then spray it again and brush through it. Now we are going to create a middle part to do so, you can take a comb and draw an invisible line from your nose. All the way to the back of your head then bring your hair forward and section off the hair from the crown of your head to the top of your ear. Imagine where you tie a really high ponytail, that is the crown of your head. Do the same thing on the other side, take the rest of your hair. That is not a part of this section and tie it away now. The hair that isn't sectioned away is the hair. We are going to be cutting first here, i'm just parting, my hair, a half an inch away from my center part on both sides. As you can see, the hair has been sectioned off from my center part. There are half in sections on each side. I then brush through this hair. This is going to be the hair that we cut off first and it's going to be our guide. I take the rest of the hair and tie it back, so it doesn't get in the way i take a comb and brush the hair straight up on a 90 degree angle. I try to keep the hair as straight as possible by scissoring it and holding it in place with my fingers. I then bring it downwards so that it is at eye level. This is how much i decided i wanted to cut off. I'M going to cut the hair straight across and then point cut inwards. This is the length of the shortest layer. I'Ll then release the top most section of my hair that i tied away just a moment ago. I part my hair in the middle and divide the section on the right into two equal pieces. Again, i'm going to comb my hair all the way up straight at a 90 degree angle and bring it downwards here. You can see clearly the hair that we just cut. This is our guide. We are going to cut the hair straight across to meet this guide and then point cut inwards again. The hair has been cut into an even straight line, as you can see, subtle layers are already forming. Now, i'm going to split the right side of the hair into two again and work with the bottom section. I comb all the way up again and bring it downwards and find the guide. Then i cut straight across the guide and point cut inwards because i'm working in such large sections, i always like to double check my work. Just in case, i missed any pieces of hair to do so. I take the entire section on the right side and brush it up so that there are no knots and then i comb it all the way straight up and bring it downwards. As you can see, i missed a piece of hair. I cut it straight across and point cut inwards. The right section of her hair has now been cut. I then move on to the left side. I divide the left side into two sections as well. I take the first section brush it all the way up to a 90 degree angle and then bring it downwards to eye level. Here you can see. The guide is clearly visible, underneath i then cut this section of hair straight across to the guide, as well as point cut inwards. On this side, i'm going to take all the hair, including the section that we just cut and comb it straight up again and bring it downwards. I'M going to find the guide and cut the hair straight across and point cut inwards, making sure the line is even you brush the hair upwards on both the right and left side and bring it down. The hair has been cut into an even straight line, as you can see. The reason why layers form is because the shape of our head is round so cutting it straight across naturally makes our hair fall at different lengths and creates layers. Now i'm going to take a two inch section at the very top of my head that i just cut and toss it backwards. This section is going to serve as the guide for the back of our hair and then tie away the rest of the hair that we just cut. I then untie the back of my hair and bring it forward here. You can see the two pieces on either side will serve as my guide to cut the rest of my hair. I brush my hair and divide the right side of my hair into two pieces. I tie away the first section i brush through the other half of my hair and bring it all the way straight up on a 90 degree angle, i scissor the hair through my fingers, bring it downward and find the guide. As you can see, the tiny piece right here is the guide i cut my hair straight across to meet the guide and point cut inwards. Now i take the other half of my hair that i sectioned away and do the same thing i'll comb. It straight upwards bring it down, find my guide, cut it straight across to meet the guide and point cut inwards. Here, i'm just double checking my work again by taking all of my hair, brushing it straight up, making sure that there are no tangles bringing back down and making sure the ends of my hair cut into a straight even line and then point cutting inwards. I then tie away the rest of the hair that i just cut for this last section, i'm going to cut this side of my hair all at once again i'll brush through my hair and make sure there are no tangles and bring the hair straight up. When i work with such a large section, i find it's easier to use a flat paddle brush instead of a comb. I find my guide and cut straight across and then point cut inwards. I'Ll then double check whether the hair has been cut, evenly and trim off any strands that are sticking out, and now our hair is layered. Moving on to the final step, i re-wet my hair and using my nose as a guide, i'm going to create a middle part. Then i'm going to be sectioning off my hair, two inches above my hairline on either side of my middle part. I'M going to tie away the rest of my hair. This is going to be a small section, as this is the hair that frames your face. I then divide this right side into two sections. I grab the hair with my two fingers and with a little bit of tension, i'm going to over direct the hair slightly inward at an angle, so you scissor your fingers and direct the hair inward at an angle. Then we are going to cut the hair downwards at an angle. The hair is meant to get longer and longer the lower down you go, creating a downward diagonal line like this remember, to cut off a little at a time as this is the hair that frames. The face, so it is an important section, take your time. I then do the same thing. On the other side, as you can see, i took a little piece from the other side to determine how much to cut this time i cut from the bottom down, because i'm right-handed here i'm checking to see if everything is even i see that i need to Cut off a little more on the other side, and that's it my friends, the haircut is complete. As you can see, the layers are even, and my hair already has so much more body than it did before. Here'S what it looks like from the back i'll then blow dry, my hair, alright. So that brings us to the end of this video, i'm always so pleased with the results. My hair feels so much more healthy and less heavy, and i love how much more volume this haircut gives me and that it looks good, both straightened and curled. Here'S what it looks like from the back as you can see, the layers are even invisible and my hair is still long from the back and there's a lot of texture. Even though i look like i cut off a lot in the end, it still looks long and voluminous. I try to do this every five to six months. I waited a bit longer this time due to pandemic. I'Ve just been stuck at home and haven't really had anywhere to go, so i took off a lot more than i normally would have. However, you can cut off, however much you would like, or you feel would suit you. That'S the upside of being able to cut your own hair at home, i'd like to repeat that if you're cutting your hair for the first time definitely go slowly pause this video wherever you need to and cut a little bit at a time if you're happy with The results you can definitely cut off more than next time. Okay, so that's it guys! Thank you so much for watching. If you found this video helpful, please give this video a thumbs up and subscribe to my channel

Comments
Christina Marquez: I did this haircut on myself today and it turned out amazing! You just saved me $100, thank you!
Sasha M.: it took me about 1.5 hours because i was being careful, but i don’t think i’ve ever had such a nice haircut in my life i went from fairly long —> medium length hair and the result is so wispy and elegant! thank you!
Katie Fuller: OMG I just paused literally every 15 seconds but I cut SUCH CUTE 90's style layers into my long hair. so much more body, texture and volume that my thin hair neeeeeeded
Era: I just tried it and came back to say THANK YOU SO MUCH! this gave me the perfect results. The ponytail method doesn't work for me and looks tacky. But THIS is the ✨b e s t✨ tutorial out there for long layers. Bless you ❤️
live hrndz: Although I had to pause several times because it was my first attempt ever to cut my own hair. The results are amazing!!! I am honestly in shock. I cut off about 12 inches and this tutorial worked great, even for a shorter desire. Thank you for sharing this! Lately I have been super depressed and felt the need to want a change but paying over $100.00 right now for a hair cut is just not in the budget. So thank you!
Its_Britty_Bisshh: My stepdaughter asked me to cut her hair this evening when she comes for the weekend, and for her to trust me that much melts my heart,. This will be the tutorial I use (I see so many comments saying they done the haircut and love it) so thank you ❤️
Brianna Horace: I’ve been cutting my hair at home for a couple months now with the help of youtube tutorials, but this is by far the easiest with the most beautiful results! thank you! <3
Squeaky Muffins: I have been doing the single ponytail “unicorn” cut for a while now, and adapted it for my curls, it was okay…but the layers seemed to all curl together and weren’t really noticeable. I tried this (took me an hour) and I’m SO much happier with the shape of my hair and curls. It looks great, thank you so much! Pinning this on Pinterest & saving it for later! ❤
Deena 98: The best cut your own layers video ever! I've tried two other methods this year but this is the most simple and beautiful one, super happy with the results will come back in 3-4 months (my hair grows super fast )
Karen Pena: I did it! I had to pause every 3 seconds but the explanation was great. Thank you! I added to my Favorites so I can revisit in 4 mths
Versace Kisses: Just used this tutorial and got the perfect voluminous layered hair! I have cut my hair before but this definitely gave me the most polished cut ever. it looks more confusing than it is, by the time you start, it’s actually not so complicated! I went quite a bit shorter than she did and it came out great! THE ONLY WARNING I WOULD GIVE IS: the very bottom layer she cut first in the video might be easier to cut at the end of ur haircut. I cut the bottom layer first and i ended up messing it up somehow (it looked uneven next to my other layers, throwing off the overall “V” shape of my hair) I may not be the best at eye calculating measurements, but a few clean up cuts at the end just to match everything up and all was well - it looked perfect, I was actually shocked at how easy it was to correct! Thank you so much for this wonderful tutorial!
Kristen H: Absolutely stunning and this worked PERFECT on my hair at home. Thank you so much!
Nsnsns 1234: I just did it!! It looks amazing thank you so much for the tutorial and your great explanation!
Niecy Torvend: Just stopping by to say I tried this on a wig and it’s beautiful!! Thank you for the beautiful video and clear tutorial
Binal Patel: I just want to say thank you so much for this video! I would pause and rewatch each cutting section to make sure I was doing it right. Almost gave up after the bottom part because I wanted to cut off 8 inches of length because my hair had gotten up to my hips and was too heavy and thick to manage. I thought I already messed it up, stopped and considered doing to wolf cut but thank god I didn’t. I resectioned and continued with the video. I love the results. I have the overall length of hair I wanted. The only think I didn’t do was the face framing later because I did really paranoid when hair that is close to my face is short since I have a round face and chubby cheeks that I’ve never been able to get rid of. Again thank you again for this tutorial, I’ll definitely be using this again and again in the future!
Emmeline Sprig: IMPORTANT: hold the hair perpendicular to your middle part (parallel to your face). I was about halfway through my haircut before I realized I was holding the hair wrong. Had to cut my hair shorter to correct this. Otherwise, it’s a pretty nice result. I’ll try again when this grows out and see if I can get it right
V V: I avoided so much the layer haircuts because I had 2 bad experiences at some top salons after two years of growing my hair to my belly button I’ve tried this haircut sooo nervous. Hands down the best haircut I ever had. And probably my forever go 2 thank you ❤️
JessicaR: I watched this 30 times but it helped me finally cut layers in my long hair and it looks SOOOO much better. I do not going to a salon because they have always cut so much off. Love how yours turned out!
Kyande Ngy: I've been looking all over youtube to find a tutorial like this. Thank you so much, you look absolutely stunning!
Cristina Sanchez: We have the same length of hair, and I've been wanting to have more layers and at the same time added more volume to it. Thank you for this tutorial, I will definitely follow how you did your hair.
massiddai: I did it today with my mum's assistance and I swear it turned out really nice, thank you for sharing your easy technique <3 I will forever use it ahaha xx
Coffee Chaos & Cuddles: Thank you so much for this great tutorial ❤️ I cut some curtain bangs as well and used the same blow drying brush you used to style my hair. It feels so soft and amazing and is layered and flowy just like I wanted!! Now I can cut color and style my own hair It's so beautiful! I'm a happy girl Thanks again
まさみ: Not gonna lie, I was freaking out the entire time thinking I was doing this incorrectly but I was really surprised as soon as I blow dried my hair!!! I love it! Saved me a good amount of money :))
Linda: THANK YOU SO MUCH!!! FIRST TIME I have ever cut my hair since it's gotten long and I followed your precise steps and it turned out GREAT! Have more back surgery in the future and sitting in a salon just isn't possible for me! You are my life savor!!! Thank you so much.
Bex RN: This tutorial is the best. If I knew it were this easy to do with a systematic approach I would have cut my hair a long time ago. I had attempted bang trims in the past with seriously botched results. Once I finished in an hour, I proudly showed my husband and he was very impressed. He strongly advised against it given my past failures but I assured him I'd studied up this method and watched the video 5 times. This is the most confident I have ever felt after a haircut and I did it myself:-) I read a great many of the other reviews and I skipped step 1 entirely and went for the half inch center part to start the layers. I'm pleased with the results.
Aracely See: Love this haircut! I've been doing a variation of this to my hair for a few years now because I always left unsatisfied with at the salon.
Beyond The Beauty Ent: As a professional hairstylist, you did an amazing job! I did get nervous but it came out beautiful! Great technique and hand work! Fellow Youtuber, MaRanda Leigh (Beyond the Beauty Ent)
Stephanie Lopez: Thank you, thank you so much !! My hair was so dried up and damaged and with a 8 month old at home it's been kinda hard to get time to go in to the salon to get a cut thank you so much once more it was so easy to follow along with the video. 100% RECOMENDED !
Monica Esmeralda Flores: Yessss… i was a bit spectacle about it in the middle of cutting my hair but when I went to release I saw I still had my long length of hair i was completely happy and I’m over all satisfied with your tutorial!!!! Thank you sooooo much for your time and energy into making this video. It was worth it!
Nefertiti MMXIV: Best DIY tutorial!! I applied all your techniques and my hair looks amazing!!!! Thank you!!! ♀️
Duangjai: I have never had such a beautiful haircut in my life!! Thank you so much for sharing this!!
OFTwify: I was worried with my hair beginning to thin slightly that this would look stringy. It looks and feels so much better, great video.
Esmée March: Wow your hair look soo good. Thank you so much for this tutorial, my hair came out really beautiful. Will definitely stick to this one!! :)
ROPA: This is truly the best layer cut you can do at home. I have hair till my hips and it’s thick.. I followed every step except the first one with the lower hair. I did that in the last to take out thin look in the end. It came out beautifully
N GM: Excellent job cutting it yourself. My hair is the same colour but one length and around 23 inches long, I would love to style it in this manner and you just gave me my next style inspiration
Meeds R: Thank you for this great video. I followed all your steps and ended up with a professional looking haircut from the convenience of my own home. Your instructions and demonstration are broken down in easy to follow steps
4 Peace: The best haircut I have ever gotten, I followed the steps, and the result I got was 100 times better than at the most expensive haircut salons I have gone. Thank you goddess
Jessica Charlotte: Thank you. This has been my favorite way of cutting my hair. My hair looks amazing. Will definitely keep doing this technique!!
Daly: I just cut my hair with your technique really helped me so much. Simple but beautiful thank you so much I love it
Gorhnou Lee: I’m a cosmetology student atm, and have been cutting long layers like no tomorrow. Lol. But this technique basically covers what we learned, of course in different technique. The only other thing we do is point cut the shortest layer with the longest layer in vertical sections. I’m impressed for an at home haircut.
Jade T: This video is AMAZING! The instructions were so clear and easy to follow. Im in love with my hair now THANK YOU
Roumayssa: I did my sisters hair. She loves it! Thank you❤️
Nedessi: May I ask what's the purpose of doing the first part 2:20 (1 Determine the length) when you have to cut the back part using the pieces from the front as your guide to cut it even shorter (7:16 - 9:11)?
Eun: Literally the best hair layer tutorial on YouTube, thank you so much
Bengale Floki & Somali Odin: I did it. And I love it. I did a few things different like curtain bangs and more layers. But thanks to your measuring technique everything is even, thank you❤️ and sorry if I wrote something wrong, English is not my first language, greetings from Austria ❤️
Noni: I was already cutting my hair myself, since I got disappointed by my hair stylist who charged me $100+ for nothing, but this video will level up my haircut. I can't wait to try it tonight. I have a similar hair to you, so I hope it looks as good as yours :)
Edfran Girn: I just cut my hair following every step of your video and I love my first new hair cut to myself, thank you so much!!!! ❤
Miss McKenna's Music: I just cut my hair how you suggested! I love it!!! I was scared at first, since I haven't cut my hair fancy by myself before. Thank you for the inspiration!!!
Udval enkhbaatar: Thank you so much for the greatest tutorial ever!!! Every time when i look at my hair i would not believe that i have cut it myself! Lots of compliments thank u
Christi Gottschalk: Thank you! Did this yesterday! Awesome cut! Makes my fine hair look full!
Brenda Tellez: Beautiful hair!! It came out really nice! I'm just practicing cutting my own hair and I hope I get as good as you one day.
Amber M: Looks amazing! Question... So the very first cut you do, to the very back section of your hair, is to determine the length of the longest layer. But then at around 7:52, you cut that section again with the new guide, and it seems like you are cutting way more off the longest layer (since you are now working with the back section of your hair again). Are you actually cutting more off of the longest layer, or is the longest layer (that you cut first) still staying the same length?
Xandra van Wijk: Tried this and I LOVE the result!!! Thank you so much, best hair cut I've ever had, and saves so much money!
Jane Roberts: I had the 2am urge to stress cut my hair and I’m glad I followed this! I have wavy hair and it turned out beautiful ❤️
Alma Zavala: My hair came out great thank you for the video ☺️
Monica Pedigo: Hello. So, I just tried this myself, and it's amazing! It did take me nearly 3 hours LOL. It probably shouldn't take anyone that long. I was just trying to make sure I was doing it right. I have long hair too.. so when bringing it up it was a struggle and it got tangled quick. I love the turn out so much body! I've never had long layers! My hair has always been long to my bottom with no layers. It just looked flat. This cut helped me keep length , while still adding boddy and volume. It also is so weightless my scalp feels so much better! I'm kind of having trouble finding some hairstyle though. Like a messt top bun.
Deborah Wiles: You did great and most importantly, you presented yourself with respectful taste in clothing and your calm speech was a blessing to hear. Also how about making a makeup tutorial on the way you did your make-up for this tutorial
Christine Nunez: This video helped me so much! Thank you, I was able to cut my hair and make it look really nice! After watching this video 100x’s hahaha.. I have never cut my own hair before, I was so scared! Lol
Leanne Powell: Hi I followed step by step and got beautiful results!! I pay 25 bucks and my hair is flat no volume and I feel like I just went to a salon!! I have never cut my hair before and I was extremely nervous but kept following each step and my hair has volume and looks so healthy now!! I did cut more than I wanted but I think I needed it because my hair was damaged and weighed down. You are amazing and I appreciate this video!! Blessings
Gloria Leal: Best hair tutorial ever, it was easy to follow and the results were simply amazing, my hair feels fuller and with so much body and volume!! Thank you soo much for sharing this video, I will never ever spend more time and money on hair salons!! ♀️❤️
julib89: Literally going to use this video today thank you!
Sam K: Love the way you smiled when you saw how gorgeous your outcome was after blowdrying - that’s my time for a big smile too xxx
Fruzsina Szabó: Well done! Great tutorial and btw you have such an amazing hair
lastochka100: What a beauty she is! Thank you for a nice tutorial!
Sarah Pace Sings: Thank you for the help!!!! My hair turned out great!!
AJK LaZh: Thank you! It worked and I love my new haircut ❤
cupcup: Omg I did it !! I loveedd the end result!! Defined adds alot of body and movement to hair !! I highly recommend to anyone with wavy or any kind of textured hair! :) only thing I will say is it's an arm workout and the hair used as a guide was very confusing at times. Other than that I'm super happy ! Thanks love
Martie: Just cut my little sisters hair using this vid! Turned out AMAZING! She also wanted bangs so now she looks like a mini Zooey Deschanel ♀️
Sara: omg it was so much easier and quicker than I thought it would be and it worked!!!
Shasika Jayarathne: It worked. Came out so good. Thanks you so much
Guide Guru: Its like a magic trick! The whole time I'm thinking "wow, you are really cutting it off!" But in the end its still long! This is my issue... I don't want to take my length but I'm going to watch this a couple more times and give it a shot. Thank you so much!! Newly subscribed!
IslandPearl73: ♀️Ok so Iv’e watch this about 4 times be for I could get up the nerve to cut my hair! AND!! OMG!! My hair came out great!! Thank you!! I can’t believe how full and healthy my hair looks!! ♥️♀️Thank you!!
Roe: Wow!!!! I’ve been dying to learn how to cut layers that look like this! Thank you
Jessica Kendall: Thx u so much for doing this video. I haven't cut my hair since the beginning of the pandemic and it was long with no body and in all actuality wasn't looking so healthy. But I got brave after watching this and with lots of pausing and praying, I have an awesome cut. I'm very happy with the results!
Veronika Moravčíková: This is a such a good guide! Thank you!
Lily Schieber: Wow, this was so well explained, I will try!
Areli Jaimes: This video was so help full , I cut my hair today and I love it.
Whitney Girl: First of all, wow, you are stunning your hair is absolutely beautiful it’s so healthy, and shiny, and the hair cut is amazing! Can’t wait to try this
Diane Garcia: Literally just did this! I love it!
VichyGlitterGun: I was really scared to do this, I have Scandinavian fine hair so I thought this might ruin it but I tried and omg my hair looks amazing it looks so voluminous and I am so happy I hade the bravery to do it thank you so much for the guide like I'm so happy!!!! ❤❤❤
Chelsey Hazell: This is a great tutorial thank you! I took way too much off my face framing hair and I severely ruined the haircut now I look like I'm from The Beatles I definitely learned from that.
Serendipity: Would love to see you do this on someone else too. Brilliant explanation. TY
Itzel Davila: I enjoyed this tutorial. The only part that was not accurate for me was the first step you mentioned that would be the length of our hair and then in the last step we cut the length once again to meet an even shorter guide. For this reason I ended up with an even shorter hair length than I wanted. But next time I will adjust those 2 steps beforehand so I know not to cut it too short. Thank you!!
NC: Girl you are the bomb. Cut my wig like a professional
Bridging The Rap Biggest Fan: The best tutorial to date , thanks for sharing ❣️
nicole 💋: i did it and turns out so good! thank u!
Weendy Lry: this looks so good omg!! i cant wait to try it.
E F: I just did it, too and it turned out TERRIFIC!!! It's the BEST haircut I have had in FOREVER --- possibly EVER, actually. THANK YOU!!!! Great tutorial!!
Rin: I feel like a brand new woman after doing this cut, thank you!!
Yuliia Stets: Wow It's 3:25 am and ive decided to cut my hair and its never looked so good! Thank you so much
Sabrina Thor: Coming back to your video because it worked out sooo well the first time!
k加代: i attempted this but my hair already had choppy layers, i think the reason why it didn’t turn out as well as the tutorial is because i was too scared to cut off too much since my hair would be extremely short. my hair looks so bad and i desperately need it to grow back by school
Heaven Jones: I almost cried halve way through, but I trusted the process and I love it. Tears of joy. Thankyou
Osato Osemwota: You made this so easy for me
A C: I tried this and my hair looks really really lovely. I loved this hair tutorial. My hair is not as thick as yours. Would you have any tips for half as thick as yours?
bert.balkizi: all the other videos I've seen are for women who don't have a lot of hair. This was very useful to get the grasp of cutting thicker hairs thank you
Laia Bertran: Beautiful! Thank you.
Margarita Alvarez: Nice job, looks great.
Adellya Lakshita: It’s soo beautiful
noodle: your hair looks so beautiful and healthy