How To: Making My First Pixie Wig On The Sewing Machine| Transfer Wig Measurements & Map Guidelines
- Posted on 14 March, 2022
- Pixie
- By Anonymous
#wigmaking #pixiewig #howto #myfirsttime #beautysupply #wigguidlines #myfirstattempt
Hey Loves! In this video, I attempt to make a pixie wig on the sewing machine for the first time. Here, you get to see the tips I used and can practice making one.
Products used:
Empire collection 27 piece hair
Singer Heavy Duty
00:00 Hair Used
02:00 Measurements
05:44 Adjusting cap
13:14 Drawing map
17:00 Sewing hair on cap
21:00 Sewing the bang area of the wig
26:00 Closure piece sewing
28:00 Finished product
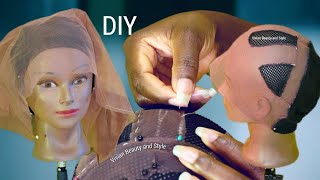
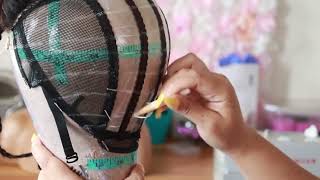
Hi, so in today's video, i'm gon na show you all me making a pixie wig. I'Ve never made a pixie wig before so we're doing this for the very first time, but i'm gon na show you all the steps that i'm taking to prep my wig and just in general, like everything i'm doing so the hair i'm using and all that. So, let's get right into it for this pixie wig, i'm going to be using two different hairs: i'm using the empire 27 piece with a free closure hair, and i'm also going to i might be using empire bump collection 8 inch. So the empire bump collection looks like this. This is like your standard, short hair. That comes like this, usually that you use it for like a bang type of situation. So i'm not sure if i'm gon na use this, but i have it and then the 27 piece comes in three different sizes, so this is the shortest. This is the longest length and then this is the medium length. I have my hair and i'm going to show you guys how i do my measurements and transfer it onto the dough, the canvas head. So i have a 23 circumference head here. My head size is technically a 22 22.5, but i am using a 23 circumference head because i do like to go in and just properly size it. So this is an excel dome, dome cap and i'm gon na go in and like properly size it. So the first one i usually do is i have my measurements here and i usually go in with the front two nape, which is a 14.5. So i placed this here. I did my first dot, which is about like eight and a half from the bottom of the canvas head about an eight and a half yeah. So i did an eight and a half, because it's just kind of i think that when you do like too far back it kind of has like an awkward awkward like placement on your wig. Then you have to you feel, like you have to bring the wig too too far back for it to sit right. So i just do 8.5 from here. That'S just like a standard around 8.5 to 9 inch, just like the standard, but then going here. I do that on the front and then i bring it here to 14.5 and then that's when i placed my pin at 14.5. So what i usually do is, i will take one of these pins, so i actually already did it, but i would take one of these pins and i would put that at the 14.5 mark before i take this pin and pull it there and then after i Do that i'm going to take, i take this and i do the nape side. So that's about a five, and so i would take it and i pull it and i do the five inches right there, and so, as you can see, this is the extra space that we're gon na get rid of, and i'm gon na show you how to Do that, then i do and a lot of people don't think this is necessary, but i do it especially. I feel like especially when you're doing like a frozen situation. Even though this is not a pretzel situation, i still do it. I do the ear to ear. So my ear to ear is about a 12.5, so i did a 12.5 there and i usually use that, especially when i'm doing frontal sole, then i know how far to bring the frontal forward here so that it still covers your temple area. But here i don't really need that and i don't really need all these extra measurements, but i'm just still kind of showing you all and then the last one would be right above where your eyebrow would be and then to the other side. So my measurements would be like around a 16.5 so because it's around the 16.5, i am going to bring this cap a little forward here on both sides so about here, and here i'm going to stretch it and so that's about so i stretch it and place That right back so that's about, like my exact like face thing, and then this is just kind of gon na help me know where to um, where my ears go. So i'm just gon na put a line on both ends. Hopefully you guys understand. If there's any questions you can put that below, but so all the space here, i will usually bring it to the front and take it off. So what i do is, i start by like pulling it a little bit and i take my pin and i'm gon na place that there so i'm literally just gon na stretch this throughout and show you i pull it. I will like loosen it a little bit, but this is me just pulling it to get like the kind of direction everything goes in. So this is how i make sure the back is flush. Turn this to the side, i'm gon na pull that and i'm not putting it over this, i'm not putting any pin in there. I'M gon na pull that and pin it. I still do leave some space, so i don't make it like flush blush. I leave a little bit of space just for wiggle room, so i'm pulling it place. Another pin and i'm literally just gon na take this all the way to the front, as you can see a flush back right, but then you're bringing it to the front. Everybody does this differently. Some people bring it to the back. Some people bring it to the front, it really depends. Sometimes i don't even bring it to the front. I bring it to the side like it really depends on how i feel, and i just pin it, and so the reason why i've taken that out is because i don't want it to be like tight, tight, but just good enough as accurate. This is flush, and then we have our pins here, and so this is what i am going to so make sure the curve comes like to the edge so that you can like literally sew that so that you don't have like so much issues with like there Being like a curve like right here, like especially when you're trying to sell it, you don't want to sit like in the bulky or anything like that, so i'm gon na sell this. I have my thread here and i'm really just gon na start on the edge and i'm going to pick up the cap, i'm not going through the elastic i'm only going on top on the front layer and this loop right here on the end. Hopefully, you can see that this loop on the end from where you knotted it is where i'm going to go directly through and pull so i'm literally going through through this part of the cap and then through the front part, not the allot, not the actual, like Elastic of the dome just the top part, and i'm pulling that like that and i'm putting it through the loop so that it's tight enough. So i'm going to show you guys that again literally going through this part through the top of the cap - and you see it - creates this loop - i'm really going to take that part of the loop. So, as you can see now, there's no loop once i put it through here you have a loop, and that is what i'm going to put this needle through. So i'm pushing it through the loop pulling it out and there we're back and i figured i would show you how i kind of went in and i like just sold all that to get rid of the excess space. So, let's get into, i wouldn't even call it the hard part, but it kind of seems like power part the intimidating part, the map - i guess you could call it, but basically i'm trying to figure out the sizing of this, because i know i can't treat this Like a regular wig, because at the end of the day, this is a no closure type of wig type of situation, so inspo might as well show you guys the inspo that i've been looking at i'm going for a cross between i'm going for a cross between This with like the longer in the front type of bang situation, if you can see that i'm going for this, but then at the same time i'm also going for you know me along teams like so basically a cross between nia long and the other picture that I just showed you, so we are going to see how we can do that. I lowkey think what i am gon na do. Is i'm gon na take this off and i think i'm gon na put it on my head and to find the midpoint. So i figured i would come on here and kind of show you what i meant by a midpoint. So i took the wig off and i put the cap on right and the midpoint i was talking about is like where i would feel like. I would want this part to go right. You know i'm just doing this as we go, i'm using the medium, the long and the bump, and i'm just going to go in and cut it shape it and cut it to how i want, because i just did not like that did not like the short One, and so i'm thinking that my midpoint is going to be so we're just doing this as we go honestly doing this as we go thinking, my midpoint will be right here, so i'm going to take a marker. Put that there put that back there and we'll kind of draw everything else and see how that goes. I think i'm going to do one and i'm going to do a row under just so. It just has that like flush look, but apart from that, i'm gon na start from here go here. Go there! So, instead of the usual half inch, because i'm singling all of this, i'm gon na do the usual instead of the usual like inch inch inch, i'm just going to do like that, like in between that i may use this may not use this we'll see. But this is just my first guideline right and i'm literally going to take this all around honestly. We just gon na see how all of this works. I'M kind of thinking i'm going to do this first row right here instead because i do want to keep the nape shape because i think that the nape shape is important. So i'm going to do the first row like that, so i'm just disregarding that and then so i know that's confusing. But basically, what i'm saying is that, instead of going straight up like this, i'm going to go down instead, because i want to keep the nape shape because i feel, like that's important, so just going downwards. So, as you can see, i'm really just going to go around around and literally create like a dome shape, so we'll be back once i created that. Let'S keep in mind here that this is my very first time doing this and you're doing it with me. So i heavily like kind of once i started going towards the ear like one level above the above the ear where it would have been your eyebrow. That'S when i started bringing it in. So that's why i'm like i'm bringing it in towards here going around to create a dough to where the midpoint is so it starts to turn into a circle like about three levels above two levels above the eyebrow. I hope that is a helpful guideline. In some ways it's not, i could do an updated one, but for right now i literally created my nape shape, basically where your eyebrow would be. I started going inwards and then like two levels above that two levels above where your eyebrow placement will be is when i started to connect the lines to create a dome. If there's any questions, please leave them below, but you're doing this with me. For the first time, so we're gon na see if this works and if this is helpful in any way, but i did do them so close together, because i am singing singling every single one and, like i said i will be doing a track underneath. So, let's get into the sewing machine process, okay, so we are going to get started on the sewing process. I have my sewing machine on zig zag stitch. I could do a video on all that on, like all the details like the sewing machine and stuff, but i didn't really relax this just to try it out and see. I might switch it to a single stitch, but for right now it's on zigzag stitch with a width of four, so we're gon na get started, and hopefully i don't break the needle. So let's see okay, so i am like. I said this is like we're learning this together figuring out this together. I wanted to do the first row to match, like the name shape and then so disregard these lines. These extra lines here, because i'm doing the first one to the name, shape and then the next one i will take that way started from there. So i doubled the front. You just didn't see that on camera, but i did double the front. But what i am going to do is a row underneath so after i do the second row, i'm going to do a row underneath because i do want to be able to have it like flush to my neck again. This is me just trying different things. Just in hopes that, like once i'm done, everything will be like properly aligned and i don't have to like worry about going in to fix anything so we're just gon na do the second row and then we're going to do the row underneath so i'm gon na Do this and then we'll see so the reason why i'm changing that, so that might look weird how i switched it, but i just decided, as you can see here, i'm not stretching the cap. I also think that it's easier because it has short, but i'm not stretching the cap or anything. So i decided that i am just going to go through and keep sewing this and then we'll come back to that, because i just kind of want to get as many tracks on there as i can. But i'm going to go back in and like fill in spaces, so i'm just going to show you one more time me filling it in i'm about to do this really close. Do this roll really close, because i kind of tried it on and i feel like those needed a little bit more thickness, so i'm going to do this one really close in there and yeah. Hopefully this makes sense. You feel like you're, going in the wrong direction. Just lift the thread up, lift up the lever, move it where you want it to go, don't try and pull it while it's still on there, just move it where you want to be push it back down, so i will be back. Oh, i wanted to come back and show you all the progress that i have made with this, as i got towards the front where, like it would be more of a bang type of situation, i started using the longest length because i do want to be able To go in and cut it to how i feel like it should be so i was just like. Let me use the longer length so that i have like more to work with, so i'm going to continue doing that and show you guys one more time before i kind of like go in and finish so just like a indicator of kind of what i'm doing. I'M going to like right now, i'm just using this total row of like the track like i didn't, do anything else, but as i get towards like the front and the top area, i will like kind of stop and start and add different like tracks or like Kind of just use the longest track towards the top and use the eight inch really close towards like the front area so that i have more room to go in and cut. But let me just show you so hopefully this is visible, but i am literally at the top and right now i'm learning this sewing. So whenever i get to the end, i double it up and then i get more hair and get ready to attach. It still keep it in mind, don't stretch the cap, don't do any of that, just let it glide i just placed it. Hopefully this makes sense, i'm literally just colliding with the sewing machine following my guidelines. If i need to go back, i'm just and once i get to the point where i started, i literally lift it up a little bit. Show you what we are working with. I know i'm really close really really close, but this is what we are working with. I did i want to mention that i did go in because i was sitting here and i was trying to figure it out. So this is the front. This is the front area that i have to trim that piece, but i was sitting here and i was trying to figure out. You know how do i feel about the back situation going on or whatever so there? I did do it in a way where, like i'm gon na, have to go in and like trim it to kind of how i like it anyway, because i did um because at first i was saying that i was only gon na use the long ones on The top, but i ended up alternating between like the long and the medium, but what i wanted to say is that i did go in and do the track that i was talking about. So i did that only on this very bottom directly underneath the nape length. So i ended up doing that. I ended up adding another track over there, just for a little bit more fullness in the back and just to kind of give you that fake mullet type of like not mullet, because i'm definitely not going for mullet. But just like a longer tail at the back, so that is what i did. I sealed that on the bottom there for that look, but we are almost done and then i'm going to attach the closure. This is all we have left of space. We have our egg here, so i am going to figure out how we are going to attach the closure piece, because the closure piece is like this, and i do remember like from way back when we were dealing with closure pieces like this, you would usually just Glue it or you would try and like hand sew it. What i am going to do is make this as easy as possible on myself, so i'm going to take a pen - and i'm gon na pin the middle like this, and i think that i am i'm gon na end up sewing over the tracks anyway. So i'm literally gon na, like lift it up and wherever i feel like the track is so i'm trying to figure this out. So we're figuring this out together. How we're gon na do this. That makes the most sense. What i think i can do is just lift this up and the extra lace - that's there just sew around that. So i'm thinking that is what i'm going to do. I already pinned the middle, so i'm just going to lift this up, put it in a little hair tie and i'm just going to sew around. I am going to end up sewing over the hair, but i don't think that matters like that. So we're going to do that here is the closure piece right here and right here is the lit the lace, so you can see right there. That is the lace right there, so i'm literally just going to sew over top of that in a circle like that, i'm you can single stitch it or whatever you want to do, but i'm just keeping the same stitch. I'M gon na be honest and saying this was a lot easier than i thought it would be a whole lot easier than i thought it would be. So it's very much a beehive like you literally sewing in a legit beehive. So i am done. I did not end up using any of the 8 inch bump. I do have quite a bit of hair left over, not that much but a little bit. So i am thinking that you know, depending on how this goes and how i like, depending on how i like this length, i may make another one with the eight inch bump with like a little bang situation. I'M thinking that i want to do another video showing you guys how to do this with an actual like closure or actual frontal. So you have that type of look, but i'm gon na go in and sew in a comb in this and in the next video. Hopefully, i will show you guys like how i mold and cut if i do decide to cut anything, but right now i feel like all i would need is like a little bit of trimming, because i did like a variation of the medium and the long. So thank you for watching, and this is my pixie wig and i'm just going to you know i'm going to show you guys on the wig. So it you can kind of see what it looks like and yeah. Oh, i know it says a lot, but before we end this video off, i just wanted to show you what it looks like. This is what the back looks like. This is like the little tail part that i was talking about. I just wanted it to have. Like that kind of, like v-shape, without having to cut so much just to create that v-shape, that's why i did the track on the nape. That is why i did the nape shape first nape shape. That is why i did the nape line, and then i ended up going in and doing another one below because it created this v shape that i was going for. So there's just like a few little things that i need to trim here and there. The only thing i know for a fact is, i definitely and i'm about to do it in this video. Actually, i definitely have to cut a little bit of the hair off towards this front side area, because this is where i started off using the longer track, and then i realized that that's not really the look i'm going for so i'm just gon na trim it A little bit before i put it on my head, but i will go ahead and trim it on my head because i do want it to match my face, shape and match my head shape and all that stuff. But this is the pixie wig. You know. I do have to curl this stuff and kind of trim these bangs a little bit get them going, but this is what we have and i just talked your ear off, but hopefully this was informative. We both learned at the same time and you have that shape all done on a sewing machine. So thank you for watching my video. I hope you enjoyed and don't forget to like comment and subscribe and also leave like some video suggestions in the comments below, but thank you for watching bye. You
Comments
Everything Marcelette: This is the perfect alternative I didn’t want to do a quick weave thanks boo
Courtney Aikens: What's your settings on for your machine
Candace Scott: Do u ever have problems with your machine?
Sharon Mayo: Smart Young Lady! Are you in Los Angeles?