Sewin No Leave Out/ No Closure Pixie Cut Hairstyle / Very Detailed /Stocken Cap
- Posted on 15 November, 2019
- Pixie
- By Anonymous
HI LOVES, SO MANY REQUEST ON PIXIE CUT HAIRSTYLES WITHOUT USING CLOSURE, FRONTAL OR LEAVE OUT. SO HERE IS THE VIDEO HOPE YOU ENJOYED AND LEARNT SOMETHING FROM THIS. PLEASE SHARE TO FAMIES AND FRIENDS. THANKS SO MUCH FOR WATCHING.STAY BLESSED XOXO
My Video You Might Be Interested In
Instant Natural Dread Locks: https://youtu.be/TYimXgFjYko
How To Box Braid Like A Professional :https://youtu.be/XTuzwqzobBo
How To Curly Braid/ Summer Makeup https://youtu.be/bzNZihOk05A
14 Ways To Style Curly Box Braid
How To Bridal Hair/ up do :https://youtu.be/-GvfK2MG2ic
How To Market Twist: https://youtu.be/KMdy7Leq30s
Update Diy How To Make Own Lace Closure: https://youtu.be/goRuVKN7-rQ
How to get long hair using banana mask https://youtu.be/qPXlbYOpXlQ
Glowing skin using Natural products
Ways to style box braids
African fashion
African women's wear
African lifestyle
Women's wear
Nigeria fashion.
Let's keep in touch follow me on
instagram: beauty_hauljj
Snapchat : beautyhauljj3
Camera Used:
https://www.amazon.com/gp/product/B01D...
For business and branding opportunity: [email protected]
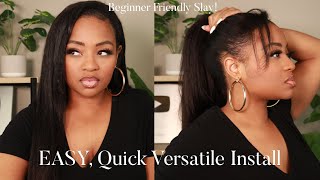
Hi guys welcome back to my channel and thank you so so much for tuning in to today's tutorial. I hope you are doing good and great as well. Today'S video is going to be on how to do the pixie cut orianna hairstyle. So if you are new here, just go ahead and click the subscribe button and join the family and do not forget to leave a comment in the comment section below and give this video a big thumbs up. We'Ll actually appreciate that when i see your big thumbs up, it like motivates me to keep doing more videos for you guys and also don't forget, to share this video to friends and family okay. I just want to apologize that this video will be very long, but not too that long. So i'm just going to do like a summary, because this video is different from the previous pixie cut. This is a pixie cut with a fringe in front by the sides. So yeah it would be too long, so just stay tuned to watch this video from the beginning to the end, so that you don't get to miss any step. Like i said before, i have filmed like about two to three different videos on pixie cuts, but yeah. This is different, so i just want to show you guys how to how to place the weft for this particular hairstyle, and in this video i will also be showing you guys how to place, how to identify the front and the back of the weft. So just stay tuned and watch till the end so that you don't get to miss any step. Okay. The first stop is just to section the hair into two different portions, the front and the back. So i'm going to be doing like the backward core row or the inward cornrow or the french cornrow or the patella cornrow or the dd coral, whatever you call it. I just mentioned a few that i can remember so yeah you guys already know. I have a video on that on how to do like the french cornrow, i'm going to leave the link in the description box so that you can easily go and check it out, not doing the inward cornrow or the french cornrow at the back. I'M also going to go ahead to do the same in front and also going to join. All the two tips at the middle with needle and thread is different, so i just decided to like get a potion by the sides i use take home to actually do this. I just section out a potion just little portion by this side all around her. The parameters of her head and then i conrode it all round and then use needle and try to secure the tip, that's to hide the tip. The reason is because of the stockings cap, and also for the hairstyle we're going for we're going for a fringe and a mustache by the side. So the reason is just so that the cap will be able to hold fame onto her head for the purpose of this tutorial or for this particular hairstyle, we'll be using two stockings cap that comes in this pack and also a bonding glue, this particular bonding glue. I always use you guys already know if you're an og, so it's called la la. If you cannot lay your hands on these that, if you're not in nigeria - or you can't find this in the market, you can actually use the 30 second super bond. You also need a gel spray and any gel spray we do, but this particular one is from nova long gel spray. Okay, the hair i'm using for today's tutorial is called labella from expression and one pack. That is what i'm actually using and in a pack you get about 12 pieces or 12 bundles and inside the 12 bundles. I have more of black and a colored, but that color that i won't be really using the color because she's a student and she asked - or she requested that i she just used only one bundle of that of the color and used more of black. Because of our school after doing the cornrow, we just go ahead to wear her the stockings cap without using a bandage. So today's video i'm not using any bandage. And after where we had the stocking scalp, which the cornrow around her edges or the parameters of her head would just help to hold down the cap in place. So now i'm just using needle and try to just secure the stocking's cap onto my head. So it doesn't move while i'm actually placing the weft on her head. The essence of the second stockings cap is for easy remover, so that whenever she wants to remove the head or the cap, she can also remove it easily without any stress, and then she can also wear it as a wig and then number two is for protection. That'S to protect her hair and also three to give like a smooth surface to work with, while wearing her. The second stocking scalp. I'M making sure that it's covering all the parts of our head, including the parameters of our head, because it's the easiest part of our hair to break so yeah before starting to place the weft at the back. You have to identify both the front and the back of the weft or the inside and the outside of the weft, so that you don't get to make any mistakes while placing it and to identify both the front and the back. You have to check for the coils first, where the coil is actually facing. That'S the direction of the course where it's facing, then the part where the coil is facing is the inside and the part where it's not facing is the outside hope. You understand it. After the identification, you just go ahead to apply the bonding glue or the glue to the weft of the hair and make sure you're applying it on the inside and not the outside and place it inside inwards. So that when you are trimming it to lay down very flat, it will be very flat at the back. The very first weft is to be placed at the very back of our head and before placing it, you will have to open up the weft and, if you're an og, like you remember, really well like very well. You will know that i've already talked about double waves and single web. So if you are confused, i would advise you to go check, my previous or the previous video on how to sew in either how to sew in without a closure or a previous video on pixi coin. So this wave comes doubled and i'm using eraser to like kind of open it. First, before applying a glue and while applying the glue to the weft, you have to be gentle and make sure that you apply it very little so that you get a good finishing or a good result. This is because of the trimming, so it needs to lay very flat so that you can easily get that flat. Look when you trim it. If you place the outside instead of the inside, it will kind of give you a different shape or a different hairstyle entirely. Moving on to placing the weft so giving little or no space between the placement making sure that the waves are pretty much close to each other because of the trimming after placing a particular line of a weft, you will just go ahead to spread the spray gel. So that it will kind of stick that the weft will stick to the cap and also hold it better. I also like to advise you that as a hairstylist, you always want to practice your work like practice, always make perfect. So after watching this video, if your hairstylist you go back and practice, you can even either use a dom to practice or you can use like a real client to practice so always practice practice practice. Practice practice make perfect. You know that i'll reach in the middle part of my head, i'm no longer placing the single weft, i'm now placing the double web so that that part will be full enough for the trimming, and it also gives us that style or that look we're going for. Okay for this particular hairstyle, we're not doing the turnover method, we're just cutting the excess when we get to where we don't want it to be. We just cut it off using scissors to do that, and then you place it on the next line and continue to just keep placing and placing this is very fast. Using the bonding glue is very, very fast rather than sewing in, but if you want to see me do like the sew in method on this particular hairstyle, please would like you to leave a comment in the comment section below and any hairstyle of your choice. Like any hairstyle, you are confused on doing, even if i don't know how to do it, i'm going to get like a different hairstylist to come and teach us. You know we are all learning, so i'm going to get a different hairstyle to come and teach us the hairstyle. So just leave a comment on the comment in the comment section below the particular hairstyle. You are confused or you really want to learn so leave it in the comment section below and as i'm placing the weave on, i'm actually adding like little pressure and i'm using my fingers to do so so that it will stick better and after adding pressure to It i'm just spraying it around that particular part where i actually place the the wheel so that it will stick and hold better okay. Now we just allow you guys to see for yourself so that you get a better understanding on the whole method of placing, because all placing is deliberate, since the french pixie curl, with a mustache by the sides. So i'm placing it deliberately - and you guys just watch this video carefully, okay, making sure that i'm placing weft equally on both sides and after placing a particular posture. We just spray with spray gel always make sure you spray with spray gel so that it can hold better or stick better to the cap. Okay, now i'm just placing the weave on in a kind of a cycle, because the hairstyle is a fringe and i'm making sure that the cycle will end in the middle of the head, because it's a fringe hairstyle. So we'll continue doing so. The round closing method until there are no more space for me to close or for me to have, put or place the wave on okay, the trick to this one closing method is not to leave any line or any space in between the wefts just place. The webs very close to each other, and while doing so, you just add a little pressure to it, so that it will stick and hold down to the cap to complete the closing. You either use the tip of the scissors, a tail comb or your finger to just press down the last visible weft. You press it down and then spray it afterwards with gel spray. Moving on after installation, you just want to use a tail comb or a small comb to just comb the hair to the direction where you want to trim it so yeah. This is what the hair should look like after the installation of the weft. Okay, now time to style for styling, you use either a blade or a blade comb to trim off the back. In some cases you can use a clipper. That is, if you want to, but it gives a different results. So now i'm actually trimming the back very flat as flat as possible, because that's the style we're actually going for the pixie cut style or piezo cut to look we're naturally going for okay. At this point, i'm just going to allow you guys to see for yourself on how i'm trimming so that you get a better understanding and if you are still confused after watching the streaming, you can leave a comment in the comment section below so that i will Know that you're confused and i'll film a part three or four or five for you guys. You know you are special to me very special, so i'm going to film that um. So, thank you so much for watching this video to do and hope it's helpful and hope you enjoy this video, i'm so glad you did because i know you did don't forget to give this video a big thumbs up subscribe. If you haven't subscribe and join the family share this video to friends and family, because you can never tell who actually needs this video, i give this video a big big, big big thumbs up. I'M looking forward to to see your comments in the comment section and yeah. I will talk to you guys in my next video stay blessed bye,


Comments
Candice Byrd: You gotta respect her craft‼️ being in another country and not being able to get the hair and the products we use in the states... yasss great job
ToriOfTheNile: Idk, I loved the way it looked here 10:38, so cute. Came out so stunning, and your model is GORGEOUS
Kathleen Evers: You just make everything look easy
Ade Juliet: Kudos to you, your work is neat nd nice. Can you do d sewin method please? Thanks
Rina Mae: Can you please make a video of how to make a high ponytail without any glued on edges or leave out?! I have really really short hair but want to wear it down and up!
Yusuff Kafilat: wonderful keep it up sis
Misspbama Prisca: Nice trimming but I thought the finishing was too far behind but still love it
Naana Otoo: Thank you very much dear. Can u please do a full saw in method?
Dobri Okies: Its superb
Tobiloba Jibowo: Good morning ma . you have blessed me so much with your good works .I am so grateful, more grace to do more . pls how do i fix score cap without using wig cap and closure.
Ngozi Orji: I love your work please can you make on how to set the back of a pixie cut sew in step by step
Shakirah Demilade: Wao, am always loving u post, tanx ma'am for keeping us in trend
Yemisi Idowu: Nice job
obehi mirable: I so much love this
Donna Taylor: Good job
Franca Nelson: Thank you.
Charity Stainless: Beautifully made, pls make a tutorial on box braid, the one that they doesn't feather d tip but they tie d knot and use razor blade to trim it a bit pls, is urgent
Happy Mathew: Lovely
ItsQueenTD: 11:00 I wasn't confused on what u we're doing but I want u to film part 3 or 4 or 5 because I just love your videosooo auntie teach me ❤️
William Ifeoma: Nice work
Franca Nelson: Hi i realy love this post.I habe alwaya wanted to do a atyle like this one.
ADEYEMI ADEJOJU AZEEZAT: Excellent Pls does this nova spray gel hold bonding glue more than that of spritz? Which one can you recommend.
Temilola Oladosu: Great work, job well done....pls can u do a video on how to do ponytail wig...tanx
Clement Cordelia: I have been waiting for this style please can I use only six pieces of the because i have a different expression weavon
EBBAH CHRISTINE ANONGBO: Please what's the name of the spray that you use thank you
Usman Faith: I want a tutorial on Afro wig cap using funky weave on
Olapade Aishat: When you reach the closing pls did you used the double weave or single
PRAYING THE WORD: This is lovely. Please l will like you to do the sew in method.
Franca Nelson: Pls i will like to learn how to do one sided or partial hair weaon.Thanks
Usman Faith:
Charity Stainless: I made a twisted wig but unfortunately tore d net with d hook, and i added extra net to double and hide d tear, now d hook refused to pass through, pls what will i do?
Deborah Chidinma: please I need a tutorial on how to cut and style a Bob wig
obieze rita: How many packs did you use,please?
Tina Ikujegbe: This is your favorite client. The girl sabi do hair no be small. Not everybody is into wigs.
obieze rita: Lovely dear....can I achieve this using 4flowers Xpression collection?
Odibe Oldjon: How many pack do you use
Debby Oluwaseun: What is the name of the waveon u use
Godsfavour love: How much is this wig ? i need 2 of it and i also need your number please.
April Thompson: Slayed
Pretty Queen: Please I really need a video on our to trime the hair
Maureen Prisca Arthur: This nice but I would like to see sowin style
Aderonke Osundeyi: Pls I need u too do the sewing method
Maybell Enoghase Enoghase: I like the look of the hair, did u stays in Nigeria
Narh Narh: Good
Sasha queen: Hi beauty hauljj