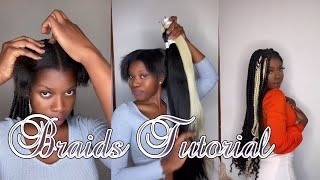
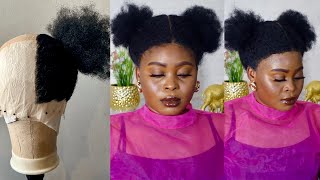
Diy| Pixie/ Bowl Cut Wig Tutorial
Diy| Pixie/ Bowl Cut Wig Tutorial . I’m going to recreate a wig I seen on IG from @ Baltimoresbaddeststylist! Her work is amazing so I decided to se if I can make a wig similar. The results are definitely not spot on but I’ve gotten plenty of compliments! I also have fun cutting this wig up I hope you all enjoy
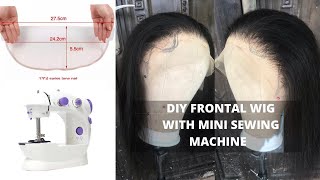
Oh right now I just came to the realization. I need to do something with my hair, because once my hair is done, everything will fall into place, so I've been trying to get it get away from hair like I that's something that I was doing back in the day, but now I'm gon na whole new Journey with other things, so it's just like - I really want to get away from it. But then, today a challenge has come across me and I've been watching this lady, her name's Baltimore, better stylist, go ahead and go an Instagram and follow her. I'M leaving her name here yeah. She makes some bomb shortcut weeks and I was like that. I could probably do this, so I'm challenging myself to see if I can make a wig similar to one of baltimore, baddest stylist wigs and I'm going to show a little video of her wig here like how beautiful is that that's beautiful and I think I can Make it so if you want to see if I can rise to the occasion for this challenge, stay tuned and keep on watching so here, I'm just showing you a closure that I had off a previous week. I'M gon na use that today's the wig that we making today I have the velvet Remy 27 pieces in the color number one and first I'm just going to color that closure, because I definitely don't want it the same color, I'm gon na. Do it all black unit for this I'm just going to make sure that is saturated and comb. It all the way through being very careful not to get it on the lace part, I'm just combing it through lightly and we're gon na go ahead and rinse that out get all the residue making sure I'm paying attention to that closure part. I don't want any black guys staying in that area and I pretty much did a good job with it. I feel like this is my favorite shampoo. You got so it gets every week or every piece of hair shiny and pretty go ahead and top it off with some conditionally make sure you rinse that out now. This is the pattern actually only does on her wig caps to kind of like got her hollow to place two tricks. I thought that was cool. I think that's a real good idea so that you can know where you put in the trash. I got the closure hanging here, just to add dry for a sec, and I'm gon na place that right up here, where the X is making sure that I get the back of it on on that X 10 and I pin it down right there right there. Yet so you wan na put it right there and then pin it down. So this is secure and then it's gon na be like rows in the front. I'M gon na use smaller track the shorter tracks at the front and then kind of use the longer tracks to meet it. At that point, where I'm putting the pendant all right, let's go ahead and thread these needles. Well, I'm only gon na thread one year with, because I'm only so in the closure, one everything else, I'm gon na glue it now Baltimore beta stylist. She normally stitches her wigs with her sewing machine which is so freakin cool. I love it all right, so we all done the stitching that clothes are down and we're going to go ahead and cut out that middle portion where the closure is. I don't want those weight to be too small on my hair, so you know I rather cut that down than later all right, so it's cut out and we're gon na go ahead and slip it back on, pin that cap down just so. It'S not all moving. All over the place when we call me through and I'm gon na just start tracking it or not, so the hair comes into three tiers. What I'm gon na be doing is using the medium length at the bottom beneath and then once I graduate to the crown of the head, I'm gon na use the longer length. I don't use the short length for anything in this wig, so you can just put that off to the side. Okay, so at this point I'm gon na go ahead and fill in those three lines with the shorter pieces, and then I may use the chocolate hair to put it right above those to kind of fill in the gap. So I'm doing the smaller tracks here up into the third line and then it should be three more lines where you will put the longer pieces ahead and I'm gon na do that to the front and the back alright. So we got the pieces in so I'm just gon na blow out that closure to flatten it a little and next time I proceed with the cutting, which is the fun part all right. So I pinned off the ear tips because I need them to stay long. Just so, I can have more space to you know, cut them up and back here. I'M just tape around the back of the wig to give it that tapered flat look now while you're cutting this don't be scared. You want to go in and really get that back of the hair as flat as possible. Okay, so the comb has two different size, I'm using the shorter side that has the short teeth on it to fine-tune the back of the cut. Now I like to bump the hair, as I cut just so I can see the cut more clearer because I feel like when the hair is straight. For some reason, I'm I cut the wig up so so done like so good tip is to bump as you go, it works for me. Hopefully, it'll work for you. Okay, as you can see in this side-by-side view the hair and the front starting to look more side-swept, I don't think I'm gon na go for that. I'M gon na cut it up a little more because I think I'm wanting like a bold cut. Instead, I'm not sure that I like that sideswipe look on me, so you can see how it's turned out at that bump. It looks kind of good, so I'm really excited about it. The closure piece is looking really good. Like you know, it looks like a scout, so I think I'm I'm happy with it right now. I'M going to go ahead and go in with the Clippers just so I can get like a more of a cleaner cut around the sideburn area and I'm also filling the sideburns a little too long. So I might even like trim it down a little bit before. I do like the reveal of it, but uh, yes, so make sure you some trimmers. You can do this part with scissors if you want, I just did it with the tremors, because it just made for a more easier cut and it's kind of satisfying to like see it go through the hair like butter like that, and we're all done with this Wig, I want to thank you all for watching this video. If you liked videos like this, give it a thumbs up and leave me a comment down below. I had so much fun making this wig and I didn't get a spot on, but you know it's it's a little funky cut, anyways don't be like me: y'all cut your beauty, beads off, don't leave them hanging and until next time I'll see y'all every next
Comments
The Baddest Tutorials: Omgosh this is so dope one of my clients sent this to me and it absolutely made my day ,and it made me think you just never know who may come across you work and be inspired I truly appreciate you sharing my art with your audience . You did a great job on the construction and cut
angel lu: This was sooooo helpful!
trellyxx: I really love this wig .Would it be an option to have one mad I’m willing to pay for shipping and all!
Candace Johnson: You did a great job
angel lu: What clippers were you using? They were so perfectly sized.
It is what it is & It be what it be: I want a wig now!!!!
It is what it is & It be what it be: I want one!!!
Jahda Lennie: Wwooww tats exactly what I'm looking for. Sis please can you make one for me? Pleasssseee
Kellee Mcfadden: Beautiful
Blushing Bombshell: I love it. You always could cut up some hair honty yessss.
Towonda Grant: What size closure did you used?
That504 Chick: Really cute
Shica Lovely: Big up to king VON ! And love your hat and work
LolaBabe: Hey girl love the video Baltimorebaddeststylist is my cousin
That504 Chick: I love your accent
KrissySweets: Hair is whats poppin fr now, go bk to it