New Method!!! Most Natural Sleek Braided Ponytail On Type 4 Natural Hair | No Feed In Braid
- Posted on 26 November, 2020
- Ponytail Hairstyles
- By Anonymous
New Method! most natural sleek braided ponytail on type 4 natural hair. No feed in braids!
Please remember to SUBSCRIBE & hit the bell to always get notified when I post new vids. Also like, comment and share if you find a thing or two that`s useful in this vid.... or if you have a useful tip or suggestion that you`d like to leave with me! :)
God Bless You!!!
Keep up with me:
IG: https://www.instagram.com/mariamcoreen...
SC: Mariam Coreen
For business inquiries, email: [email protected]
Products used
Outre Jumbo Braid #2 (2 & 1/2 pks)
Eco styler Argan Oil Gel
Other Videos
Jamaican in Germany https://youtu.be/NqPIARnJDmE
Bridal/Wedding Playlist:
https://www.youtube.com/playlist?list=...
Feed In Braid No Cornrow! https://youtu.be/MeXRnaqWpj4
How to Sleek Low Bun https://youtu.be/C6VZ7oa3ZKg
#sleekponytail
#protectivestyle
#4chair
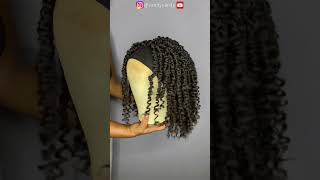
Hello, darlings welcome back to my channel today, i'm going to show you guys how i did this really natural, looking sleek braided ponytail on my natural hair, really easy and really quick. If you want to see just keep on watching so i'm starting off by making a center part, because i want to brush my hair back in one here guys, this method is definitely a game changer. To give you that really sleek natural, looking ponytail without doing any feeding and without having that big, not fake, look when you normally just attach the hair over your bun. So i'm just separating my natural hair now into three sections using my finger to do that, and i want the back section it's a bit smaller than the top, because i want it to be like more. I want my ketchup to be lower, so it depends on where you want your ketchup. I want mine to be a bit lower, so i'm just trying to make the back section a little bit smaller than the top sections and i attached um hair ties to the end of each section, and i hold here in the direction which i'm going to be Brushing it to make the hair construction one, so this is how the sections look. This is the direction that i hold it in before i put the hair ties on it, so now i'm going ahead and cutting the hair, but i'm not cutting it in exactly half. I'M going about 10 centimeter past the the scrunchie that is in the middle of the hair, so a little bit more than half i'm using. So, of course, you need to stretch your hair and then you're going to separate the hair you're going to take away one third of the hair and then loop it over the next two thirds of the hair and the one there that you loop over the two Thirds of the hair is going to make one leg for your plaiting and the next two thirds is going to make the other two legs now it's time for the magic. So i'm going to go ahead and put that in the center. At the back of my head, i hope that wasn't too confusing for you guys, but you guys can see what i'm doing right here. I just kind of place it in the center and i'm using my fingers and my knuckles to hold it down and then i'm going to pair it up with my natural hair. So each leg of my natural hair, that is in a scrunchie, must be paired with a leg off the braid in here that i have in my hand, and then you're, just gon na start plaiting and when i'm using my left hand to carry over the the Hair to plait it, i'm using my knuckles, from my right hand, toe press into the middle just to hold the the bulk of the hair in place when i'm using my right hand to carry over the hair for the plating. I'M using my left fingers and my left knuckles to hold on the hair, and you only need to do this for the first two or three times when you go over with the plating, because by the time you reach by time, you pass the root of the Hair, you don't need to do that anymore. It'S completely secure and safe there. It'S not going to be moving around or anything and you don't need to practice tight either and while i'm planting, i'm also sliding off my hair time, i'm leaving this in regular time. So it's easier for you guys to follow just in case it's a bit confusing while i'm explaining it a part of my part was a little bit out of place, but i couldn't see it. I wasn't using a mirror, as you guys noticed, if i were to use a mirror to do this. Like one of the background at the front, then the lighting would be terrible and you guys probably would not see what i'm doing so. I just sat directly in front of my camera was not able to see what i was doing and the hair was a lot in my hand, because i wanted my plaque to be really thick. So i wasn't able to see what was going on behind me and hence i kind of plant it and a strand of the hair. It just did not come in the right place, as you guys see here and, to be honest, i didn't want my plait to be this long, because i wanted to look really really natural um. So if you want your plaque to be a bit shorter than my plait that case, you would only need a pack and a half in total, because you would cut it here in half and put those two halves together to make it thicker. And then you cut another half from another pack of hair and then you put all three together but in my case i used two and a half packs two and a half packs, because when i cut the hair i didn't cut it in half. So the shorter portion of the hair that i cut off, i could not use that i had to throw that away. So, in my case, i just cut two packs. First put those two packs together and then i went ahead and cut another pack and put with it hi guys. Doesn'T this really look like my natural hair, like it's coming from my head, you kind of want to remind me of clippings, but the only thing is that it's a lot more seamless you're, not feeling any pain with it in your head. It just feels like natural hair. I must be honest huh. So this is how the finished plot looks. It'S a bit fuzzy where my natural hair is you guys can always flat yours with gel or plaster is white, so it blends maybe easier. So what i'm going to do is take some gel, i'm just going to take some regular eco styler gel i'm just going to um rub that onto my natural hair. You just apply gel where needed, to blend it in and you're just gon na tie it under here and leave it to set so guys. This is the finished results, and this is how it is looking. I am really really loving. It really love how natural this looks on my hair, i'm just so in love with this hairstyle and just how cute and simple it is to achieve so this is it for this video guys. I really hope you guys enjoyed it. If you did please be sure to give it a thumbs up before you leave if you're new to my channel, please don't forget to subscribe, and i thank you all so much for watching, and i will see you my darlings in my next video you


Comments
Sam M: Thank you for sharing this helpful tutorial! It’s so simple and precise. Happy Holidays ✨
Mary Mbah: I've missed your hair tutorials. This is a brilliant idea! It's so beautiful and looks very natural as well. Well done!
StephTheOriginal: Love the concept! Looks super natural!
Juliet Uzor: You make it seem so easy
Marsha Manning: Guuurrl! This is it
MeMissLady: Very Beautiful
London Loves: Your hair is incredible. Do you have 4b hair? So glad I discovered your vlog - you’re so feminine!
Chat Pointer: It looks good but i was getting frustrated just watching you braid.
anisa Juma: First