Flat Iron Beach Waves Hair Tutorial! Dacey Cash
- Posted on 10 August, 2018
- Short Hair
- By Anonymous
‣ Instagram @dacey_cash
‣ Snapchat @daceycash
‣ Hey girl hey! Today I’m sharing a tutorial on creating flat iron waves! I think this is the perfect way to create waves that are not uniform and truly look like perfect un-done effortless waves!
‣ PRODUCTS USED
‣ Shop LivingProof https://seph.me/2M39nQp
‣ Flat Iron http://bit.ly/2P1KC58
‣ Blow Dryer http://bit.ly/2MbL9Tt
‣ In This Video I am Wearing
‣ Illuminating Primer http://amzn.to/2jYDzLc
‣ Foundation http://amzn.to/2u8Bkxt
‣ Concealer http://amzn.to/2ptwwNT
‣ Powder http://amzn.to/2gQDagJ
‣ Contour Powder http://amzn.to/2FQed0q
‣ Bronzing Powder http://amzn.to/2jzrwU1
‣ Highlighter http://amzn.to/2jeDPsm
‣ Blush http://amzn.to/2h6Ef1h
‣ Brow Pencil http://amzn.to/2jNW9En
‣ Brow Gel http://amzn.to/2HPNj55
‣ Eyeliner Pencil http://amzn.to/2u79i5t
‣ Eyshadows http://bit.ly/2FQ0VAT
‣ Mascara http://amzn.to/2j6AAPf
‣ Lip Pencil http://amzn.to/2IDzhVH
‣ Lip Color http://bit.ly/2KJVtgo
‣ FTC / this video is sponsored by Livingproof. Some of my links in the description box are affiliate links! If you choose to shop through my affiliate links, I make a small commission from the the sale! It does NOT cost you anything extra! Thanks guys! xo
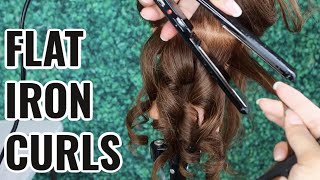
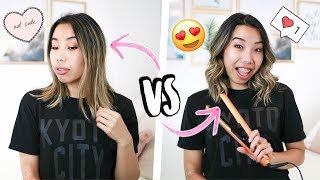
Hey guys, what up? How are you welcome back to my channel today we are doing a hair tutorial on this um. Look. It is a beachy wavy, PC, texturized, salty hair tutorial. I think this is like a true ocean waves. Hair tutorial, there's not uniform movement. It'S got a lot of piscina sand texture. I love it. I am obsessed with this hairstyle. You guys have been requesting it like crazy, especially when I wear it on Instagram or in my youtube video, so I'm so excited to finally share the technique with you guys. It definitely took me a while to get the hang of. I'M not gon na lie. It'S something that you really have to practice and kind of get your wrist used to the movement. So don't be discouraged. If it takes, you, multiple tries to really get the hang of it. It'S really something that you have to practice, but once you get the hang of it, you'll be able to do it really quickly. I do have tips and tricks for you guys and we're gon na be using two different techniques. I'M gon na show you guys how you can create kind of the crimped Bend wave and then also like kind of like a ribbon Bend you'll see when we get into the tutorial. Please make sure that you guys subscribe to my channel if you haven't already give this video a thumbs up. If you want to see some more hair, tutorials and don't forget to come, follow me on Instagram, because I am on Instagram when I'm not on YouTube and now, let's get into the tutorial guys. The reason you want to start off with clean hair is because it's like a blank canvas. There'S no products build up, don't have any oils in the hair, so there's nothing. That'S gon na interfere with this style, potentially weighing the hair down or just creating any different type of texture issues going on. So the main thing with this is you want to use as little product as possible just because, when you're creating that Flatiron Bend, there's a lot of room for the hair to get weighed down and just fall flat. So with my hair is still damp from the shower, I just let it air dry. While I did my makeup, I'm gon na take a little bit of the living proof of 5 in one style, and this is actually going to be used to kind of help. The hair hold the style so just use a little bit of the cream like that. I'M going to work it in between my palm so now that I've got the cream worked throughout the hair. I am going to blow-dry the hair and I do recommend that you guys attach the bill to your hair dryer. Just because then you can concentrate and you can direct the airflow, although we are doing a rough blow-dry and not you know a sleek blowout or anything. This just makes things a little bit easier to control and the hair is not going to turn out as poufy. So I just like to direct the airflow in a downward motion just so that the hair doesn't get too crazy. So, in terms of tools, we're gon na be using some crocodile clips. I really think that some sort of sectioning tool is going to help. You guys a lot, because that way you can differentiate the hair that needs to be styled and the hair that is already styled. It'S just really helpful, especially with a look like this and then your flat iron horse torch your flat iron of choice. So we can start off by sectioning the hair, the let's start off by sectioning the hair. I'M gon na start like right about here on my head and then we're gon na clip up this section in terms of heat setting on the Flatiron. My Flatiron personally only has one heat setting. It just has an on button, so mine has just turned on, but if you have multiple settings on your Flatiron, then I would say anywhere to medium medium. High heat. You don't want the heat to be too high, obviously, but you don't want it to be too low, because this is already such a subtle Bend that do need a little bit of that heat power to put that bend in the hair. So so we're gon na. Be starting off with sections that are about an inch wide. You don't want to be working with sections that are too thick and you don't want to be working with sections of hair that are bigger or wider than your Flatiron itself. You want to grip your hair somewhere in the middle so that you have some slack, because if you're gripping it too taut you're not gon na be able to feed the hair into the flat iron. So I will show you guys what I mean. So I'm gon na grip right about here and then I'm gon na clamp, the hair, I'm gon na create a Bend by pulling and then I'm gon na come from underneath twist. The iron same thing on this side so see I'm just kind of like rocking the iron back and forth, and then I'm leaving the end out. Sometimes certain sections need to be repented. Reeb ended. Sometimes certain sections need to be read waived so you're, just gon na go over under over under over the reason you want to leave the end out of the hair is because otherwise, if you are, you know bending the ends unless you bend them all in the Exact same direction, the ends are all going to be going like in crazy directions, so just leave the ends of your hair straight. Sometimes I do have to go over certain pieces and extra time and there's that bend so we're gon na let down another section is now in these straight sections: we're gon na be putting some product, so the layer, that's the closest to my neck, that very bottom Layer, I always like to style that as little as possible, I wanted to have like the general. You know, shape of the rest of the hairstyle, but I like that to be kind of limp. If you will, because then it just makes my hair look longer and it also kind of creates different definitions in the hairstyle makes my layers a little bit more apparent. So I always kind of want this first section to be borderline straight. So now we can go in with a little bit more product, and this is really gon na help the hair be a little bit more dramatic of a wave, so I'm gon na be using the living proof of body builder. This stuff has heat protection up to 450 degrees, so it's also a great heat protectant to use when you're styling your hair, with hot tools and the way this works is it has a nozzle which customizes the product, so you can twist it this way to get More body and then you'll twist it this way to get less body, so I'm actually gon na put it right in the middle and I'm gon na spray. This from about ear, lobes down in the hair just on both sides, well brush the product through, so we're getting the same process, we're gon na go over and then we're going to go under over under over same thing over under over. Under I mean just like break up the hair, so the cool thing about these waves is that, if you guys want a more dramatic wave and Bend, all you have to do is do almost a full rotation when you're turning the iron and then you'll get a Lot more dramatic of a bend in the hair. I like mine, to look super natural, like that. I don't even really want it to look like. I did anything to the hair I kind of want it to be just like. I woke up like this type of hair. I don't want it to look style. So that's why I like making my waves a lot more subtle, but if you guys want something, that's more of a dramatic way, then all you have to do is just turn the iron more. When you're creating each wave, you would just do more of a full spin. I do like to make the pieces by my face a little bit more waved, though, so I will kind of spend a little bit more time kind of creating a more dramatic Bend when I'm doing the pieces by my face okay. So now we will let down the last section of hair and you guys will part your hair on whatever side you want at this point, I'm gon na spray, some bodybuilder on the hair. Now this last section, I do it a little bit differently, just because this top layer, I don't want it to be like two crimps looking, and I find that sometimes, if I do this, it can get a little crimp II. So what I actually do is take the hair, like this put it out of Bend and then you're gon na flat iron. The bend just like this and kind of feed it into the hair in an S shape, clamp the hair and then, since it went that way, we're gon na make it go this way. This time see. This is why you're doing a tutorial and not explaining okay. Okay, so now you guys saw that so you're, essentially making the hair do kind of like ribbon curves as you do. This so you'll form your little curve and then you're gon na flat iron. The curve I'm just doing like light little clamps, just like so and then we're gon na curve it the opposite way and flat iron. That curve do the same thing. The next way and always leave the end out, don't curve the end but see you're just creating those little bends, and this takes a lot of extra time. So that's why I save this step for just the top layer, because you really only see the top layer now for the pieces that are gon na frame your face. You'Re gon na want to always Bend away then just lightly clap on these pieces kind of forming a you put the hair like that and then kind of get the hair off to the side. Now it's super important that you guys don't shake these out until they're. Fully cooled so just leave that side alone until we're completely done with the hair. Like I said guys, this does take a lot of extra time to do it this way, but if you just save it for the top layer, I think it's so worth it, because you'll really get that true Bend. That'S not a curl, and it just looks so effortless just do that when you are doing this top layer, you want to work in really tiny ribbons of hair, because if you do something that's too big, then you might not get all the hair heated correctly, and I think the really cool thing about this hairstyle is that every piece of hair turns out different, so nothing looks uniform and it really does look really natural, so I'm just gon na shake the hair out on this side. I think this I turned out a little bit more curvy, so I'm just gon na make this side match a little bit more and try to create something a little bit more dramatic guys. I love this hairstyle. I think it just looks so cute. So now I'm gon na go through and any pieces that look a little bit more straight than I want them to I'm gon na make them a little bit more exaggerated, see it just kind of makes things a little bit more defined. You can totally totally do your entire head with this technique, just be aware that it takes a really long time if you have shorter, hair, you're, probably more suited to doing your whole head like this. But if you have long hair, it's it's not worth doing it. On the daily you really I'm gon na go back in with a little bit of the body builder and I'm gon na turn the nozzle to less body, because we've already put a lot of the product in the hair before we styled it. But you guys will see just how a little bit of this will just kind of like bring my hair back to life and give it a little bit more volume everywhere. So we're gon na do the thing where you hold the can away from the face, and you let the hair cast into the product. It'S gon na give a little bit of texture and penis and just make everything a little bit more wispy and undone for these front pieces. What I like to do is just kind of spray a little bit on the front piece and then you're gon na. Take your fingers rub them like this, and you're gon na make the front just a little bit extra wispy, I would say just kind of finger style until you're happy, because the product will keep your hair in place, so you can kind of move it around to Your liking, once you guys, are done just kind of like double checking that everything is. You know, waved and bended to your perfection. You'Re done this is so much easier than you think. It just takes a lot of extra time because you're having to manipulate the hair every time, rather than just like passing an iron or twisting with a curling iron. But I really like this style. I like how nothing is uniform and it just looks like salty Beach. Hair, so I definitely think that the way you can kind of expedite the process get this to go a little bit faster is by waving these lower sections and then, when you get to the top sections and the really key face framing pieces, that's when you can Kind of do the ribbon feed and, like twist the iron and manipulate the hair with the flat iron that way, but yeah. I really hope you guys liked this tutorial. I'M gon na have product links, information and all of that stuff. In the description box down below and if you guys have any questions regarding products technique, anything at all, you guys know you can hit me up in the comments down below and I will of course get back to you. I'M also going to have all of the makeup and everything that I was wearing in this video linked in the description box for you and don't forget to come. Follow me on Instagram. Please subscribe to my channel if you guys haven't already and give this video a thumbs up. If you want me to do some more hair, tutorials leave a comment down below. Let me know some more hair tutorials it. You guys want to see on my channel and yeah. I will see you guys in my next video. Thank you so much for watching this video and for requesting it also

Comments
Kathryn Patterson: When you do the individual pieces it doesn't look like much, but in the end it all comes together so nicely, and you can really see the texture! Very pretty!
kromatic: Your hair tutorial are always THE BEST! Random suggestion: I would love to see a "special event" makeup tutorial. I'm going to a number of weddings soon.
Anna Drees: Hey Dacey! Love this look! I think this spray will def help my hair stay textured, I HAVE to try it! I think it would be cool if you did a video on a whole look for an internship! Like including hair, makeup, outfit, accessories! I am starting my second internship as a school therapist (I’m getting my masters in social work!) and I think it would be so helpful to have some cute ideas for outfits and stuff! Love your videos girl!
Arianna Jones: Love this and it’s easy thank you!
Gena McGlone: Thank God for you! I would never have thought of doing it this way! Absolutely beautiful!
Grace C: Simply beautiful!!! Thank you for sharing with us! ✨
Alejandra C.: I am excited to try this out! I always love how your hair is styled ❤
Andrea van Wyk: Hi Dacey!! Love love love your tutorials !! I know your hair is darker now than in this video... but did you ever do a hair dye tutorial to get this colour?? Love your channel :)
M K: You look gorgeous in blue! Love this look
Emily Martínez López: You’re so gorgeous! Love all your hair tutorials
Karol Aguila: Please please PLEASE do a tutorial on this makeup look!! love you so much <3
Samantha Guerrero: I love this look! and you are so pretty. A hair stylist showed me the same first technique of 'bending', but she just kept the iron closed and twisted (like a clamp curler). I don't know if this would be easier for you? :)
sanders18: Yesss I'm going to a party tomorrow so I needed this! Thanks girl!!
Sheema Hussain: Awww I so love you for this. Was waiting for this tutorial so badly. U r just the best dacey. Thank you so much for this video. Love you. ❤️
Raei_exe: Please do a tutorial on this makeup look too
Brenna K Lyons: Natural beauty.. I love this video Dacey!
Jade: That blue top is so flattering on you!
Katie W: QUEEEEN!!! Love you Dacey, keep on killing it ❤
leyla zhane: Just braid your hair at night and take out the braids in the morning. Same waves. No heat and healthier for the hair
Amanda Alejo: YAAASSSS!! More hair tutorial/tips/tricks etc!!!
sapphiremariah1: "re-bended" lol love it! great video!! you have beautiful hair!!
india mostella: please do a go to the hair salon video with me the next time you get your hair colored !!! i love the color
christina: yay!! so glad you posted this! :) love you dacey!!
Amanda Estrada: Oh so gorgeous!! Will you do a new Smokey eye look? I also just got engaged so maybe a bridal look? ♥️ And as usually, looking forward to the day you color your hair on camera!!
Raei_exe: Now i’m regretting cutting my hair short
Claudia T: Can you do a wet to dry routine please
Jane Herrera: You are just so gorgeous! And I loveeee your hair color
NOYB52: Have u tried doing this the night before and see if it still looks the same the next day?
Armixers are LIT: you look amazing .
Ane Emma: Love your videos Dacey where did you get your necklace from ? ❤️
osakura pathepsina: Yes!! Amazing !!
Hannah A: How can someone be this pretty
Lucas Devenney: Amazing
Ken Leung: Making a flat iron curls tutorial!
Desiree Martin: Hello! What color is your base? Like number? I feel like maybe you’ve talked about it can you do another hair video?
OMGjeshka: u are stunning dACEY!
victoriaaak: Did you re-dye your hair yourself this time or did you get it done at a salon?
Bobby jo Wilson: What would you class the color of your hair in this ♀️
Adelina Detesan: How do you color your hair?
Angelika: Where did you get your necklace from?
Jehona Ukehaxhaj: where’s this top and necklace from dacey? beauty
lucy clarisse aguila: Omg youre so beautyfull gushh youre my idol
Kim Weehler: What brand is your necklace/chain?
Alma Lucero: ❤️❤️❤️
Hannah Roman: Everytime you upload I hope it’s the at home dying your hair
Sasha xo: Where’s your necklace from?
Jamie T: ALREADY MISSING UR LIGHT HAIR SO MUCH
Aylin S:
whahana: ❤️❤️☺️
marina romano: when i saw the thumbnail i thought you were debby ryan for a second
Michelle N: where is your shirt from?
Kara Denise: I need your skin tone
hi La: Where did u get your ear piercings from?
Jayde Nicole: So gorg!!! And where is your shirt from?? It’s so cute!
yanizz: There is literally NO difference in before and after. I could tell you’re having a hard time dominating the iron. This was not a good tutorial, but I agree with everyone commenting that you should make a tutorial for the makeup style you’re wearing, I do like that a lot! :)
Lily Kuykendall: You kind of look like debby ryan ❤ your so pretty
L. K.: where is your necklace from?
Elizabeth Gregory:
Diana Miranda: what hair cut is this?
87cakeface: Where is your shirt from? Can you post the link?
normerika: Your hair looks over styled and it’s too time consuming. Your makeup is cute though!
Milli B: She looks like the wolf from twilight
Sarah KaLia Yang: What’s your hair color?
Sata matos: Please do a video with your boyfriend
Lizbeth Tejeda: Wtf these arent even waves you're just burning your hair for no reason doesnt even look nice looks like when u untie your ponytail and the hair tie leaves weird marks
priya patel: In my opinion, why use so much heat on something so simple, rather than just curling your hair or straightening it.. I would not use all this heat on a look that is not worthy, if that makes any sense!! Still pretty not being negative in any way. Whatever suits you, you be happy with.
Quincy Prince: Re bent?...
Oigu bjh: Don’t try it doesn’t work
Oumaima oumii: U re just burning ur hair. u didn't make any hair style . No difference between before and after
M. Truk: I'm sorry what is this... Not sure if I'd call them beach waves..
ninejaa: Did you have your nose lift?