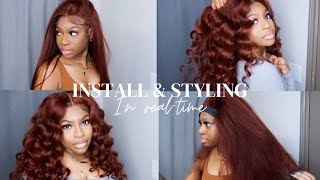
Color Correction Wig Transformation | Burgundy To Honey Brown W/ Curtain Bangs
- Posted on 21 January, 2023
- Bob Wig
- By Anonymous
This was a PROJECT! But I think it was worth it My first time trying bangs and I think I really like it. I definitely underestimated how much of my face would be in the camera during the process so you'll have to excuse my bonnet and crusty braid down (sorry Mo'Nique )
Thank you for watching and make sure to like, comment, subscribe, and turn on post notifications before you go! ✨
I don't have a link to the hair because I bought it in store a couple years ago and I can't even remember the vendor name.
PRODUCTS
Matrix Light Master Lightening Bleach Powder
Redken Pro-Oxide 30 Volume Cream Developer
Matrix 40 Volume Cream Developer
Kiss Tintation Semi-Permanent Hair Color (Honey Brown)
Adore Semi-Permanent Haircolor (#107 Mocha)
Redken Shades Eq Hair Color Gloss (06T-Iron)
Redken Shades Eq Processing Solution
BioSilk Silk Therapy Original Shampoo
BioSilk Silk Therapy Original Conditioner
Cannabis Sativa (Hemp) Seed Oil Lush Length Lite Leave-In
CHI Silk Infusion
Matrix Total Results High Amplify Hairspray
Keep in touch?
Instagram: @ohemgeeitschelsea and @chelseatheestylist
Pinterest: @ohemgeeitschelsea
TikTok: @ohemgeeitschelsea
https://www.instagram.com/ohemgeeitsch...
https://www.instagram.com/chelseathees...
.
.
.
.
.
.
#wigtransformation #wigrevamp #colorcorrection #haircut #honeybrownhair #diy #protectivestyles
Foreign Chelsea Alexa welcome back to my channel, So today we're going to be doing a whole wig transformation. That'S going to start off with the color correction. So, as you can see, I have this wig here. It'S like the dark, burgundy color um. I actually got this wig for a steal. I'M not even gon na lie to you. I got it for like 65 at like a beauty supply store. This is like the only video I have of me actually wearing it burgundy. I don't know why. I have no videos but anyways, so yeah 65 dollars real inexpensive and honestly I've reached this big like this is my third gon na, be my third time bleaching it. So I ain't gon na lie. It'S doing a little something something like I'm not mad at it. At all so um, it's already layered. I cut this hair. When I first got it, I was still in beauty school, so the cut is not the best but we're gon na work with it. Okay, so let's just get started. I'M gon na use Matrix light Master, which is like an amazing lightener and then I'm gon na mix um 30 volume and a little bit of 40 volume. I barely have anything in the 40 volume, which is why I keep on shaking it. But I'm gon na section off the frontal part right now, because frontals I feel like always lift faster than the rest of the hair. So I want to make sure that I'm doing that part last, I'm just going to clip it away completely forgot my foils at my job. So I use my regular foil that I had in my drawer in the kitchen, I'm gon na start off with two and a half Scoops. Only because I knew I was low on developer and I didn't want to mix more than I actually needed and wasted. So yeah, that's all I had in the 40 and then I'm gon na use a little bit of 30 and I'm gon na mix it. I don't have a whisk girl, that's everything at work, so I'm just using what I have to be honest and that's the consistency right now. It'S a little runny, but it's gon na get thicker as you'll see so a little trick. I like to do I like to put a little lightener on the foil first, that way when I put the hair on top of it, it'll just kind of stick without me having to like hold on to it for too long. So I do that and then I just go in like just painting the entire thing. Um saturation is going to be your friend when it comes to lifting hair, I'm not gon na lie. I don't know why. I can't remember how I colored this hair. When I first got it, it was black and then I put a little bit of highlights in it and then I bleached it all out. I think to put this red color on but, like I said, I cannot remember what I did to this wig. I'M not gon na lie to you, so I just use a high developer because I thought maybe it was permanent color and I wanted to get it out anyways, so I'm just putting that lightener all over the hair, making sure I'm really getting it everywhere. I'M spreading the hair out left to right back and forth just to make sure even the bottom under parts are covered, and then I'm going to just fold that foil right on up and keep it moving. Ideally, I would do more saturation than just that, but I don't have that much lightener, so I got ta do what I can do and that's how the lightener look after like five minutes. So as you can see, it gets thick pretty fast. So don't worry if it's too runny the first time you do it. So I'm going on to the next section. Now I have the foils cut wide enough, where I can just like do like a whole section at a time um. But you don't want it to be too thick, because if it's too thick it's going to be harder to um bleach it and it's going to take longer to get light. If you don't know, I'm a hair, color, specialist and her natural hair care, especially so my hairstylist, my profession, so I know what I'm doing yeah. I know what I'm doing, but even as you can see, I lifted that hair up right there and it was still dark. That'S why I have to go left to right, as you see me doing, because you need to make sure all the hair underneath that uh, that section is still lifted. Otherwise, when you pull it out, it's just gon na be red still and that's not what I wanted. So I'm checking it again and make sure it's all lifted or that it's all saturated and it is so I'm just going to make sure to do a little bit extra again. Separation is the best, but I'm just doing what I can, because when it comes to these wig revamps, I really do not be buying extra stuff. I use whatever I have at home, so I'm adding, I think, two more Scoops right now and more 30 volume developer. If I don't have any more 40 volume developer, but it's fine to be honest, um and then I'm gon na go on to my next section, um, so yeah as far as tips for like bleaching, hair, especially red hair. You want to make sure if you really really get it saturated, you really do thin sections and get that hair or get that bleach everywhere. Like I know, I speed it up, but I'm really emphasizing how I'm going left to right on the foil to make sure that all the hair underneath is getting lifted, because when I first started doing hair color, I had that problem. A lot so just make sure you're really taking your time to get all the hair saturated, even the top parts. At this point, I feel like I've used like eight to nine scoops of liner, and I keep showing all this part, because I want y'all to understand. Just how much product it takes so when you buy um or order wigs to be colored and stuff like that, like it has to be included in the price, because there's a lot of product we're using and that's how the first four looks. I'M not gon na lie to you like I said I can't remember if I use permanent color or uh semi-permanent color, when I first did this wig, but that came right on out. So I'm pretty pleased with this lightener right now, I'm on the frontal section, I'm just making sure that I'm going in between just to make sure the roots are have bleach on them, but I bleach the knots already. So I don't really want to get it on the actual lace, because if you boots your knots too much, it makes the frontal start shedding a little bit too much and I ran out of foil. So I was being ghetto and I reused foils. So I'm gon na go ahead now and just pull out the rest of the foils. I left it pretty well like I didn't. I didn't really wait as soon as I finished. The frontal part I just started picking off both in the back, and I mean I lifted - really really well um for this hair to be so cheap. I'M not gon na lie like it's really resilient like, and I got it like two and a half years ago. So I've been wearing this wig for a little while I'm gon na spray a little bit of water at the um very very ends because they were getting a little bit too light, and I wanted to kind of just float on that process. Yeah, I'm just gon na pour some more foils. I let the front post the final foils come so maybe about 20 more minutes, because I think they need to learn more time to get ready. And then I ended up wanting to go with a purple, shampoo, The Matrix brass off and then bio, Silk, shampoo um. I mix those shampoos together and then I rinsed it - and this is how it looked. It'S still pretty damp, but I mean the Red's pretty much out it's a little bit orange, but hair is always kind of orange when you first lift it. The front part is a little bit darker, but I don't mind because um, it's just gon na it's gon na be all be darker anyways, so I'm gon na go in now with kiss Honey brown and adore mocha. There was brewing anything in the air dorm welcome, but I wanted to use it because I know it's a little bit of a cooler brown and then I use the entire um uh a bottle of Kiss Honey Brown and then I'm just gon na mix that together And start applying, so I did want to use the Adora mocha because I believe it has more cool tones and the kiss Honey Brown is really really warm, but there was barely anything in the um a door mocha, so I actually did do what I had to Do but I already knew because I've used Honey brown before and I feel like it's more orange and brown than actual Brown. So I already knew that once I finished um applying this color and rinsing it, I was probably going to do another toner. That was just strictly a quilt on there. I don't talk about color three much on here, only because um, it's a little bit complicated, but basically my hair is Orange right now and I don't want it to be a warm Brown. I want to be more of a neutral Brown, so if you go to color theory, then in order to cancel out orange, you have to use blue. So I needed a more of a like a blue base toner. What you're going to see me apply um later on in the video so right now, I'm just applying that color all over um, I'm just kind of just slapping it on to be honest, there's no Rhyme or Reason. There are some short pieces that you're going to see me coloring right there A lot of times when you have wigs um that are cheap. They, the vendor, will throw in those short pieces right there, because it'll make the wig look fuller, but not actually make it longer. So if you paid the money for a wig look out for that kind of thing, because they're definitely trying to charge you but yeah. So now I'm going on to the frontal I'm just going to keep on coloring. It um I'm being very careful around the lace because I don't want it to be stained and I'm just making sure that it's really all over the frontal. I'M making little sections to make sure that they're root and everything. Because I know I'm gon na have a bang, so the part that's going to be part often show, and I want to make sure that it's brown and not orange, basically foreign. So this is how I looked when I first finished applying the color even right. Now you can see that it's kind of warm and when I say warm I mean something that has like orange or red undertones. So I'm going to rinse that and condition it with the bio silk: Silk Therapy conditioner, and then I'm going to tone it again with good stuff, professional stuff, Redken 6t, and that's like a little gel that comes with it um. This is how it looked when I first ranked it like. I said it looks really really orange, like barely Brown and mostly orange, I'm going to spare y'all watching me put on the new toner if it's the same process, but this is how it looked after I applied it. As you can see. That looks more like a neutral Brown, as opposed to like an orange brown, so I'm very pleased with it. So as far as the cut I know under the bangs, so I took out this little section in the front and then I just straight up cut it. I'M not gon na lie. I wanted to put it on my head, so I knew where it was going to fall. Once I figured out where I wanted it. I just took scissors or my shears and I just started cutting like kind of like jackets, so I'll walk into like blunt cut, but after I did that I just wanted to make sure that it wouldn't be too long in my face. If I bumped it or anything - and I feel like the length is fine, so I'm going to go ahead now with the rest of the cut I'm going to like section it off like it's like. If I was on a person, it would be like right behind the ears. That'S how I'm trying to section it off right now, because that's the part, that's going to be a little shorter in the back. So once I do that, I'm going to do what's what I call long layers. So I'm just like picking sections from the back right now, like I'm doing the middle section first and now I'm going to lift it all the way up and I'm just going to cut it. That way, that's a way to get layers in your hair and make sure that they're still even and another thing too is this. Hair has like shorter pieces at the top, but I didn't cut myself against the cheap wind. So the front wheel was not as long as the rest of the hair like there are a lot of problems with it and I'm okay with that, because it gets crunchy. So I'm just trying to make sure that the top layer is Blended in with the bottom and that it's not too big of a discrepancy. So I'm gon na like lift that hair all the way up to the top, and then I'm just going to cut it. That'S going to keep the bottom hair long, but still make sure that it all makes sense in the grand scheme of things so yeah. I kind of just do that all around the head, like I just do sections like that, all around the head to make sure that it's all even and that it's all layered properly foreign. So, as far as the front of the hair, I wanted what are called curtain bangs. So I'm going to take the front of the hair and I'm like dragging it all the way to the other side of the head and cutting on an angle. That kind of creates, like that layered effect, foreign bins, are like bangs that are kind of layered in the front like almost like face frame bangs but we'll actually know exactly like face cream bangs. So that's just the way to um keep the bottom long, but still have it again make sense with the actual haircut. So I'm just going down and cutting it on an angle so that it'll frame my face when I finish styling and things like that. So I have this cheap old leaving picture that I got from Walmart I'll put it in the description box, along with everything else. I'M just going to spray that and then I use cheese soap infusion a little bit of that and I work it all throughout the hair and then I'm going to start blow drying. I have a round brush. It'S cheaper a round brush that I got from beauty school, I'm going to use that with my blow dryer and I'm just going to dry the hair. I like the round brush for this style, because I needed a little bit of body into it. A lot of times when I straighten or when I blow out wigs I'll, just use a paddle brush, but in this case I wanted it to be a little voluminous and have more body to it. So I decided to use the ground brush. Oh thank you! So for the whole head for the most part I brushed like downward, but for the front I'm blow drying it more towards the front so that it'll lay the way. I want it to oh foreign, and then I really just use my hot comb to like create a middle a little bit. I didn't really want it to be too flat, so I just used to kind of separate the middle and then to like heart coming forward. So it wouldn't lay it like a bang and now for the styling, I'm going to take this curling iron and I'm just curling the hair under like just right, underneath I'm not trying to do it like left or right, just really right under and then once I Do that I um actually I'm setting it on velcro rollers that I got from Sally's. I want to say I just I don't want to actually be curly. I want to have like that. Blowout, look so doing this kind of get that blowout effect without actually having to do like a full round brush blowout, so I'm gon na set it on the roller and then I'm going to clip it with a metal pin, because I realized that it was not Staying on its own foreign and then for styling the front, I'm actually going to curl it upwards yeah, so I'm going to curl it upward. It looks a little bit crazy when I first do it, but you got ta touch the process because I promise you it's not coming out looking cute, so I do it upwards and then I take one of those big velcro rollers and I set it on there As well, but I didn't have to use a um clip for it, because it's pretty short enough, where it just stayed on its own foreign stronghold, hairspray and I just sprayed the whole thing down, and I let that cool and sit. While I finished the rest of my makeup and got ready and stuff like that foreign, so you can see it's not like it's really curly, but it just has like body to it and shape, and then I just took out those top rollers and I looked crazy As hell and I got a little bit scared, so I finished the rest off camera and here's what we've got is this not cute like? Is this not giving you Country Club? So that's what's giving me personally, I switched back to my room because I feel, like the lighting wasn't really getting what it was supposed to give, but yeah the thought ended up. Looking after final styling, when I tell you when I first put this wig on, I was so scared because I've never done anything anything close to this ever so. I just did not know how to feel about it. But honestly, I think I'm really feeling it as you can see. I was constantly planning it. I was I liked that fact that I looked kind of messy like a lot of times for wigs. I, like it's, looking really sleek and clean, but I like the fact that it looked messy and now I'm kind of putting the bangs to the side. So I can see how it looks that way too, and I I really like it and then I realized that'd. Be cute as a little Bob, so I always fill in it even more there's one thing about me: I'm gon na wear my wigs till the wheels fall off so now. I know what I'm tired of this I'm gon na cut into a bob as well so yeah, but for now I'm just gon na enjoy it as or the way it looks right now, but yeah I was feeling I don't know like it's definitely giving Country Club. My fact that it's giving Aspen like I need I need like a fur coat or something, and I agree um but anyways. Oh yeah, Miley Cyrus song, was on girl. That'S on the Block, anyways! That'S the end of the video y'all. Thank you. So much for watching make sure to like comment and subscribe. I'M really like digging this whole, like wig transformation, video thing, so I'm gon na do a little bit more anyways I'll, see y'all later bye.


Comments
Rodney Phillips: More life. More content. More you.