Glueless Hd 5X5 Closure Wig Install & Soft Crimps Ft. Love Letter Black Label Hair + Tips & Tricks
- Posted on 13 July, 2021
- Closure Wig
- By Anonymous
in this video I share my process of installing my clueless HD 5x5 closure wig using my hair line! Be sure to check it out below and leave any questions in the comments below. Enjoy! Xo- Bri
Shop With Me
WWW.THELOVELETTERCOLLECTION.COM
Hair in the video: https://www.thelovelettercollection.co...
BW 20,22,24" + 18" HD 5x5 lace closure
https://www.thelovelettercollection.co...
Order a Custom Unit:
https://www.thelovelettercollection.co...
SOCIALS
@BRIANATAHARI
@PSBYBRI_
@THELOVELETTERCOLLECTION
BUSINESS ONLY EMAILS
Beauty Content: [email protected]
Family Content: [email protected]
FTC: This video is not sponsored.
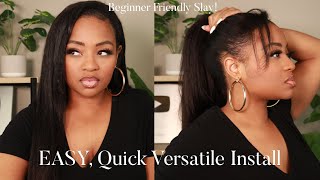
Hi everyone and welcome back to the third life in today's video i'll, be sharing how i achieve these soft crimps in this flawless glueless install using love letter bundles all right. So i just finished my clients for today and on my last one. So let's get into this wig install, i had my mom break me down, but i tried my wig on and these two center braids we're gon na be giving lumpy mamas and we cannot have that. So i'm just gon na take these two. I'M gon na make this cornrow into two plaits. I want you shy and just tie it down like that or just tack it down, because it's a whole situation, so i'm gon na go repeat this. On the other side, tack, all these loose ends down and then i'll be back to do the ball cap. So, to make things smoother and easier, i decided to do all voice over for the rest of the videos that struggle breakdown is just going to get us by now. I'M slicking my edges back using some edge control, so they can be nice and out the way before going in with 99 alcohol to clear my hairline to get it ready for the glueless adhesive. Next, for my ball cap i'll be using ultrashare pantyhose in the color beige. I find these to lay a lot better. Then a cap is thinner which leads to a nice flawless, install, that's flatter and not as thick as far as the cap goes. So i'm just tying that in a knot and then we're going to cut holes for my ears same process as if i was using a cap. It'S just pantyhose instead see here that i got a little ahead of myself and went ahead and grabbed the olive oil ors wig grip, gel and started applying that to my hair to lay the ball cap. But i forgot, i have to sew the cap. So a little thing i like to do is measure. However far my closure goes across my head, so i'll know exactly where to sew and where to apply my gel, so my ball cap can lay perfectly under my closure. You don't want to have a six by six ball cap with a five 5x5 closure or a 4x4 ball cap with a 5x5 closure. It needs to match up perfectly. So i use my measuring tape to line it up and get it sewn perfectly. And then i go in with the wig grip gel and apply it to my hair to get the cap to stick down and once i go ahead and lay it down with the gel for extra security, i'm going to secure it with the frontal clean lace, adhesive Spray just to lock it all in and these two products neither contains the glue. So this is still glueless. It'S just glueless adhesives and alternatives being used once i get both of those products applied, i'm going to sit under the dryer until that hardens. Usually that takes about 10 to 15 minutes, while that's going on i'm going to get these crimps done up the products that i'm using or the utensil that i'm using is the ion crimper. You can find this at sally's and for a spray i'm using sebastian shaper. Normally i would use got to be spray, but that gives stiff crimps and i wanted soft brushable crimps for this look. So that's why i use the sebastian instead and i'm just going in and crimping if you watch crimping videos or have done this style. You know this is a tedious process, so get your music ready. Your shows going your podcast, whatever you like, whatever you're, into going for this process, and i like to lift the tail end as i'm doing each crimp so that i can get the formation of the wave in there. And i do about 10 seconds for each time and then you'll also see that i start the crimp in the last wave of the previous crimp. That sounds crazy, but once you do it, you'll get the feel for exactly how it goes and then once i get to the top, i like to flat iron it some in the top, so that it can be nice and smooth for the rest of the hair. I did not flat iron it first because again, these were soft crimps, not super defined and stiff crimps. So all the texture was welcome. I'M just gon na finish this off and i will come back for the actual install now that my bald cap has dried. I'M gon na cut off the excess cap. I use my regular size scissors for the perimeter and then once i get closer to the hairline, i use my smaller nail scissors. Those are going to be a best friend in any wig install to make sure that you are cutting close and precise without cutting to your skin. Once that extra cap is gone, i like to lay down the parts that started to lift with the tail end of a rat, tail comb or edge brush and then blow dry that and finish it off with cleaning with alcohol before applying the less adhesive. Once more now, i'm just matching my makeup to my skin. I like to put it right on my forehead, so it can match because a lot of times our face and our hands are different colors and your scalp and your part is going to be the closest to your forehead and that's the ruby, kisses, concealer cream palette And i'm going to apply it to the ball cap, as well as to the inside of the wig before applying the wig onto my head, because this isn't my first time applying this wig. I like to mark where i need to lay the lace exactly so that it's not too far up or too far back, and that gives me a guide as to where to start to lay the adhesive spray. And then i apply the adhesive spray onto a stick and not directly onto my forehead, so that it's mess free and it doesn't get onto the lace or the hair and cause a stickiness. And then i blow dry it before applying a second layer. You can do two or three layers depending on how long you're going to have this on, but i knew that it would be under a week for me, so i just did two layers: let it get tacky and then pull my lace up right behind that guide. That i previously put in place - and i did that with a light eyeliner pencil - i'm going to tie that down with my baby hairs. Normally, if doing this on a client, this is where i would style, but because i already styled it, i just let it set in for about 10 minutes or so and dried it before cutting off that band, and then next we're gon na go in and lay These baby hairs, because i don't like mine's food thick, i thinned it out before cutting them and laying them, and i'm just going to cut going from short to long going longer. As i get closer to my ear and before i'm going to lay them, i'm going to curl them with my red by kiss pencil flat iron. This helps them to swoop so much easier, they're already going in the direction that you need them to, because they're curled and i like to curl away from my face not going back, i lay them. First, using love letter edge lay just to get the formation going, because if you go straight in with wig grip gel it's going to get too stiff too fast, and once i get them sitting exactly how i like i go in with the wig grip gel to Solidify them and get them laying nice and stuck they're, not going anywhere. Once you put this wig grip gel on baby, i used to make the mistake of going straight in with the wig grip gel and they were not moving. They would get stuck before they were swooped right, but if you go in with edgelit first and then the wig grip gel tie them babies down with a black strip in the rest of your stockings, some play with her. Lastly, because again, this is not my first time installing this wig that part has widened up a little bit with time, so i'm just gon na use the tail end of the edge brush and i'm gon na hold that in place. While i spray and honestly i sprayed it too much right here and ended up having to clean it up with the concealer after the fact so be careful when doing this, because if you over spray, you will be out here looking like miss blackout mamas. But luckily we cleaned it up next, going in with my pump it up spritz my pump broke, so i'm just tapping that onto the part in space before going in with the hot comb just to raise it up and give it that scalp like look now, we Can reveal the baby hairs. I also like to keep my baby hairs covered up while i'm doing a spray so that i don't spray the front of the lace, because that can turn into a whole mess as well and last but not least, i'm going back in with the ruby kisses concealer Cream just to give it that scalp, like finish going into my part, as well as to the front of the lace, to just get that makeup to melt nice and solid into the finished look again. This is love letter loose wave in the inches 20. 22. 24. Love letter black label to be exact, my hair is nothing to be played with. Please check it out by going to www.thelovelettercollection.com, it will not fail you. This is literally some of the best hair in the game grade 10a, and i mean just look at the results. They speak for themselves and the fact that this is glueless and will not harm your edges. Just takes it that much higher on the upper echelon chart like what are we talking about, but this is the finished look. I hope you all enjoyed this soft crimp install. I had to redeem myself the last wig and slot day was when i was pregnant and it was just not given so we're back in the game if you like this hair tutorial and want to see more feel free to. Let me know in the comments below thank you for watching. If you made it this far, you are the realest good luck on your wig install if you're about to take up this challenge - and i will see you in the next video


Comments
jae_antoinette: Bri, you SLAY these wigs! I appreciate the effort you put in to make them look natural. Some of the shows I watch need your services!
Ryyyy: THIS VIDEO! VOICE OVER, TUTORIAL, AND HAIR WAS JUST BOMB! IM IN LOVE! ordering asap
Gill Perry: ♀️Absolutely stunning
Kinasha Murphy: Yesssssssss hair!! Let me order some hair. The co wash is bomb!! If you haven’t ordered from my girl you trippin!! Threat Set!!!
Ashley: Girl I’m stacking my coins so I can get in your chair one day. Longgg overdue for a mommy makeover.
The Tasters Choice:
TheJanyaNielle: come on consistencyyyy vid after vidd ❤️❤️
Create Diys: Jesus loves you