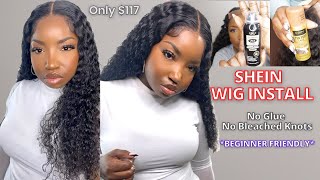
Great Everyday 4X4 Closure Wig Install | Very Beginner Friendly | Ft. Junoda Hair By Sezzle
- Posted on 18 March, 2022
- Closure Wig
- By Anonymous
Hi loves,
If you enjoyed this video please make sure you Like and Subscribe ❤️
**This was a 4x4 closure wig not a 5x5**
Within 30 Days NO Reason Free Return Only for My subscribers Place Order
●▬▬▬▬▬▬▬▬▬♛ #JunodaWig ♛ ▬▬▬▬▬▬▬▬▬ ●
I am wearing straight hair wig in video: https://bit.ly/3weXEnN
https://www.junodawig.com/ ➤HOT SALE wigs: https://bit.ly/3wdWpoH
More Affordable 4x4 Lace Wig Available: https://bit.ly/37G4zw2
hair information: 4x4 lace closure wig 26 inch 150 density
Using Special Code To Get 15% OFF: JA15 For New Costumer Get Extra $$$ OFF
AfterPay & Klarna & Quadpay & Sezzle PAY 4 Equal payment Within 6 weeks!
Can Not Miss!!! Invisible HD lace Wigs available: https://bit.ly/3IhxzXr
New Trending Affordable wig: https://bit.ly/3whVOSZ
Recommend human hair bundles with closure: https://bit.ly/37zw8XH
YouTube @JunodaWig: https://bit.ly/3xborzP
Instagram @junoda_wig: https://www.instagram.com/junoda_wig/
Facebook @JunodaWig: https://business.facebook.com/JunodaWi...
Want To Promote? Order Problem Contact: [email protected]
#junodawig#junodahairstyles#junodahair#straighthairwig#laceclosurewig
_____________________________________________
♡ G E T T O K N O W M E ♡
◦ Instagram: https://www.instagram.com/itslouxoxo/
◦ TikTok: Itslouxoxo
◦ Serious Business Inquires: [email protected]
________________________________________________
♡ P O P U L A R V I D E O S ♡
◦ Story Time: https://bit.ly/3a4R6fr
◦ Nude Lipgloss Combos: https://bit.ly/3s93rFL
◦ Entrepreneur Life: https://bit.ly/2RrfsK2
________________________________________________
♡ P R O D U C T L I N K S ♡
My Amazon Favorites: https://amzn.to/3uHQHYd
◦ Filming Products:
◦ Camera: https://amzn.to/33ZHRJg
◦ Tripod: https://amzn.to/2wSqUV3
◦ Ringlight: https://amzn.to/2URVC8L
I put some ice on my head. Hey loves. Welcome back to my channel for today's video we're going to be doing another um hair tutorial this one's going to be pretty quick because it's a closure - and you guys know how i do about closures. I'M gon na do this little side swoop. I'M gon na do this side suit that i've seen this girl do um. I already showed you guys how the wig looked like in the clip before. I hope i recorded that, but i'm already plucked her and everything, and i already bleached it it kind of already got over bleach so but we'll fix that. So what i'm gon na do is you guys already know? I use my um cream of nature from ruby kisses in the level 15 and i sometimes mix it with the light one, but they do have two different tones. So i'm gon na go ahead and you already know the drill. So i don't really have to like. Be explaining stuff because you already know what i'd be doing well unless you're new, but i'm just gon na put that everywhere um as you guys can see. I just put the makeup on it and i already sectioned off my little baby hairs. Um. Should i cut the lace off before yeah, i'm gon na cut the lace off before i put it on my head because i feel like if i put it on my head and then cut it, it's going to be a little bit janky. So i'm going to do it first, i'm going to use some scissors, but if you are using the scissors, make sure you're doing it like zigzag motion and not just like straight across, so it doesn't give that like wiggy type of look to it. Okay, so i just went ahead and i just cut it off now, since i'm not gon na put no cap on or anything i'm gon na make sure i make this a little bit more secure. I already have the black band in there dirty included that in there, but i'm still going to go ahead and um attach these i'm going to connect these together and then i'm just going to sweep these okay so um. I'M gon na kinda like twist her a little bit to the side because i want it to be like a true side part. Why is it so bumpy yeah? So i want it to be a really like good side part. So i'm gon na just screw her, because i think this is like a five by five closure, so i wanted to see see it's still not gon na sweep the way that i want it to so. I'M gon na go ahead and and just keep moving this until i get it to the place that i wanted to so like. This is all right, you guys, so i was just kind of figuring out how i was going to um like swoop this down, but um it it's still a little bumpy. For some reason, i'm not sure why, like one side, is a little bit bumpy and it's probably because i didn't lay it late, how i needed to lay it got to make sure it's not too far. So now that i got it where i needed to i'm gon na go ahead, let me actually do my baby hairs, because this is actually getting in my way. So i'm gon na go ahead and cut here. I'M not gon na go ahead and go in with the foam. I'M gon na just use the gods to be instead, because i don't want it to leak out my makeup and i'm gon na go in with um a little bit. Spray could be any spray, but i'm gon na go with the eben um. The yellow can - and i'm just gon na pass this on top, not gon na spray directly, because again, i'm not trying to mess up my makeup, and this is just supposed to secure the lace just a tad bit since i am gon na be like brushing it Back um i'm gon na go in with this um hair wax stick just so i can make sure everything lays how i need it to because there is a lot of flyways like. I want this to be like a sleek type of ponytail, but i don't want not ponytail like side soup, but i just don't want it to be like too um is now. I'M not sure if i want to keep it like this, because, like this, it's still pretty it's still pretty cute like this, but i kind of wanted to try this side swoop. What do you think should i leave it like this, or should i try to do the suit you like it like this, like? What do you guys think like? This is how it look like? Well, that's how it would look like if i leave it like this or should i just leave it and have it like this, but i feel like like this she's going gon na be in she's gon na be annoying she's gon na be annoying still sideways. Let'S bring her forward like just go ahead and just play around with it like. I said it's no like big, nothing too serious, so um, and then i kind of want to take this. So it doesn't move around. I want to i'm gon na go ahead and take a rubber band and connect it to a little piece of hair in the back and that's just gon na help. So i'm gon na connect the band part two, like i'm gon na, take a little section in the back and then i'm just gon na connect them, and this is just gon na help it and stay a little bit more secure and not move around too much. Like i said, if you guys want it a little bit more secure, you guys can go ahead and just put the spray on it, but me i don't. I didn't want it to be too um too secure. I just want to make it look like i just swooped my hair in the back. Okay, and this is how she's looking like and then by. Oh, i probably should have done like a black rubber band, or did it a little bit further away because you can kind of see it i'm going to come back and then i'm going to flat iron in a little bit, i kind of already flat ironed the Hair, but actually before i go and fix it, let me go ahead and cut the ends, because this is 26 inch, but the ends are a little bit on the thinner side, so i am going to go, go in and cut it. You guys already know the drill, okay, so went ahead, and i just cut the end just to make it a little bit more fuller and i'm going to go ahead and fly in the rest. And then i'm going to come back and then show you guys. The um, the final look of how everything looks like all right, you guys, so what you guys just seen me do is. I just went back in because remember how i told you guys, i kind of um over bleach the um knots a little bit. So i did go in with some black um. I went back with some black knot, liners some jadora off black and then i just put it on the fixed apart a little bit. I don't know if you guys can tell and um i actually did not use the rubber band method. I actually did um just use a little clip to just clip it on the side, so it doesn't necessarily like budge too much, but it still turned out pretty cute. It was just something really simple: was it something that needed like a full-on tutorial tutorial? So it was just pretty quick, but this is how it looks like, and this is with the 5x5 closure - and this was a 26 inch from the company junato. I don't really know how to um spell the name like that. So i'll put it on the screen and you guys will see me showing you guys the name and everything in the beginning of this video, but thank you genada for sponsoring today's video. Let me know what you guys think about this style: she's, pretty cute the lace blended, how i needed it to blend. I'M gon na go ahead and take some cute pictures, because i am on my way out, but i hope you guys enjoyed this quick little tutorial. That i gave to you guys, let me know what you guys think all in the comments down below. Let me know if you guys would wear this style um make sure you guys like comment and subscribe and i'll see you guys in my next video bye man. You


Comments
Naturally_kayy: Love it! You inspired me to try it out
junoda wig: so pretty Dolls don't forget to use her code to shop~
Akada Geroge: Beautiful
Dee Luther: Love Your Video BreAthtaking thumbnail tho Sooo Damn Gorgeous u are Ur Makeup always on Point Cute Ass eyelashes tho Happy Fabulous Weekend Too Be Bless N Stay Safe Always
Sammy Da Goat: Second Comment Lovely Thumbnail Stunning Unit
Unknown: Okay but what is this mixxxx??! Loved the tutorial! ♥️