How To Install Microlinks At Home! | Diy Beginner Friendly Install Ft. Curlsqueen
- Posted on 08 October, 2022
- Headband Wig
- By Anonymous
OPEN ME
▬▬▬▬▬▬▬▬▬▬▬▬▬▬▬▬▬▬▬▬▬▬▬
Use Code JDYT to save $$$ OFF
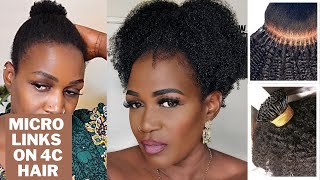
I am wearing 20 inches microlink itips in Water Loose Curly texture from CURLSQUEEN .
Shop the same #waterloosecurly #microlink #itips #extensions #braidlesssewin for #naturalhair
https://www.curlsqueen.shop/91e9967d
√Ultra Full Set-300 Pcs-300Grams
√ 100% High Grade Brazilian Virgin Human Hair
√ True To Length
√ Suitable for 2C/3A Hair Texture
√ Thick & Full From Top To End
Connect with Curlsqueen :
Instagram: https://www.instagram.com/curlsqueenof...
Tiktok: https://www.tiktok.com/@curlsqueen.com...
▬▬▬▬▬▬▬▬▬▬▬▬▬▬▬▬▬▬▬▬▬▬▬
Let’s stay connected!!
Instagram:
@jasmyndestine
https://www.instagram.com/jasmyndestin...
THE DESTINEE SHOPPE:
https://www.destineeshoppe.com
Twitter:
https://twitter.com/JasmynDestine
Please LIKE MY FACEBOOK page:
https://www.facebook.com/makeupbyjasmy...
Jasmyn's AMAZON Storefront:
https://www.amazon.com/shop/jasmyndest...
Videos I watched for reference!
Lovely Bryana Microlink install:
Informative breakdown on the microlink process:
POPULAR LINKS:
HOW TO DO YOUR OWN BUILDER GEL NAILS AT HOME | BEGINNER FRIENDLY
https://www.youtube.com/watch?v=ntQsnP...
SUPER EASY POLYGEL TUTORIAL:
https://www.youtube.com/watch?v=kI2RPg...
POLY GEL NAIL TUTORIAL FOR BEGINNERS:
https://www.youtube.com/watch?v=iWiHxR...
~DISCOUNT CODE$ & LINK$~
MAKARTT.COM (GEL & POLYGEL PRODUCTS)
USE CODE "JASMYN" AT CHECKOUT FOR 15% OFF
https://makartt.com/?ref=jasmyn
MUSIC:
https://www.epidemicsound.com/referral...
*Disclaimer:
Some links above may be affiliate links where I do receive a commission off of any sales made through my link. You can always chose to not purchase through my link!
FAQ:
Age: 25
Location: Los Angeles, CA
Ethnicity: Black/Hispanic
Camera: Canon G7X Mark ii
Editing software: Final Cut Pro X
Hello, everyone welcome back to my channel hey this. Is your girl, Jasmine the scene if you're new here, if you're returning, hey girl, hey, what's up what's up, what's Skye we're back with an old video, you guys this one? Obviously, you see the title of the video in the thumbnail, so yeah this one's gon na be a good one. I don't know. Obviously I haven't done my hair yet so I don't know what to expect, but it's gon na be interesting and it's gon na be a fun wild ride. So if you guys are excited for this, video then obviously make sure you keep watching shout out to curls. Queen girls, Queen we're sponsoring today's video, I'm gon na, actually be installing my own micro links eye tips um, whichever you refer to them as, but I'm going to be installing them on myself today you guys know I'm DIY clean. I mean I looked into getting of them professionally installed, but that price point is just a little high for me. Right now and honestly, I feel like it's something that I can do by myself. I'Ve watched a ton of YouTube videos. I went to YouTube University and yeah, so we're just gon na tackle this on our own at home, DIYs with yourself, okay, DIY, Jasmine, DIY desk scene, okay yeah! So if you guys are excited to see me and saw my own, my own micro links um then make sure you keep watching, don't click that subscribe button and join the tribe at any point throughout the video. I love you guys and yeah. Let'S just get right into her inside of your beautiful gold: silk curls Queen bag you're gon na have a little like mesh baggie. This is actually super cute um, but inside of here is going to be all of your tools that you're gon na need. In order to install your micro links, there's a curls cleaning brush so funny, because I already grabbed the one I already have. The name has like kind of rubbed off. I use this all the time um, but I grabbed that to use but yeah you're gon na have a new one in your little kit. You'Re gon na have some claw Clips. These are so cute, they're, blue and then a comb literally everything you need like. I grabbed some of this stuff, but I just realized like I'm. The kit is going to come with everything that you need in order to install them at home. So that's perfect. There is a plier set of pliers and then the little beads that you're going to use along with the hoop loopy thing you guys will later on find out what that does these little like velcro things are to keep your hair like sectioned, away and parted away From each other and then there's a bonnet, they always send a little Bonnet super cute. So that's everything that comes in there and then, of course, you're gon na get your hair. I'M gon na have the specs for the hair on the screen, because I don't remember the exact length or how many grams I have here. So this is how much hair it smells good though it smells like it's freshly shampooed, which I like um. Let me take one of them out of the bag. If you guys remember my tape-ins video that I did a couple of months ago with curls Queen, I had like a tighter curl texture. It was like a deep curly and, although, like I made it work, I felt like the curls were a little little bit too tight for my natural, like curl pattern, I felt like there was more of a distinction, so this time around, I asked for a looser Curl still curly hair, but it's definitely a looser curl. It'S a bit bigger and I just I just think that this is gon na work better. For me, I've watched a couple of videos. I was watching my girl, lovely Brianna. She recently installed some micro links on herself and they looked really good, really natural, so I was watching her videos and a couple of other people, I'll link them down in the description box for anyone else who wants to check out which videos I referenced last time. I installed the Titans on balloon out hair, but this time I'm going to be installing them. In my natural texture and my curly hair, I washed my hair yesterday and just threw it back in a slit sponge like a little bit of gel. But honestly, that's not bad, like it's still damp, because I washed it last night yeah and if I can't do the back, I'm gon na be calling for assistance. I will literally call Mona up too difficult, but I'm just gon na start off by creating my sections. Yeah, so I wear my hair in a middle part. That'S like very standard for me. I'M also going to switch to doing a voiceover, because I need to listen to music. While I do this okay, so I'm starting out by sectioning my hair in four. So I split it all the way down the middle and then the two half pieces, I'm splitting down the middle as well I'm a little tongue-tied, it's a little early for me um, but yeah I'm doing this so that I can obviously be able to split it Down the middle, if I need to like into braids or two ponytails or whatever, or if I want to be able to do a half up, half down, which I know I'm going to want to do so, that's why I'm splitting it in four sections - and it's Also, just going to make it easier on me with installing these micro links on myself so yeah after I did that I'm going in and I'm sectioning out my edges and I'm going to do this around the whole perimeter of my head. But I'm just showing you this front section here, because that's what we're working with right now, I'm using! I first used my finger, but then I was like girl use the comb so using the comb, the rattle comb, to make sure that you can't see it through. If you check with the rattle comb, you can still see it. You got to take more hair out sis, because then that means that your beads will be showing. So did that section - and this is obviously so that I can put my hair up in a full, ponytail or bun. If I choose to do so, um micro links are basically like a braidless sew-in. So I want to be able to do all of these Styles because I'm probably going to have them in for a while and yeah um. So I'm sectioning out this front section checked. It did not pass the comb test, so I went back in and I'd take more hair out checked again it passed so now I can. You know twist that back section up that we're going to be working with for a minute, so I can braid this down and then we can start working on things. I just ended up braiding the two braids together and then just clipping it towards the back. For later, okay, so this is the section that we're working with this is the loop tool that we're going to be using. These are the beads for the micro links and the pliers that all come in your kits, I'm going to section out this first row and I want my parts to be straight, so I'm making sure to be, you know, try to be as crisp and specific as Possible, let them take that little velcro thingy and that really really helped with sectioning my hair out and like keeping the hair away from each other um. And then I'm loading up the loop tool with as many beads as can fit and then I'm taking the first bead. This is the first time I was doing it slide it on. I kept this in because I messed up and I wanted you guys to see how I messed up, but I went ahead and I put beads down the whole row. The sections that I was grabbing in this first row were actually too thick. There was like too much hair, so the bead fit on, but once I went to go and slide that first eye tip in the hair actually pushed the bead like apart. So if you look at the beads closely, there's actually a rubber on the inside of the bead, that's what protects your hair from getting damaged with the eye tip being squeezed together with the pliers, so I had to take off the beads and start um start again. I needed a thinner row so if you're trying to stick your eye tip in and it's not fitting because you have too much of your hair within the bead, then it's going to separate. So it's easy to put it back together. But that was just something that I obviously learned from the gym, because I I did it wrong as soon as I started, but you guys can learn from my mistakes. So I had to split. Take those beads off and split the section in half and then try again, and I did it right so I will say that this was like super easy to do. I feel like, if you're, not someone who typically like, does your hair or you don't really know how to do hair, but you feel like you're, confident in following directions: you'd be able to do this. I think two friends could do this on each other easily. You know two sisters, a mother and a daughter like honestly, if you've ever wanted to try micro links and you think that it's like something that's really hard. It'S honestly not. I found this to be easier, like the method than tapings, because, like tapeans, have to be placed a certain way on your head, so that you one don't see them because they're whole tapes and also so that they sit comfortably on your head. These, I feel like a lot more hidden, and I mean you just have to like know how you want your hair parted so that you don't see them and I feel like you could do them. It'S really not that hard. I was surprised because I thought I was gon na - have a hard time, especially when I got to the back of my head, but it was. It worked really well, so that was my first row flipped it up. One of them was a little bit too close to my scalp. So if you place it too, close too close to your scalp you're gon na feel like a slight tension, so you can actually unsqueeze it slide it down. Squeeze it back um, which I ended up doing, but this is me doing the second row and after that I was like okay, so don't put them too close to your scalp because then, obviously, when you flip them up or they move around or you try to Lay on them or whatever you're gon na, feel it it's going to be uncomfortable. This is me, showing you guys up close, so you see how small of a section I'm grabbing like you want it to be enough hair to where the bead slides on doesn't move around. But you don't want it to be too much hair to where the eye tip doesn't fit in and then you just slide the eye tip in take the pliers and squeeze it together and it squeezes really like really easily. I was like being extra hard in the beginning for no reason: it's the slightest little pinch and then it's good to go and it's literally not going anywhere um yeah and it was so simple. I was so surprised and I was like wow. This is gon na. Look good, like I'm, actually really impressed, so I did that whole. You know. First, section worked my way all the way. Up to my middle part, you want to obviously leave a section closest to your middle part like a row or two. I left like two rows with no micro links, no beads, because you want to be able to not see them all the way up into the park, and you want the hair to be thick enough to where, when you flip it back over, it's hidden which it Was which I was so happy about um so yeah? This was the first section. Look at all them beads, look at all the micro links. It looks really good. I was like whoa. This is gon na be fire like once I do my whole head. It was just time consuming this first section loaded six hours, two hours, Benson being a big old baby. Look at him. He wanted cuddles when I, when I'm working for like too long on my computer on my desk or whatever he literally comes and he's like. Did you forget about me like he just wants to cuddle? So that's what that was um, but I took out that I flipped the top section over. So this is my middle part still got my edges braided away, but it looked good. I was like wow, I'm actually so impressed like this is something I can get with: okay and then yeah. This is what it looks like if you part it through the texture of the hair, matched my hair perfectly. My hair just brushed out um. This was my hair versus the micro link, so you could see the difference like it's not like you know your girl had all this hair. I have hair, but not that much hair. It literally took me two days: well, not a full two days, but it took me the day. I was working on it and the following day to finish these, because I needed to take a break. My arms were on fire and it was just a lot like it felt like just a lot of work. So this is my whole head with micro links front and back so now. It looks good here because it was like all like frizzy and brushed out and not defined, but as I really started to look at my hair, I was like uh. I feel like I'm gon na, have to cut my hair to match these extensions and not just cut my hair, but also cut the extensions to match my hair, because my hair is like somewhat layered but also like grown out. But I needed to see like the real shape, so I was like well first, let me wet it and apply products, so I can see what I'm working with. So I can see how the curls blend with my hair. It was literally the same texture, but once I started to wet it, you could really see that my hair was just so blunt and it just wasn't blending and I was like I don't like it. It was like as soon it was like as quickly as I liked it. I disliked it so then I was like you know what we got ta give her a cute little cut, I'm not a hair stylist, I'm not a hair technician girl. I don't know what I'd be doing half of the time. I just be doing it. You know, and it's my head and after I got to walk around looking crazy. At least I could just be mad at myself, but I feel, like I end up, usually figuring it out. I have been cutting my own hair since, like I don't know forever literally um, so I just started hacking away. So don't necessarily take this for how you're supposed to do things, but more so just watching me try to figure my ish out, because I wanted it to look good. I was like you know what I'm okay, if I don't retain all of the length that I had, because, although I wanted it to be like longer, I wanted it to look good. That was the main goal. I wanted it to look good. I don't want it to look, you know crazy and it was looking crazy. So I was like you know what let me pull up my Pinterest board and I looked at some photos of like you know the ideal cut that I would like, and I was just trying to mimic that on my hair using you know that as inspiration and Just kind of going based on what I know I like layered, big curly hair. This is what I came up with. I was like. Let me go put some more products in it and really Define these curls and come back at you and yeah. You guys yo girl is all done. Oh my God. This literally took me two days to execute, but when I tell you these results, I mean it's cute as well like it's mad cute, I'm so happy with the way that this turned out, because for a minute there I was scared. Okay, I have very like dense hair and I just feel like it's like a lot in volume. So it's hard for me to get really long extensions to blend just because of the length that it's at right now, maybe when it's a little bit longer. So you know we got a little scissor happy, but I'm so so freaking happy with this result because, like it's a little bit longer, but it has Shades and that's what I needed because, like my natural hair, had no shape like, I definitely needed a cut because My hair grew up from when it was like chin length and now it's like collarbone length, so it was kind of just all like one and it wasn't giving, but the extensions the micro links added in I just have so much more volume like. I literally have a Pinterest board: that's like curly afros, like big curly, just big curly hair and I've wanted a cut like that for a while. Now. So I'm really happy that I was able to achieve it with my links like in the back of my head by myself, like it just looks so freaking so freaking happy. This is so cute. I kind of wish I had this at the beginning of the summer because I probably would have just had an envelope summer, but better late than never, I'm obsessed it's the hair. For me, it's gon na be the hair for me. Curls Queen did that these curls are bomb the texture I'll have on the screen, but then also listed Down Below in the description box with a discount code, for you guys so make sure you check out the description box check out curls Queen their hair is Bomb Like literally this texture, this curly texture was perfect. It'S like literally perfect cut me a little bang like I've been wanting a curly Bang. Oh I'm so happy. It looks so good like it looks so good, and then I just like did like a really regular soft Glam. Look, it's nothing too crazy. I started wearing eyeshadow again and eyeliner, which is like major for me, because it was a solid chunk of time where I was literally not doing any kind of eye look, but I'm loving this she's very cute. If you guys want like a tutorial, maybe I'll do one for Instagram and Tick Tock like Instagram reels, make sure you follow me on both of those platforms. I'Ll have those on the screen. Oh, my final thoughts on micro links aside from me, absolutely loving the outcome. I think that they're actually easier, the the actual method of applying the extension to your hair is easier than tape ends for me and then also, I feel like tape means I don't know, obviously, because I just installed them what the wear is on the micro link. So I will keep you guys updated on that, but the tape ends did rip out some of my hair when I took them out. So hopefully that doesn't happen with this um. With these micro links, these eye tips. It was just very tedious, like honestly, installing the micro links was so tedious, like it was so time consuming. That'S pretty much it, but I think it was actually easier for me to do on my own, like I thought I wasn't going to be able to do the back of my head, but actually I did it like pretty easily if you guys enjoyed today's video, then Make sure you give a huge Thumbs Up Down Below, go ahead and smash that subscribe button and join the tribe? Okay? I love you guys so much. Thank you so much for watching this video. Don'T forget, you are smart. You'Re, beautiful and people love you. I love you and I can't wait to see my next episode bye. Thank you.

Comments
Shaneice Crystal: The end results BOMB!!!!!!
April K: I’m going to try this !!! Because I can’t braid for my life and I think I can do this. Also, you did really good I would’ve thought you went and got them done. I tried to do tape ins and it was horrible Can you also do maintenance video on when you need to tighten the links and how to remove them when you think your ready to take them out.
CurlsQueenofficial: Love this look sooo much!! Thanks for the sharing.
Emily Hammond: Wow! you did a great job! Your hair looks nice!
Taryn Davis: I’m so inspired!!!! I needed curly hair inspired❤️
Billie Hicks: My hats off to you for your patience and your ‘know how’ to do challenging task.
Dre Day: This looks so NATURAL Love
Dori Darling: Jas your diy’s are perfection and your i tips came out beautifully. I’ve been watching so many stylist install the i tips but as you mentioned, that prices are not so cute.
Jill Ransom: You did a really great job! Like when you had the pineapple and you turned around not a link in sight! will def have to try this
Kayla Cooper: The hair turned out great. I hope to try this out soon. By the way, the background music was jamming
Family Guy: Boy oh boy are you daring! One thing your very good at this it came out great. I love that you try all these things on yourself that everyone pays hundreds of dollars for.
Johnnel Adderley: Jasmyn D.I.Y Destine, yassss honey, love it. You did such a fantastic job with the Micro Links installation and the cut, I'm so impressed. Well done sweets, you did that!! Great video honey, thank you so much for sharing. Take care and enjoy the rest of your weekend .
Nina Negedu: Hair looks bomb af❤️
Alexis Hope Vlogs: This turned out so well!!! For a minute there I was scared with you
Taryn Watson: Yassss girl, love the results!
DefinitelyVivian: this looks so good WHAT OMG ❤❤❤❤❤
Banele Mpangase: She has alot of patience with her hair
Jahmisha Colston: These are cute! How do you compare the i tips to tape ins?
Bicana: That loooks amazing!!!!!
brigitte cavanagh: LoL I already bought my straight hair hope it looks good after
Héva 🦢: Girl you need a 360 mirror with lights from Amazon if makes everything so much easier
💰 Make $750 Per Day: "It is better to fail in originality than to succeed in imitation." **Herman Melville
Kristen: FINALLY JASSS!!!!!!❤️
Taylor: You really ate this up!
A GIRL.: i love your videos so much
mosana berhane: are the tapes and this hair reusable? btw u slayyy always
brigitte cavanagh: How did you do the back? just by touching and you knew? Mine are straight and I will try it, I will have to do the back as well.Your hair when you are already with eyelashes looks very very nice. Fantastic
TiahLovely: Where did you get this hair I need this???
Fati Zahra: Hello ♥ انتي رائعة
mazarrah fortunato: na nfs, you did that!
Penelope:
bethany burton: you was scared? i was like a shit! 2 days gone but that cute
Sheamber: Firstttt ❤ hiii
Fitzroy Miller: Hello Hello babes