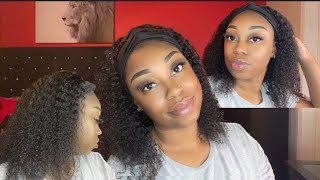
How To : D.I.Y Box Braid Headband Wig | How To Make A Headband Wig | Ft Union Beauty
- Posted on 31 January, 2022
- Headband Wig
- By Anonymous
Hi, thanks for watching my video of me making my own Headband wig using crochet box braids !
Thank you so much for taking the time out to view my video. Please like the video, leave a comment below and Subscribe if you haven't already!
TIMESTAMPS
0:00 Intro
0:36 Items needed
2:00 Sewing headband to net
4:00 Crocheting box braids
Music played:
Music by Brentin Davis - Flint Story - https://thmatc.co/?l=1A434F14
ABOUT MY CHANNEL
My channel is about Hair. I Also cover lots of cool stuff such as Natural Hair, Hauls and DIY's
Check out my channel here:
https://www.youtube.com/jessknotty
Don’t forget to subscribe!
CHECK OUT OUR OTHER VIDEOS
GET IN TOUCH
For Buisness inquires please contact me on [email protected]
FOLLOW US ON SOCIAL
Get updates or reach out to Get updates on my Social Media Profiles!
Instagram: @JESSKNOTTY
TIKTOK: @JESSKNOTTY
knotless braids,jumbo knotless braids,knotless box braids,large knotless braids,large knotless box braids,diy knotless braids,knotless braids tutorial,how to knotless box braids,jumbo knotless box braids,how to do knotless braids,knotless braids on yourself,knotless box braids on yourself,knotless braids large,how to knotless braids,box braids,how to do knotless box braids,knotless braids for beginners,knotless box braids on natural hair
knotless box braids,knotless braids,parting for knotless braids,knotless braids tutorial,how to part hair for knotless braids,knotless braids for beginners,box braids,how to do knotless braids,perfect parts for knotless braids,braids,how to part knotless box braids,pre parting for box braids,small knotless braids,jumbo knotless braids,knotless box braids tutorial,how to do knotless box braids,pre parting for knotless braids,parting for knotless box braids
diy hair mask,hair,shout out to my ex,hair mask,dry natural hair mask,bentonit clay mask natural hair,1 minute hair mask,clay mask for natural hair,ski mask the slump god,aztec clay mask natural hair,aztec clay mask hair,thick natural hair,1 minute hair mask garnier,how to natural hair,i used the aztec clay mask on my skin,how to revive damaged natural hair,natural hair,how to grow long hair,ski mask,face mask,how to retain longer hair why your hair isnt growing,growing long hair,growing,growing natural hair,why isn't my hair growing,tips for growing hair long,growing long natural hair,growing natural hair long,tips for growing long hair,tips for growing hair fast,why your hair isn't growing,growing out my natural hair,tips for growing hair faster,growing longer natural hair,blowing out hair,tips for growing natural hair,growing thicker natural hair,tips for growing my natural hair healthy,healthy hair,healthy afro hair,growing healthy natural hair,10 tips for growing healthy natural hair,how to grow healthy natural hair,health,healthy natural hair,growing,grow long healthy hair,growing long natural hair,long healthy hair,healthy natural hair growth,healthy hair tips,healthy grey hair,healthy relaxed hair,healthy hair journey,health (industry),growing natural hair,why is my natural hair not growing 4c hair,4c hair growth,how to grow long 4c hair,4c natural hair,4c,grow healthy 4c natural hair,grow long 4c hair,long 4c hair,growing 4c hair,how to grow 4c hair,4c hair growth tips,growing 4c hair longer,growing 4c natural hair,4c natural hair growth tips,why your hair isnt growing,why your hair isnt growing 4c,growing 4c natural hair fast,growing natural black hair long 4c,4c natural hair not growing,long 4c natural hair,how to grow 4c hair fast kinky hair,kinky curly hair,growing natural hair,stretching kinky curly hair,kinky,kinky clip ins,kinky curly clip ins,kinky curly hair stretching method,kinky coily hair,kinky hair styles,hair products for kinky hair,affordable kinky curly clip ins,reason why your hair isn't growing,glory okings,grow long hair,thinning edges,grow long 4c hair,grow 4c hair long,grow natural hair without protective styling,protective styling,grow type 4 hair long
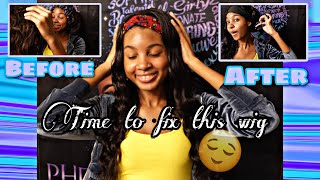
Hello, everybody and welcome back to my channel, it's your just knotty and today i'm going to be doing a headband wig, so i will be needing my mannequin head and my wig stand. If you guys don't have one go ahead and purchase you one, this wig stand is everything. It'S definitely came in handy for me. You can maneuver it, however you'd like, and you can tighten it to your liking for extra stability to get started with this headband wig. We are going to need this weaving set. It has a needle and a thread we're going to need this headband wig. It doesn't really matter what color you guys go with, but i went with this one. We'Re also going to need a wig cap that has a mesh net on it. To me, this is easier to use when crocheting, of course, we're going to need a crochet needle we're also going to need these t-pins mines came with the wig stand, but you can also purchase this on amazon. Last but not least, we're going to need a few packs of these box braids crochet. Here this hair was sent to me from a store on amazon. I will have the link down below. There were a total of eight packs in each pack had about 18 strands of braids or pieces of braids. These braids are natural. Looking soft and they're 30 inches in the color 1b to start off, i'm going to put the fishnet on top of the mannequin head and then put the headband below it. Now i did flip the headband wig inside out only because when i get done sewing in the crochet hair, it will help conceal it when i flip it over. It doesn't make sense now, but you guys will see later to help the headband wig stay in place. I'M going to apply t pins in the front and in the back of the headband i want the headband to be real close to the fishnet so that when i start sewing, i won't have to put too much effort into sewing and everything will be right next To each other, when i start sewing, i'm going to take the tip of the headband and the tip of the fishnet and sew that together, i'm not going to start at the middle just a tip. I'M not an expert at sewing. You guys, but whatever i do, gets the job done. I always tie a knot when i first start sewing and then i continue on doing basic knots throughout the entire head. All right, you guys i'm done sewing. This is what the entire mannequin head looks like. Now that i'm done sewing the headband to the fishnet, we're gon na go ahead and start crocheting. The crochet braids onto the fishnet, i'm gon na hook the crochet needle to about three of the holes, and then i'm gon na add on the crochet here and pull it through. It was not hard to pull it through the holes. It actually went by pretty smooth one thing that i can say, though, is that i made the mistake of starting too far up. I should have started along the perimeter of the fishnet, so when you guys are making a headband wig, please don't make the same mistake that i did. Hopefully, you can learn from my mistakes when i'm crocheting the braids, the first row are going to be close to each other, but all the other ones are just going to be slightly scattered, and i know this fishnet seems pretty thin, but it's very tough. I was pulling and tugging and none of the fishnet pour at all, i'm completely done with the entire back. It looks real full i'm going to show you guys what i was talking about previously when i said i started too far up, even though it looks like everything is nice and covered when you lift the hair up, you see all of this gap. I wanted a gap in the back, but i didn't want that much of a gap, because when i lift the headband up, it's still going to be a lot of the fishnet showing i'm gon na continue, crocheting and filling in the gaps and i'll come back. When i'm done crocheting, this is what everything looks like now that i'm done with the perimeter of the hair, i'm not going to add any crochet here to the middle. Only because i'm going to be wearing this in a ponytail and if i add hair into the middle, it's going to look a little bit too bulky. But i'm going to go ahead and put the hair in a ponytail just to see. If i have any spots that i need to add more crochet hair to, as you guys can already tell by the looks of it, there's a lot of net - that's showing. I was actually better off just put in the crochet hair all over the head, but i'm just gon na lift the headband up just so. I can see what i'm working with and those little gaps that you guys see. I'M just gon na go ahead and add some hair there. When i do put this on my head, i am to have to finesse this and make sure i pull the net all the way down. The net is pretty stretchy, so i will be able to pull the net all the way down to where the crochet does start for those little gaps that you guys see in the back and some in the front, i'm going to go ahead and add the crochet Hair now my hair is a darker color, so it's going to blend in so you won't really see much of the fishnet, but i'm going to try my best to cover up as much of the space as i can. So i'm just about done filling in the gaps and what better time than to accessorize. I have a few of these headbands that i'm gon na put on to the headband wig. Now this first one was a little bit tight to put on after struggling and it justin it did fit over the headband, the original headband perfectly. Next i tried this next. I tried this satin scarf. This was one of my favorites when styling this headband wig. This is the end of my video, you guys. To be honest, i almost didn't post this video. I was actually gon na delete all of the footage, but i decided to keep it not only because i didn't want to waste my time and hard work, but also because, even though i did make a few mistakes, it was something that i could learn from and As well as something that someone else can learn from, i hope you guys like this video. If you did go ahead and leave it a thumbs up, if you guys have any questions, leave it down below and i'll try my best to respond in a timely manner and don't forget to subscribe on your way out. Thank you guys for watching this video and i'll see you guys next time.


Comments
Safani Ooft: I loved the explaining where it went a little off plan, i learned a lot. I m half way with my first wig and know now how to go from here, thank u for not deleting !
xxElijah The Slayer: Great job!
Laura Baillum: I love it
Lifewitqueen P: Wow the hair look really good and full
Steph Eats n Travels: Digging the headband!
Kelvin9916: ❤️❤️❤️❣️
Marilyn Samuels: You did a goid job
blush baby: I wish she could have shown braids down