Yor Forger Wig Styling Tutorial
- Posted on 15 May, 2022
- T Part Wig
- By Anonymous
Cosplay Pattern on Etsy: https://www.etsy.com/listing/123210201...
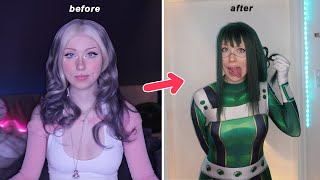
Here is how I made the wig for my Yor Forger cosplay. You can see how I made the bun at the back and also how I cut the fringe straight. Next time I will be showing you the final reveal.
Pattern Shop https://www.etsy.com/shop/Aliceincospl...
Early access to patterns, previews and extra content: https://www.patreon.com/aliceincosplay...
Instagram + TikTok: @cosplayalice
Music from Epidemic Sound (affiliate link): https://www.epidemicsound.com/referral...
Find cosplay ideas, tutorials and patterns at https://www.aliceincosplayland.com
Contact ➤ [email protected]
Nope nope nope huh, this one was it welcome to cosplayland. I am alice, and here i am yet again styling a new wig and yes, the spicy amount of wigs. You have seen. I actually don't like greek styling so much so i just do my best. I'M gon na try to use as little items this times as possible because i want to make this one quickly and i happen to have this black wig in my stash from a project i never finished. It is a little bit short, but it's what i have right now. So if you are doing this week, i recommend you to do something a little bit longer and just make sure that there's a lot of hair on your wig. So you can be doing those buns at the back. I wasn't planning on recording this tutorial, but i got a request from china on the comments asking me to do it so shout out to her, because otherwise you wouldn't have had this tutorial. Let'S get started, as always. I started by putting my wig on my hair stamped. I have this head and i have not where my forehead ends and where my eyebrows are. This is going to help me visualize how long i need to cut my bangs. Otherwise, i wouldn't be sure of where i'm cutting. I could be too long or too short once i am ready, and i know where it has to be: i'm just gon na pin it in place to make sure it doesn't move, make sure you fill the gap at the back with some paper. So your wig is going to be fully stretched and you won't have any surprises later when you try it on and it becomes too short add some pins to the sides as well and you are ready to start the style in the wig. Maybe you have the same problem as me. My greek stun is just a cheap stand and it just falls all the time and that's not ideal when you are styling your wigs, so you want to use some weights at the bottom. This is gon na help stabilize it and it won't move as much. It will be much easier and it's a game changer. So if you have anything, even if it's just like some sand in a bag, just put it at the bottom and it won't move anymore. That'S it well done when you are styling a wig. The first thing you want to do is make sure you comb it very thoroughly, so there is no tangles anywhere and it's as straight as possible. This is going to make your life so much easier later. If you have any of those pins poking out, just make sure you put them flat against the wig, so you don't get them out with the comb, and i'm just gon na be brushing these until it's completely straight once you have sorted your wig, you wanna part. It into sections which are gon na be the different parts that you have to work with with your wig. In this case, i'm going to be doing a part for the fringe and one for the long sides that she has and the last one is going to be the backbone so just use. One of these comes with a long end to help you separate the different stunts just make sure again that they are as straight as possible. Comb them very well and use some clips to separate them. Drawer has longer sides, so i'm just going to be separating that part as well again, you just want to combat and just make sure all the hairs are going in the right direction and then just add one of your hair clips to the sides. So they are in different parts from the back and they are not going to be tangled when you are working with them. I'M going to be working first with the sides, so the first thing i want to do is make sure it is very straight. You don't need anything fancy. Just a hair dryer will work. What you're doing is you're heating, the fibers, and you are letting them know that you want them in a different position. My hair is a slightly style, so it looks like it's going inwards, but i want mine completely straight, so the heat is going to help me achieve this. Once you do this, you can see that this side is much longer than the other one, because the effect of it being straight makes it look longer, which is great, because my wig is already short, as it is once you're happy with it. I'M just going to be applying a little bit of hairspray and i'm also applying a bit of hairspray to the back, which is the next part that i'm going to be doing. What you're doing with these is just making sure there's a fine layer of hairspray. That'S keeping your hair together. So when you work with it, it's not going to go everywhere and it's going to slightly stick together, i'm starting with the hairstyle on the sides and the back, and i decided to do a plate on the side to make it look more interesting and what i'm Gon na do is just divide, my hair into three sections and i'm gon na cross them. If i was doing a plate, it would be like that, but each time i'm going to add more hair to each cross from the top and from the bottom. That'S gon na make it look more interesting and if you look at the images of the anime and the manga, it looks like there's something going on there. Sometimes it appears sometimes it doesn't, but i think it looks super cool and it's not too difficult. Of course, if you are using a longer wig, it's gon na be much easier than me, because mine was a little bit short and these wigs tend to have shorter hair at the bottom. I only need about three or four crosses, and it will be enough. However, it is a bit tricky, so don't you worry, you have to let go and start again because practice makes perfect once you are more or less happy apply a bit more hairspray to help those hairs going in the right direction. I didn't like mine so much so i started over again and i kept trying until i had it in the position. I wanted use your hair dryer to tame your hair because it's gon na help. You move those fibers in the direction that you want comb. A little bit with your hands until you are satisfied with your work. You are not going to be seeing it, but i tried this about six times until i got it in a position that i liked and if braiding is not your thing, you can actually just twist the hair yeah just twist the hair and just pull it towards The back - and it will also create a very nice effect that will work very well with the bone i'm going to be doing later, just twist. It like this and add some pins to the back and place it in the position that you want. This is actually a much easier option and it's very quick to do. I eventually managed to get the braid how i wanted, and it was much closer to the scalp which made for a better result in the end. So once i had that, i only had to finish the braid again. Just three or four passes will be enough and i'm going to be just adding a rubber band at the end, so it doesn't untangle while i'm working with the other half. Remember that you want to keep your style rather loose at the bottom, because you don't want to be showing the mesh of your wig. That is underneath, and these wigs are actually not meant to be doing this kind of hairstyle. So make sure you have something rather good quality, so it doesn't show a lot. You can always help a little bit with your comb and move a few strands to just cover those ugly gaps that you get there. If you have plenty of hair, you could also be adding extra webs to the side to cover those parts. Once i'm happy with the size, i'm just going to join them together with a rubber band, i actually realized later that it would have been a better idea to remove the previous one, but because my braids were a bit short, i didn't i'm also adding a rubber Band to the very end of my hair - and this is to help me - keep all the hair tidy when i'm doing the bun, you can see all those hairs very short from my week. Hopefully, if you chose a longer week, you don't you won't, have this problem. I actually had to struggle a lot trying to get all those up, but i eventually got them working as i wanted. Once again, i'm going to be using my hair dryer and a little bit of hairspray to convince my hair to go the opposite direction. Instead of doing my bone in one go, my hair was too short, so i decided to go a little bit at a time, so i just grabbed a strand of hair and try to pull it inside my braids. So that way it will be tucked underneath and i only have to add a few pins to the inside, so they are not seen to hold them in place. I will do this with both sides before i attempt again to try the trick with the hairband and yes, i agree. Hairpins are very difficult to open. This is actually a pretty cool hairstyle to go out, but we need to do that one at the end. So i'm gon na try again with my hair and i'm going to be once more using a rubber bun at the very edge of my hair and folding it over on itself until it is hidden inside those braids make sure your hair is welcomed and also try And keep it quite tight because otherwise it's going to go all over the place and you will have to start again. This is actually a much better attempt and i only had to deal with a little bit of hair coming out and, as you see, it's actually very easy to get it on place and just attach a few pins to the edges hidden inside the bone. So when you're wearing it, it won't be seen just add as many hair pins as you need and also add some hairspray until you get something resembling a pun like this, not bad. I like using this very strong glue, called got to be because that one will guarantee my boon, won't move, or at least it won't move much. So if you can use the strongest that you can find also any hairs that are out of place, they literally get stuck together to the weak just by passing your hands over them. So it is very useful. Keep going at it until you have something that you like, and finally i'm going to be dealing with the fringe. Yeah bangs are the most hated most feared things for cosplayers, because you can't grow back hair on a wig. So if you mess this part, it's pretty difficult to get it back. This fringe is actually quite long. It almost covers the eyes, so i want to more or less know how long it needs to be beforehand. So i'm just going to be deciding on the length and doing it slightly longer because it's easier to cook more than trying to add later on when you're cutting the hair. Try to get the sharpest scissors that you can find. I'M actually using my fabric scissors. But don't worry, this is a fiber. I can use my fabric scissors on them. Make sure your scissors are vertical and not horizontal like this. This is only useful to get chunks out, but if you are trying to get a natural look, you want to be using them this way, or it will be very uneven when you finish just keep going around with your scissors. It takes some times and some practice, but you will eventually get there, grab small strands of hair and use your previous cut as a reference to keep going and make it all. Even it is normal if it's not completely straight the first time, but you can just go back to it and carry on just make sure to let go every so often and see how it's going. Mine is a bit twisted because i'm trying to show you, while i'm looking at the camera, which makes it more difficult and now what i'm going to be doing before i commit to my final cut, which is going to be slightly shorter. I want to make my bangs slightly puffier. I want to backcomb my hair and make it a little bit messy underneath and then i want to add some hairspray to keep its shape once i have it to a position that i like, i just comb it back and it will be much forwards and it Will also help me see better because when the bang is still slightly away from your face, it makes things a little bit easier in my opinion. So once you're happy just comb it again and i'm now going to check the length of my bags and go back with my scissors to make sure they are all even again. You could stop here, but just has slightly parted bangs and i'm going to try and recreate them, because i can so basically what i'm going to be doing is just using my hairspray again, i'm just going to part the wig in a way which looks natural to How she has that some of the bangs are wider, some of them are narrower. Some of them are spiky, so i'm just going to be placing my hair, where i think it would be on the anime and once i'm ready, i'm just going to be applying more hairspray and try them and see. If i can see with them, which is a very important part with your wig, again apply more hairspray and if you're having trouble with those pointy ends, you can add a little bit of hair, styling gel, which is very useful, but just use it on the very Edges of the hair, so you are not covering the full bang, so this will keep it like very tidy and you will keep the movement of your hair once you are happy, don't forget to apply more hairspray to everything to make sure it doesn't move, and you Will have a lovely week finished, i'm very happy, i didn't get to kill my wig and it actually survived so next time. I will be showing you how it looks with the full dress, which i remind you, it's already done, and you can see the video tutorial on my channel also make sure you check my patreon, because there you can find all the tutorials extra stuff behind the scenes And all the patterns for this cosplay, the dress button - is only available for this month in my patreon, but don't worry because if you are late, you can always go to the shop and get it there as well. If you want to keep up to date with all the projects, i'm doing right now, don't forget to check my instagram, because all the news will appear there first and i also include some mini tutorials and extra stuff from behind the scenes, as well as pictures of My cats, which are very important - i hope you liked this tutorial. Let me know in the comments what you would like me to do next and don't forget to have a wonderful day, and i will see you around next time. Bye, you


Comments
Ale :3: Thank you for the tutorial!! I’m sure it’ll be really useful for my own Yor cosplay!
Alex Cabrera: THANK YOU THANK YOU THANK YOU!! I literally have a convention to attend in a week and my yor wig wasnt styled yet and i found ur tutorial and its honestly the most helpful ever!!
nur: So helpful thank you sm!
🍡sandra kawaii🍡: it was very perfect you talented ❤
Evangelia Cheng (Student OVHS): I love the tutorial
Lau: Nice video, it looks great. Where do you get the wig from? Greetings from Spain :)
ーせんぱい。: can you cosplay komi shouko please ?
ssnekky: I’m sorry, but can you help me understand the braiding? I’ve been struggling for hours trying to get it but I’m not even sure what you were doing yourself /not mad