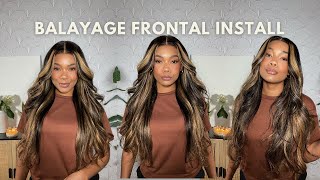
First Time Installing A Lace Frontal | Beginner Friendly Ft Wiggings Hair | $109 Only
- Posted on 18 February, 2023
- T Part Wig
- By Anonymous
Hey loves,
Welcome to another video. In this video I installed a frontal for the first time with a wig from Wiggins Hair.
Hair details: 14inch WIGGINS Body Wave Brown Bob Wig
Direct Link➤http://bit.ly/40XIWOU
#WigginsHair Official Store:➤http://bit.ly/3lt5yq7
More coupons!Join In Facebook Group➤https://bit.ly/3pzwi8e
You may also like:
1.Skin Melt HD Lace Wig➤http://bit.ly/3YV9oXs
2.Top Selling Lace Frontal wig➤http://bit.ly/3IrCcBH
3.NEW V part wig! More Natural➤http://bit.ly/3XA72w4
#wigginsloosedeepwave #wigginscoloredwigs #wigginshdlacewig
Follow Wiggins Hair On Social Medias:
Instagram @wigginshair ➤https://bit.ly/3ILWwdL
Tiktok @wigginshairbest ➤https://bit.ly/38krOfq
Facebook @wigginshair ➤https://bit.ly/3xBqvmj
Wholesale WhatsApp: +86 18339906150 Email: [email protected]
Shop my planners- https://selar.co/m/FacilbyYY?
Book a Consultation here - https://www.iamyeychi.com/brand-consul...
Shop my Presets- http://www.iamyeychi.com/shop/
________________________________________________
Email Address: [email protected]
Website: https://www.iamyeychi.com/
Instagram: https://www.instagram.com/iamyeychii/
Twitter: https://twitter.com/iamyeychii
_____________________________________________________
Important Uploads
Room Tour- https://www.youtube.com/watch?v=5JNS6v...
Gears I use- https://www.youtube.com/watch?v=bSARHb...
Skincare Routine- https://www.youtube.com/watch?v=hKgvxk...
_____________________________________________________________
FAQs
How old am I: 23 years (1st of November )
What do I use to film: Canon M50
Where do I stay: Manchester, England
What do you use to edit: Final Cut Pro on my MacBook Pro
She said: hey loves, welcome to a new video, it's your girl Yeti here and in today's video I'm going to be installing this week from Wiggins hair. This is the 14 inches lace front brown, bob wig. It came with a couple of extra goodies. I have a headband here. This is like leopard print. I can use the style my hair differently. I also got myself a pair of lashes. They gave me this brush that I can use to do my baby hair, my edges for the week or for my hair and of course it came with a headband for me to lay it down, and I use this later in the video to install my wig. Even better, it also came into recap. I love the fact that the wig cap had a close match to my skin, so I won't need so much products later on and, of course, we have a wig bag. Where I can put my wig inside when I take it off now, let's get into the wig properly so like I said this is the 14 inch lace front, Bob wig? I definitely love the color. It was love. At first sight, it came pretty cold, which is good for someone like me that doesn't like her so much or know how to cover very well. I love the fact that the lace was also pre-plugged and guys. Once again, let us appreciate this color. It came with the band to make sure it's secure and also it comes ensure it's secure. So now, let's get into the process properly. I'M simply prepping my way on my wig head. First of all, I'm trying to comb the hair just to prep it before I take it on my head, so I'm not doing too much when it's on my head, I'm not an expert, so these steps are very important, I'm going in with the wax stick. This is just to help keep the hair arranged before I go in with my hot comb, and it also makes the hardcore more effective. So I'm taking my hot comb now and I'm simply going to slowly run it through the frontal part taking the head to the back. The goal is to take it to the back guys, foreign hey guys. So this is me and my cornrows and I'm going to be doing the Bold cap method or at least try to do it yeah. So this is the recap that they gave me. I like the fact that it's not too light okay, so I need to get spray. I'M going to drag it to the front cover my ears. Oh Charles painful cover my ears. Oh well, I look like I'm going to swim. I'M going to be going in with the got to be glue, the spray glue and I'm just yeah it's working and I'm just going to spray it all over. So I'm going to go in my blow, dryer just to ensure that everything dries perfectly nice and hot yeah. So I feel like now it has dried up or do I feel like the sides are still going to leave because I have like good amounts of hair there and it was a bit tricky. So I'm just going to start by getting my ear out of this and I'm going to use the scissors to cut it open. Okay, now I'm going to cut from this middle part and let's rescue the other ear yeah and I now need to. I have my three points, so I need to cut everything down. Thank you. So the next thing I'm going to do is go in with some foundation with my foundation brush on the wig cap, just to give it the most natural scalp and ensure everything is nice and neat right. So now we have our big one thing that I'm going to do is take more foundation with the same brush and apply it on the lace just at the back here and also like at the front part here. This will just help to give it a better. You know scalp look, so let's do that foreign that I'm so excited about. Let us put on the wig and let me see how it looks on my head for the first time. Okay, oh my God guys you guys. No, this looks. I look like a different person like now. This looks really good. It looks so good guys, like I'm, not even done and I'm already feeling it. You know this color is for me it's for Yeti. 100. Oh, my God, I'm so excited! I have to get into this hair like let's finish up like I'm, really excited, and I really want to just see till the end. So right now I'm going to take the headband, and I'm simply using this to take my hair like push the hair to the back and just hold the hair away from my face. Just because I don't want hair coming into my face when I'm doing the cutting. So I just want to strap it in at the back and just use it to push the hair to the back just a little bit. It doesn't have to be too far so the first thing I'm going to do is spray. I'M not using a glue, I'm just using the spray glue, I'm not using like the normal glue. I just want to use the spray glue I feel like it does like a really good job. One thing that I'm doing too is using this comb just to press it down as I spray, and also help to arrange the hair and just take it to the back foreign parts. Let'S take off the band and everything looks dry like it's all dried up guys. I don't even think I need to. There was no need to pluck this hair, like as I got it, that I'm using it. I didn't pluck it. I didn't have to bleach the knots. Nothing - and it looks this good - this good guys yeah, but you know it's time for us to get caught in, which is not really my favorite part guys, but we have to cut off this excess lace. So, let's get into it. So first thing I'm going to do something similar to what I did the last time, I'm going to split the middle. I'M also going to split this Edge here or this corner here not Edge. So first thing: I'm going to do this side and cut off any excess lace. Try not to cut into the hairline, try my possible best, because this hairline looks so good. I don't want to tamper with it. Okay, let's keep cutting gently lifting, because this thing is like glued down to my skin, I'm not about to injure myself, so I'm trying to be as gentle as possible guys so just to make this process easier. For me, I remembered why I put the headband there in the first place. Okay, so, instead of taking it off, I should have just pushed it back, so I'm gon na put it back on now we can cut better without any interruption. All right! Thank you. So I'm going back in with the comb, the tip of the comb and the spray just to ensure I have a very good melt. You see, you see that line. There disappeared, vanished, gone, I'm not a baby hair person, but I do want to add some baby hair to this wig. I I'm not really a fan of like doing like baby hair and all of that, but it looks too good for me to just stop here. So, let's just go the full length, I'm going to make a little cut out here, not too much I'm going to do the same thing at this side, I'm going to use my scissors and I'm just going to oh my god. It feels like this is a lot of hair guys. Let me reduce this one here, so I am going to cut now and I'm just going to cut it at an angle. So I think this lens should be fine. Lord have mercy come on cut off, yeah foreign, with some hair wax and the brush that came with the hair dough. Let us just first of all take everything down ready for a nice soup. I can't stop saying that thing: okay, okay, not bad, not bad! Let me just adjust the rest of the hair to follow suits. Maybe I should have cut the hair shorter, but if it's gon na go in this way, I'm not mad about that normal at all. So I think we have one here. So, let's try and do the other one. Hopefully you understand how this thing works and you follow your second okay. Let'S, first of all, brush down burst down to Tiana. That'S done! Yeah! Oh this one didn't go, it didn't go. It didn't go at all a few moments later guys so after hours of trying, I finally cut it like it, took me a while to get this second one, it's not as nice as the first one, but at this point it's better than what I was doing Before so, I'm going to stick with this okay, it's my first time doing this on myself by myself, so I don't really expect like expert results. So this is what the install looks like I'm going to add some concealer here when I do my makeup just to make sure the parting comes out really well, because it's a little bit blunt at the moment so just to sharpen like the needle part. So let me do my face bit and I will come and show you guys. The final look hey guys. So this is the final look with my makeup. This makeup is just stunning to be honest, and it just goes with the hair. I look like a proper Brown babe. This hair color is everything I curled the front part just a little bit just to give it a bit of definition. Okay, I just used the one to call it. I I suck at you know, curling my hair by myself. When it's on my head, so it was like, I was just all over the place: okay um, but this is what it looks. Like I said said. I added some concealer here. One thing that I like to do just to make my wigs, especially like the closure side, look more natural, it's just to make the base a bit darker. Some people do this using dye, but I'm going to show you a quick way. You can do this just using regular eyeshadow, so just take Brown eyeshadow and then tap your brush along your hairline and that's all you need to do so. I'Ve packed some enough Brown eyeshadow here and I will just start tapping it along the hairline. Okay. You can also use like a cotton pad to do this. The brush will give you, of course, more control than the cutting pad okay. So this is all I am going to be doing. You can also go in with like black eyeshadow, but I feel like black. Most of the time is too dark and I just like end up making a mess of my hair. To be honest, I definitely really really love the hair. I think I just want to scatter the curl just a little bit, so I can have like some volume, because I think I actually need some volume in this hair. Okay, so just run my hands through it a bit. So this is what we have. I definitely love so many things about the hair. I feel like the length is just perfect the way it drops just on my shoulder, the shed into very minimal. I think the only strands that came out a lot was when I cut the side of the lace, and then I had to like drag it out because it was carved up with like other strands. That'S the only time that I had like a lot of hair. Come out, but it's so so soft I can easily run my hands through and let's come back to this color guys I can go on and on and on about this color it is so so gorgeous. I love the color. So another thing I want to explore with this hair is the side part, I'm more of a center part babe, but most of my friends and family members tell me that I look good in the side part. Sometimes I disagree, but let us open up like a side part here um. I don't always like my sides to be very side just not too far from the center wow. This looks good, like this, like looks good with Bessie LOL. I don't think I need it to be so defined to be honest, okay, I think we have something to work with yeah. We can work with this. I really hope this hair has not been heated in my microphone. I feel so sad if that has been happening, because I need my audio to be really good um. I love a video with like good audio guys. This looks good and I haven't even used my hot comb, yet it looks good and I've not used my hot comb and yeah. I think I will be wearing this as a side part to be honest, like, like I've, seen this beauty by this side. Okay, here definitely needs some work. Okay, um. I don't know why it's lifting, but at this point I struggle too much with this side of my hair. I don't know why I didn't do the pattern by this side yeah, but I think I prefer this side of my face, it's more of like my, like my edgy side, so the hot comb is hot, definitely and we're going to comb and press down like the Hair is so obedient, even when I was trying to curl it. I didn't even need to keep my my curler on the hair for long it curled like really well okie dokie. This is what we have now guys. This looks like really really good, so let me take my concealer brush and some concealer and just to bring out the pattern here guys. So this is the side part now. So let me know which one you prefer in the comments, the center part or the side part and your general thoughts on this week. I'M going to leave a direct link to the wig from wigan's hair in the description box. So you guys should check it out, and then you can also shop this and maybe another color or you want more length or you want something straight or you want a different lace. Type. Okay, you guys have a nice type shopping on your website because they do have good variety of hair there. Okay and it's actually quite affordable, like this hair, currently going on their website for just a little over a hundred dollars. Like that's a good deal. To be honest, it's really really good. Like I said, the hair is very, very soft. The color good. You can be sure that you're going to go out as a fine babe in this hair. Okay, so let me know how I did too. Okay, read to me: let me know how I did with my install it's like the first time. I'M doing this on my head by myself alone and yeah. I think it came out really nice, so I'm no longer scared of front house and I definitely want to have more frontals in my wardrobe in my wig wardrobe. You have suggest some more of that. Okay, so make sure you are subscribed, so you don't miss out when I post more videos like this and give this video a thumbs up and I'll see you guys in my next video bye foreign


Comments
allyson aranonu: The best explanation I've ever watched. Thank you. Now I can get a frontal wig!
OGOM’S SERIES: The colour is giving and you did a great job with the laying of the frontal. Love the center parting❣️❣️❣️❣️
Opeyemi’s Corner: The thumbnail is gorgeous! And the hair color suits you soo well
Tori Temi: The install is so beautiful the colour is so good as well
heartwarming Therapy: The side part is everything!!! It's giving everything it should give
Bukola Ogunyemi: It’s such a beautiful wig. The color also suits you
Cynthia Osita: The wig looks good on you and the colour is perfect
Ibk’s HUB: This was really good like it’s so detailed and so neat for a first timer
Ifunanya Ogemdi: Everything looks so good on you
USK World: You look so beautiful . The both part suits you, but the side part and the colour of the wig is everything ✨️
Gift Efem: The side part is giving !!! So beautiful ❤
Yekahilozue: Ohhh my, the side part is so gorgeous
Timileyin Oluyemi: This hair suits you so well
CYNTHIA LEYA: Thanks for the inspo,am def going to try this,love you!
Karen N: You look so good! Love the colour on you
Zoluchii: Baby girl!!! I love the side part and the color ❤❤
Precious: I love it ❤, it looks nice
Ayomide Bamidele: The hair color it looks so good on you
FavraO Mark: Yea…it’s working love it
Favour Chinenye: This is so beautiful
Jedidiah Selere: The side part 》》》》10/10/10/10
Favour Chinenye: This is so helpful Thanks onyinye
I am Jahsmile🙃: Easy to learn and recreate, thanks for tutoring. Definitely trying it out Thanks Yechi
Nono Ogbonna: The side parting! This colour on you, oof
moyosola_marvel: So how do you remove the wig And also when next you want to use the wig will you have to cut another wig cap
Julezandmore: This came out so beautiful 1
The Gloria: Love the color on you pls where did u get the canva head ?
Kiki Onyesoh: It’s the hair colour & side part for me
Gift Egwuenu: how long was shipping?
Ede Lilian: The side part
Kenny Ramon: You look so beautiful ♥️
Layos Corner: Gorgeous gurllll
Lifeofwinnie.: Both❤️
Raregurl Stephie: Love it
babydeeeeeeeeeeeee: Love the colour
Christiana Beture: You look so prettyyyyyyyy
Andie Cann: YOU ARE STUNNING.
hauwa usman: You are soooo prettyyyyyyy omggggg. Shes so prettyyyy. Can y'all see how pretty she issssssssssss
Trinity Uduak: Totally adorable ❤❤❤❤
Oghenemine Golley: Please where did you get the dummy head and stand
bello hamdalah: You did well. I like both the center and the side part, you are a fine woman
AMAKA OKEYY: I THOUGHT YOU WERE PASTOR MILDRED OKONKWO UNTIL I DOUBLE CHECKED THE CHANNEL.. SUCH A BEAUT.
Tochi Anozie: A pro
Dera Alio: Your beauty is distracting me
Amaka’s camera roll: Hottest out of the bunch I dunno what bunchbut you’re too fine
theFHBBYPAM: 10/10!!!
Ṣẹwà: Side part
Ore Lawal: This color >>
Jedidiah Selere: Na fine you fineee such a beautttt
Themelodee_: Over 10
Mariam: So lushhhhhhh
Oghogho Iduozee:
Uceey O: You look like Pastor Mildred... Pastor Kingsley's wife
Vivian Eze: