How To Pluck A Wig | How To Cut A Lace Front Wig | Wig Tutorial | How To Make A Wig Look Natural
- Posted on 26 August, 2020
- T Part Wig
- By Anonymous
Hi Guys! Today we are looking into prepping that synthetic wig right out the box! I remembered the first time I started really getting into wigs. I got a few in the mail, I got them by Stanley without him knowing, I opened the box and then thought... " How to cut a lace front wig" and then "How to pluck a wig...?" I never thought I would be making a wig tutorial years later. However, here we are. Add this to your "how to make a wig look natural" playlist!
~ Jesse M. Simons ~
**Follow me on**
IG: @Jesse_M_Simons
Facebook: https://www.facebook.com/Jessemsimons
Email: [email protected]
THINGS I USED IN THIS VIDEO:
Got 2B Glued Spray - https://amzn.to/3cP4IMG
Got 2B Glued Glue - https://amzn.to/3bZ8DHw
Wig Hair Band - https://amzn.to/3tBhi91
Wig Caps (Beige) - https://amzn.to/3bWC3Wq
Wig Caps (Brown) - https://amzn.to/3cFW2bm
Straitening Brush Iron- https://www.sallybeauty.com/SBS-301020...
Wig Stand Tripod Adjustable - https://amzn.to/3v0Rxzy
12" Styrofoam Wig Head - https://amzn.to/3dwb1Gk
Professional Hair Cutting Scissors Set - https://amzn.to/3xar2JW
Swissco 4 Pack Heat Resistant Blow Dry Clips - https://amzn.to/3tAbxIO
Batiste Brunette dry shampoo: https://amzn.to/2QaXESK
Wig grip- https://amzn.to/2O4MoGK
Lace Grip Cap - https://amzn.to/3eVqdw0
Wig Brush: https://amzn.to/2QQDxcW
Wig Wall - https://amzn.to/2RcM1Lv
*Other Videos You May Like*
How To Highlight A Synthetic Wig - https://bit.ly/3ekXYqj
How To Wash A Synthetic Wig - https://bit.ly/3dE7k1r
How To Pluck A Wig - https://bit.ly/3ncwqrs
How To Make A Hard Front Wig Look Natural - https://bit.ly/3sI5iBw
Wig Basics 101 - https://bit.ly/3sFqEQf
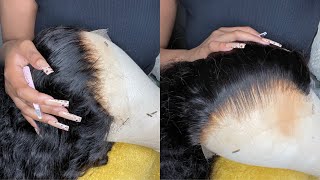
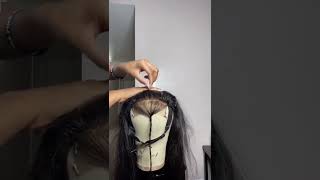
Hi guys today we're going to be going over how to pluck and cut the lace on your wig all right, so we're going to start by um going in and we're going to be plucking the part of this wig. So what i like to do, when i pluck my part of the wig first thing, i'm going to do, is i'm just going to follow the wig part back until i get to the lace just to make sure that they have parted it all the way to Back to the lace which they have here, so it comes all the way back. I'M going to want to widen this part a little bit to make it just look more natural and to almost kind of make it a little bit more uneven and not such a perfectly straight line. So i'm going to go in and the first thing i like to do and a lot of this has to do with the way that your natural hairline kind of is and what you're used to. But my hair. If you look here and this kind of wig already kind of naturally does this, but there's almost like this triangle effect happening here and it's where you have the least amount of hair right here and then it comes up into your part and i'm literally gon na Almost i'm taking away most of all the hair - that's right here in this front and then i'm just going in and i'm just making a little bit more of a predominant triangle. All right. So once you've got that um triangle that if you want to do this step, you can and then i'm just going to start going back into this part here and you want to take your tweezers and you want them to be flush up against the lace. Don'T point this tip down because then you're going to uh, potentially kind of poke a hole in the lace, so you just want to take this flat edge and you just want to slowly go through and you're just plucking a couple hairs at a time like i'm. Not saying i'm taking one hair at a time, but it's maybe two or three and i'm just going back here and then i'm going to go ahead since i want to make this part a little bit wider. I'M going to just part some of this hair here. Right here and i'm not gon na - pluck all this hair because it's a lot of hair to take off. But once i do this, i'm gon na go in and i'm gon na kind of take my tweezers again and i'm gon na go in every couple. Hairs and pluck - and this is gon na thin - this line out a little bit without making it like such a drastic, totally empty um area of the scalp, but it's just going to make it fade into the hair a little bit more. So your part is going to fade into your hair, more and you're, going to see it we're going to take a brush and brush it out, you're going to see a little more and i'm just going to take it over. On the other side, i do the same exact thing: i'm going to part you can use a comb for this or you can use the the tweezers like i'm doing it's you can use whatever you feel more comfortable with this a little bit too much hair. So now we have this and we're gon na do the same thing here and we're just gon na pluck a couple of the hairs here and then we're just gon na go, and i only just like take my tweezers back in and just kind of clean. This up a little bit more and, like i said like i like to have a really predominantly wide part. I think that it really does make a wig look, a lot more natural um and, as you guys can see too, i don't know if it's kind of hard for you to see, but it does start to get more narrow as it goes back. Your natural hair will do that too, but i tend to always find that they don't ever bring it back, though i'll go in and make just that back area wider too. Instead of widening this front spot, i think it makes it more noticeable too, and just makes it look more natural you'd, be surprised, like you, don't think about someone's part line until you put on a wig before you pluck it, and you put it on after when You'Re, like wow, that made such a huge difference all right now, we're just gon na take a brush and just brush out all the hair that we just plucked so that you're not putting this wig on and having all this like fly away, hair all over your Clothes, so this is the finish end result and we didn't take a ton of hair like i can show you, but it's a decent amount and it's enough to make a difference. Um, a subtle difference, but a good difference like i said. The next step that you would normally do here is, you would go in if you wanted to and you would pluck the hairline of the wig. Now, if you look at this hairline on this wig, i'm super impressed by the hairline on this wig. I don't really feel like it needs any plucking. I'M just gon na show. You like mock, show you cause. I'M not gon na actually pluck her, but i would show you what you would do. You can either hold your hand here and hold the lace down or you can get some type of push pins and you can push them in here too, as well. I'M just going to hold it here and then i'm going to take tweezers and to thin out the hairline. You want to do kind of the same concept we did when we pulled out those that layer of hair you want to pluck kind of every other, and you want to go in and every kind of other you don't want to take all the hair, and you Just want to start here, and you want to come back a little bit so that you're blending in as you go, so you would be plucking right here and get all this area. Then go back and just kind of like this and pluck hairs. That way, and that's gon na help kind of thin it out and bring it together so that it blends in well - and you don't have this like line of no hair, so once you go do that which you can do all the way around on both sides. If you want, like, i said, pre-plugged hair lines, if you can stick with those kind of wigs, that's kind of where it's at like this wig has a really good hairline like i'm. I'M pleasantly surprised with that one. So the next thing that we're gon na go into is cutting the lace on a wig, so cutting the lace on your wig is literally what it sounds like it's the lace front wig it has this lace on it. This is how they make the wig. It comes all the way around to where the like ear flap is we're going to be cutting all of this lace off. That sounds scary, but it's not you need scissors for this if you're a little nervous and you're starting out with this use, small scissors. That way, you have more precision in where you're cutting you want to start down here. I usually pull back or pin back the hair, so it's out of my way, because i don't want to accidentally cut a chunk of hair off. You want to get here at the bottom. This is where the lace starts, and this is where you're going to cut off. Of i will say: i recommend, if you are someone who wants to glue their wig down or thinking about gluing your way down. You want to leave a little bit of extra lace around where your ear would go just because that tends to like sideburn ear area, because that tends to be the place where it lifts the most. And you want a little bit extra lace so that you can really get the glue on there. So i always leave a little bit more lace down here in this area than i would up here where you're gon na start to see the hairline. Just so you know so you're not wondering why, like i'm, leaving a little bit more lace off down here, there's a reason all right. So when you're cutting this you're gon na hold this tight so that you can really see where the hairline is now. My recommendation to you with cutting this is you do not want this to be in a straight line. You really want to follow the hairline, and if the hairline seems pretty straight to you, you want to kind of cut that so we're going to hold this tight here so that we can see where the hairline is we're going to start at the bottom, where this Lace starts and we're going to cut it off where that hairline is, and then we're going to stop right here in the middle and we're going to go and do the same thing on the other side. So then, the last thing you just want to do is just take your brush brush her through just make sure in case you did cut any hairs or anything like that. You get those little hairs off and then bam. This is my sister elizabeth once you've done. These steps, there are a couple other things you can do to make your wig look even more natural than it already does so one of those things, especially with blonde wigs, is i a lot of times like to darken up this root a little bit. So if you notice with this one, i'm wearing she's got a pretty dark brown root here, um this one's a lighter blondish, dirty blonde root to a platinum blonde, and i'm just wanting to darken this up just a little bit more okay. So this right here is a a brunette dry, shampoo spray. So it's safe for synthetic wigs and it'll darken up the roots. The other option is eyebrow powder and a brush, and so you're just gon na take a little bit of this here and we're just gon na right there on that part where we were before we're just gon na take that and we're gon na brush that onto Her and i'm just kind of like to pat the product on, i'm not being super neat about it because, again like when these root grow outs. When they do these, you wan na get them professionally done. They aren't even um and then i'm gon na just take um my finger here and i'm just gon na blend this out a little bit. So it's not so crazy, maybe take a brush to it, just to kind of brush it out and then that's just gon na darken those roots up, and it's also going to hide the knots a little bit more on this part. So you don't see those knots as much now, because you also kind of got some of that there. The other thing that i like to do um is i also like to take some concealer. Any concealer is fine. You want to be as close to like your natural skin tone as you can find, but so this one here is pretty good. I'M going to literally flip her inside out and you can kind of see where her part is because we did that brown powder here, which is nice, because it gives you kind of a guide and we're going to take this concealer and we're going to take a Couple dabs of this a little bit goes a long way. You don't need a lot and we're going to go like this here: dab dab, dab. You want to make sure you don't get chunks like this, because we're i'll show you what happens when you get that. I just want to slowly brush it on here, connect it make it a line. So now the thing that happens and you you're we're going to smooth this out some more, but the thing that happens if you do see how we have that blob there. If you look now, we have a blob of concealer here, so you can fix that, but it's kind of a pain in the butt. So you want to take your one hand here. Have it underneath your part you're, going to pinch the part in between your hands here and we're just going to kind of literally rub a little bit and we're just blending that concealer into the top and bottom so that you don't see a chunk of concealer and It also just blends it to just hide those roots without people like looking at me like do you have makeup on your hair, so once you've done all that, the last thing that i would do with my wig, especially this one in particular because of the style That it is, i'm just gon na go and take a hot comb like this here, and this works really great. If you have a bump up here or like with this wig, it's curled under a little bit more than i like. So i'm going to be straightening that curl out a little bit, but these work really well for synthetic wigs because they don't get too hot. You can control the temperature and um. It doesn't really have a whole lot of pulling tension, which is nice, so you're not going to be breaking the hairs here, and you just want to make sure before you do. This obviously make sure that the way you're doing this on, especially if it's a synthetic wig is heat safe. This wig is because you don't want to ruin your wig and i'm just like. I said i'm just straightening that that curl under out a little bit, which is what i've done with this other one that i have already so i already know that's kind of how i want it. Okay, so now she's just a little bit more of like a straight bob. She still has a little bit of that curl in her, so there she is so she is good to go so i'm gon na throw her on for you guys just so. You can guys can see the final product of what she looks like all right, so this is it. This is the final product. The final look, as you can see, this is the part right here. The hairline looks pretty good. I don't have her glued down or anything. If i glued her down, it would make an even bigger difference on the lace and everything being able to see that and you can pull her half up and she's got a really really good hairline. Like look at this. This is impressive on its own um and i just made this part just look a little bit more like a part, so that's it. I love her um again. This is this was elizabeth, which is the sister to the one i had on. If you guys have any questions, please let me know in the comments make sure you like this video, don't forget to subscribe to my channel if you aren't subscribed already and make sure you hit that little notification bell. So you get notifications for any videos. I do in the future. I hope that this was helpful for you guys and thanks for watching you


Comments
Lori Couvillon: Beautiful!! Looks so real I'm just waiting for a wig I ordered, I'm gonna have to use this video for plucking abd cutting the lace, thank you so much!! ❤
Lucy House: Thank You Jesse ! I’m rewatching this over and over today. My wig head arrived at post office, and I ordered the Jesse Wig !!! I’m so excited for it . She’s beautiful I have 3 or 4 that need plucking, and cutting. I’ll watch that one next . You’re Beautiful Jesse! ♥️
Silky Saks: You did a great job opening up the part. This makes the wig more realistic for sure.
Carole Grant: This was great! I just got Elizabeth !! She’s beautiful! Now I know what exactly to do with her! Thank you!!
SUE BRITNELL: This looks great, what is the name and make of this wig please? Xx
iki cove: No idea why YouTube recommended this to me, but this looks great.
zeldahopper: Any idea on how to fix it if you over plucked it and made the part too wide????
Jennifer Cheek: Love this hair on you
Sierra Roosevelt: Life saver!!
Oliver Ens: You look amazing