Diy U-Part Wig Tutorial | Jasmine Defined
- Posted on 07 April, 2015
- U Part Wig
- By Anonymous
DIY U-Part Wig Tutorial
***Show more for discount code!***
The people over at #HairFleek sent me four bundles of Vietnamese hair in lengths 12", 2x14", and 16".
**Get $10 off of your #HairFleek order of $100 or more using my coupon code "Jasmine" at http://www.HairFleek.com !
This is a sponsored video.
Instagram: https://instagram.com/JasmineDefined
Snapchat: WhoIsJasmine1
Facebook: https://www.facebook.com/8273602806162...
Twitter: https://twitter.com/JasmineDefined
Blog: http://www.JasmineDefined.com
Music:
You Want More (Original Mix) by Part Native is licensed under a Creative Commons Licence.
https://soundcloud.com/partnative/you...
#UPartWig #diywig #UPartWigTutorial #WigTutorial
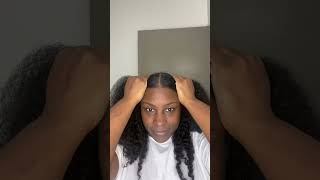
You know who it is everybody, I'm back and this week, I'm doing a new part wig using hair fleek silky straight Vietnamese hair extensions check it out. For this week I use a Styrofoam head. This u-part wig cap that I found, but you can also use a weaving cap, 2-way Clips weaving thread and a needle scissors, a paddle brush comb and hair clip a regular sewing needle you'll, see why later and of course, for our bundles of hair, fleek silky straight Vietnamese hair extensions, here's my braiding pattern: you may be your braid and pattern. Whatever way is comfortable for you so be sure to have a thick sturdy braid on both sides of your leave out, because this is where you'll have to leave. I also left a bit of hair out along my hairline in case. I want to pull the hair back, be sure to follow your wig cap to either mark off, where your leave out would be or to make sure you leave out, aligns with the. U part cap so we're going to thread the needle with a double knot at the end. Next, with the cap on the styrofoam head start sewing, these has tend to run a little small or I just have a big head so be sure to position the cap. Just as you would on your head in our first track from the longest bundle is actually going to be stitched. Just under the cap around the perimeter see more about my stitching method. In my middle part, Bob sewing video and, as you can see, this prevents any tracks from showing now I'm starting at the nape of the neck and wants to use a fold-over method to avoid cutting anymore. Well make sure you do not sew directly on this band or on the drawstrings, as it turns out. Four bundles from hair. Fleek is plenty look how closely I was able to stitch these track, and I still had some left over now. Grab your regular sewing needle. I'M actually using a yarn, diner and stitching you're weightless. There'S no rhyme or reason for this bitching just make sure it's sturdy, and this is how it should look. Just click it on Titan in the back is necessary since now, as desired thumbs up. If you liked this tutorial and be sure to subscribe, bye,

Comments
Jay Natural: Super cute! You made it look so easy, and I love the makeup!
Dresses & Dumbbells: Thanks Jasmine! This was a clear and detailed video. This wig looks great on you!
Candia President: my wig came out perfectly! Thanks !
Nekia💜💜: Thank you so much for using this wig cap I bought one and I'm trying to make a wig for graduation and could not find any videos on YouTube and then I found you ....when I'm almost halfway done lol but thanks for the tip for sewing the track underneath! Love it!
Ashley Ashia: I just used this same cap for my unit and I love it it's very light not heavy at all! I was thinking about sewing it down
Bella Orquidea: Hello, best upart tutorial on YouTube so far! one question: you use the fold over method, but for the last top track do you cut it to ensure it lay flat? Cheers!
tramline31: Great video! I'll be sure to follow this method when I get to making one! Is it hard to make one btw? Never tried before xx
Eniola G: I love all your videos and you are so gorgeous!!
Kay Jay: great!! looks so natural.
Doctor Fashion: The instructions were clear .. I don't like the quality of the hair
serenebrownie: so helpful!!
Nyesa Quinn: I swear I've watched over 30 videos on u-parts and this is the best one by far.
Whitney Smith: Hi! The video was great. Just have a question where did you find that wig cap?
La Bella Milan Hair: Did you like this specific wig cap ? Was it sturdy and a good fit ?
thatslove99: love it
Regina Shenelle Fullwood: @Jasmine Lyons did you sew through the tracks or around the tracks ?
Keishanna Michele: You did that!!!!
Ce Ce: is the wefts single drawn or doubled?
EmpressJay: Amazing
Crystal G: can that upart wig cap be used for a side part also?
Kart Kitty: Okay so I'm going to prom and I have never made one before so I have some questions, are wig clips needed, would I be able to sew on a closure, and I'm having trouble on how to start the needle can you explain a little? Thank you so much my proms Friday
Jasmine Defined: @Regina through for the first and last stitch, but around the track for the rest.
PrettyCurls: The best upart wig tutorial!
MzPinkyPink88: I saw you started in the nape area. but I'm not sure how you wrapped to the front..
Iveli Regensburger: How many hours did you need for this?
Vanessa C: I liked how you show us the back. I could not see wig cap underneath. Did you sew the weft close layer or did you leave few gap in between? I'm trying to figure it out. Thanks
Arita Dereus: Bad ass!!!