Lets Make A Wig Using Raw Hair From Enl Beauty || How To Make A Wig For Beginners
- Posted on 26 August, 2021
- U Part Wig
- By Anonymous
HOW TO MAKE A WIG WITH A 2*6 CLOSURE
Hair used 4 Bundles if 18" Raw Wavy Hair and a 18" 2*4 closure both are from ENL BEAUTY on Instagram
Cost of this wig in Naira is 180k Dollar Equivalent is $360
Shop same wig in 3 bundles with a closure 145knaira / $290
SOCIAL NETWORKS
Email: [email protected]
Subscribe: https://www.youtube.com/c/LindaEzemedo...
Instagram: https://bit.ly/3KDexgN
Tiktok: lindaezemedolu, enlbeautyhair
Thanks for showing love sis
I am an Amazon Influencer, support and shop your essentials :)
Amazon US: https://www.amazon.com/shop/lindaezeme...
I film my videos with my this:
Camera and audio- NOKIA 8.3 5G no microphone used: https://bit.ly/32rEkXO
My ringlight: https://bit.ly/3tRtGVH
Soft box Lights: https://bit.ly/3FYoUbp
Tripod Stand: https://bit.ly/3rODUDs
........................................................................................................................................................................................................... SHOP BELOW
MY BOOKS: E-BOOKS – https://enlbeautyng.com/books
ON AMAZON (PAPERBACK): HOW TO START YOUR HAIR BUSINESS: https://www.amazon.com/HOW-START-YOUR-...
HOW TO START YOUR HAIR BUSINESS (EBOOK)- https://enlbeautyng.com/product/how-to...
Hair Extensions And How To Test Its Quality (EBOOK): https://enlbeautyng.com/product/hair-e...
ENLBEAUTY HAIR (WIGS): HAIR – https://enlbeautyng.com/hair/
WIG MAINTENANCE SERVICE IN LAGOS NIGERIA: https://enlbeautyng.com/wig-maintenanc...- services/
MAKEUP: ENLBEAUTY https://enlbeautyng.com/makeup)
MY HAIR VENDORS:
Vendor Plug – ENL BEAUTY https://enlbeautyng.com/vendor-plug/
1.Raw/ Donor Vietnamese Hair Vendor – https://enlbeautyng.com/vendor-plug/ra...
2.Virgin Vietnamese Hair Vendor – ENL BEAUTY - https://enlbeautyng.com/product/virgin...
3.Virgin Chinese Hair Vendor – ENL BEAUTY
https://enlbeautyng.com/product/virgin...
4.Raw Chinese Hair Vendor – ENL BEAUTY
https://enlbeautyng.com/product/raw-ch...
COURSES: Hair Colouring Course – ENL BEAUTY (enlbeautyng.com)
https://enlbeautyng.com/hair-colouring...
Wig Making Course –
https://enlbeautyng.com/wig-making-cou...
HOW TO ADD HIGHLIGHTS TO YOUR WIG COURSE: https://enlbeautyng.com/product/how-to...
HONEY BROWN HAIR COLOURING & STYLING COURSE: https://enlbeautyng.com/product/ honey-brown-hair-colouring-styling-course/ HONEY BROWN HAIR COLOURING & STYLING COURSE
SPEAK TO ME: https://enlbeautyng.com/one-on-one-bus...
SPEAK TO ME:
IN PERSON TRAINING: EMAIL ME [email protected]
.....................................
Music is from Youtube Audio Library
videos are filmed and edited by me on my phone..................................................................................................................................................................................................................................................................................................................
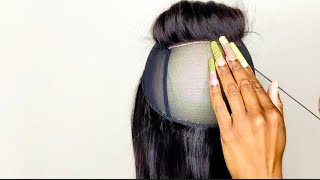
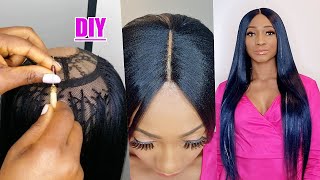
Hi, this is welcome back to my channel in this video i'm going to be showing you how to make a wig using this 2x4 closure and this natural wavy hair start now by securing the closure down on the mannequin head. I already wore the wig cap on the mannequin head and i'm using the t-pin now to just place the closure on the center of the wig, where i want it to be after i'm done. Securing the closure on your mannequin here, i'm going to reach out for my curved curved needle and i'll start to sew down the closure onto the wii cap. You can see how um moving the the needle through the closure and the wig cap and sewing it securely and i'm trying to give at least half an inch distance before i put the next um before i swoon take the next sewing. So i'm gon na repeat the entire process until i get to the other end of the closure guys, making a wig is very easy. All it needs is just you paying attention to the details and trying to ensure that you sew very neatly so i've gotten to the other end of the closure. What i'm going to do now at this end is just to make sure i sew it tightly and securely before i cut out the trade, so i'm just going to sew so so until i'm very sure that it's secured, then i can cut it off. So this is the bundles i'm using for this week. You can see it's a natural wavy here, and this is raw here guys. This is raw hair, so i just took out one of the um, the pack i just took out one of the bundle and i'm going to start sewing it onto the wig cap. So i looped the i just put the needle through the track and i sewed and i pulled it through just to secure it on that way. Cap and then i start to sew through the wefts and take note after the first um part, where i put the needle through the waves. I don't put anything to the weft again, i just take through the wig cap and then i just cross it underneath the left and i keep sewing it till i get to one end of the week and then i turn it i flip it over. Then. I continue showing it guys if you haven't watched any of my big tutorials. You should know by now that this step is very, very repetitive. The essence of flipping is over like how to flip the best way to flip your wig over. Is you need to lift it up slightly at least half an inch distance just to ensure that there's space between the initial place, where it was sewn and the next place, where you're placing it on at least a distance of half an inch or even one inch For this scenario, right now, i'm actually using um, i doubled the track, so i have like four tracks together, so i can leave the stands of at least one inch, because the the bundles are very, very i'm using four bundles of hair to make this week. That'S the reason why i had to double the tracks at the end of the year, so the four bundles go around without still being um any leftovers, because my client asked for four bundles over here. So i have to make sure that i make her big to be very full, so we keep on sewing sewing to enter it until we get to the old part guys making the wig is a very repetitive step, but the beauty of this um weak process is You just get to see how i'm just taking my time to ensure that i so closely. You can see how i'm moving and then how i also introduced a new trade. I tied together and i cut off the order and i keep on moving with a new one, so we keep progressing until we get towards the all parts and towards the finishing area of this week. Guys, if you don't know how to make a week, i can assure you it's very easy for me. I struggle with making a wig to the same machine hand sewing is just therapeutic for me and is also um, it's easier for me. So that's the reason why i always handle my week, so i'm introducing a new bundle here. I think this bundle right here is a toad bundle. Just gon na. I can't see i'm still doing like a double track, just because i still have like one more boundary mini, so i can this. I don't have to be um. I don't have to manage the hair, because i have a lot of hair too to work with. So we keep on sewing to winter. You know we get to this end here, you're, going to flip it over and continue sewing. You can see how i turned this here. I kind of elevated it up a bit so that it's going to make it easy. For me to flip it over, you can see how easy it is to flip your wig over the essence of doing that, just to make sure that the up the front part of the wheel doesn't feel in bumpy or too thick. That'S the reason why we flip it over to make sure it leaves flat. So we keep on sewing sewing to ensuring towing sewing sewing sewing yeah, as you can see now, i'm flipping it over again and i'm continuing the sewing process. But then, if you don't want to have to go through the process of flipping over the, if you don't like how it looks when you flip the wig over, you can just cut the wefts and just sew it neatly and start and and put the part you Caught out in in in the new area and continue seeing, but for me i just like to avoid cutting the wave as much as possible just so that to minimize the we, the we want from to me my shedding on the weave on and just to ensure That i don't lose unnecessary strands over here. That'S the reason why i try to avoid them cutting the wefts so now this is the last boundary right here. I'M going to use this last one now to finish up the wig, and this is the bundle number four. The hair is really full really really full, and the quality of this hair is very nice. This is from enl beauty. If you like to order um our wavy hair. Let us know you can hit me up on instagram, i'm going to put a link to uh instagram in the in the description box, and i'm also going to put a link to our whatsapp in the description box. Also, i also sell my hair vendor information. In case you like how this hair looks - and you also like how hairs are also shown in my previously tutorials look, you could purchase my hair vendor information. This hair right here is a vietnamese raw hair. It'S a raw wavy hair. If you like how it looks and you like to purchase my heavy end information, let me know in the comment section i'll be glad to hook you up with it. This particular vendor has um various types of hair and vietnamese hair burmese hair, um um. What other hair again, i'm trying i'm finding how to um cambodian hair and um one of the hair? I am loytian or something like that. So if you'd like to purchase that might have any information, let me know this: vendor information goes for just a hundred dollars, so if you want it, let me know, and um just hit me up on whatsapp, i'm gon na put a link to the whatsapp in The description box also so guys yeah we're almost done with making this. We already have the old parts we're already almost meeting the closure of where the closure ends yeah, so just keep on sewing. You can see i'm still seeing very closely and neatly just to ensure that the finishing is really good so guys we are rounding up now. We are almost done with the swing process of this week. Yeah yeah yeah yeah, so let's just keep on sewing until we get to the other end and i'm also going to add a width to that particular side which i'll just pass right now just to ensure i finish it out neatly. You can see how this wig looks. All the sides have been all closed. Everything is neat, i'm going to cut out that remaining wefts that has left over and i'm going to adjust them. So it's somewhere in the on the inside, just to ensure that i don't have any of my clients here left yeah. This big has already been purchased actually, but if you still want me to, if you want me to make something like this for you, i could make something like this. For you, it's actually an 18 inch hair. It'S 18 inch, four bundles of hair, but you don't need to use four bundles like this. Hair is so so full three bundles is more than okay. To achieve it. Look like this, and you could choose to the middle part, is side. Part is c parts depending on what look you're going for. So i'm closing out that remaining space there and we'll call it a day for the week making process. Then we could proceed towards like finishing the week. Yes, we are almost done just a few more sewings and we are done with making this big guy, as you can see, making the video so easy. It'S so easy! It just takes practice and with time you get used to making your beaks yourself, you don't have to spend money, paying someone to make your wigs for you or you just can just learn how to make vegan used as a means of income for yourself yeah. I'M just trying to secure that last part of the whiffed in and yeah our week is done. So what i'm going to do now, i'm going to start trying to open up the parts on the closure area, but then i haven't even cut inside of the in inner part of the wig cap. So i think i'm just going to try and sew that that's before i start studying the wig okay, so i'm just creating a part now, but i'll still come back to this i'll definitely see how to come back to this see how the bundles look. So now i'm going to cut out that and the wii cap on the inside after cutting it out next, i'm going to put the weak back onto the mannequin head and i'm going to try to put some elastic bands on the side. Yes, ends up putting that elastic band, which i use is just to ensure that when a client wears the bead on her head, it's secure it's comfortable. She doesn't feel like he's gon na follow from my head, and it also doesn't feel so tight. That'S the reason why the length of the elastic band is it's pretty long. At least you should be using the length of around 11 inch 10 to 12 inch length within that um range just so that it's not too tight on the client head and it's just comfortable so secure it on both sides. Where the ends of the ears meet. Then i'm just making sure i perfect that part, the middle part of the wig wall after i'm done quit, ensuring that i open up the parts. What i'm going to do next is to reach out for um hair wax, i'm going to apply the hair wax to the closure area, just to ensure that in case there are short hairs on your closure. The hair wax just leaves the short hairs down, but i'm going to reach out for my hot coin. You want to leave the short hairs down really well, but then this particular closure doesn't have short hairs, which is something that really it has a few. But it's not the kind of shirt is i just stand out and look? Oh see me, i mean short head and it doesn't have a little shirt here like most squishy's existing to tend to have, which is so amazing. You can see how it's glowing. It'S just laying down smoothly without having me having to struggle so much next. What i'm going to do now is to cut out the excess leaves on the closure area yeah. I need to do that because my client doesn't like his situation, whereby i make it big for her and i don't cut out the list she wants. Are we ready to wear? She doesn't want to have to do anything herself. She wants everything me to perfection like everything is just ready to like ready for her to be like easy breezy. She doesn't want to stress herself to do anything, so i'm just making sure i cut out all the least excess hairs and inside of the recap with evil, because my client likes a perfect job. So i need to make sure i do give a perfect job for her next, i'm using my foundation, i'm putting it on the line of the closure area where the parting is just so that it looks more natural for this particular being making process. I didn't even better be bleaching the list, but i just did your sheet foundation on the list area and you can see it still looks natural yeah guys. This is the finished. Look. Let me know your thoughts in the comment section please. If you're not subscribed to my channel kindly support me, click on the subscribe button just right below share this video with your friends are also going to enjoy watching this video. You can see what the wig looks like on me. It'S very full. It has a very natural look to it because, of course, it's a natural wavy hair, it's so beautiful guys and if you like, to purchase this hair hit me up on instagram at enlbeauty and will be glad to make this week for you yeah. What i'm wearing is four bundles of the wavy hair it retails for somewhere around 180 000 naira, but then, if you're getting three borders is going to be less than that. So, and i think three points is zumba here for this particular here so guys. Thank you. So much for watching i'll catch you in my next video bye, you
Comments
Linda Ezemedolu: To order hair or Purchase my hair vendor information Message ENL BEAUTY on WhatsApp. https://wa.me/message/VJ44HSQOKIHWO1
Grace Patrick: With this, I think I can fix my wig myself. Nice one thanks for sharing
R Redict: Nice job, That is beautiful hair!!
Chiron _ Uncoded: Beautiful