How To Install A Curly Wig For Beginners | Tinashe Hair Review
- Posted on 27 July, 2022
- Lace Closure
- By Anonymous
How To Install A Curly Wig For Beginners | Tinashe Hair Review
Hey my honey,
I hope youre all well,
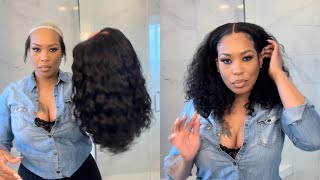
On todays video i will be installinging a 5X5 wig from TINASHE hair. This video is beginner friendly video, it will direct you step by step on how you can install your weave.
I hope you enjoy this video.
●▬▬▬▬▬▬※ Tinashe Hair ※▬▬▬▬▬▬●
Hair info: Deep Wave 13x4 HD Lace Front Wig 24 inches.
The Same Hair in The Video: https://bit.ly/3cyd7Y8
※ Tinashe Hair Website➤ https://bit.ly/3PEoxs8
※ Coupon Code"TSIG" to Save extra 15% Off
※ Buy Now, Pay Later with PayPal & Klarna.
Invisible HD Lace Wigs➤ https://bit.ly/3PC0da9
Wear & Go Glueless Lace Wig➤ https://bit.ly/3Q02E6r
2022 Trendy Colorful Wigs➤ https://bit.ly/3cJmnc9
Short Hair Styles➤ https://bit.ly/3S60HXK
#Tinashehair #hdlacewig #lacefrontwig
Instagram @tinashehair: http://bit.ly/2Isud9X
Facebook @Tinashe Hair: http://bit.ly/34FxUAm
Tiktok @Tinashe_Hair: https://bit.ly/3zeeRPs
WhatsApp: +86 16649781957 Wholesale: +86 17537405381
Email: [email protected]
how to install a weave for beginners
weave review 2022
wig review
wig review 2022
weave review
how to install a closure quick weave
how to install a weave yourself
how to install a quick weave with a closure
how to install a weave glue
how to install a weave with closure
how to install a weave
how to install a 13x4 wig
how to install a 4x4 closure wig
how to install a wig
how to install a 4x4 closure wig for beginners
how to install a wig for beginners
How To Install A Curly Wig For Beginners
Tinashe Hair Review
Hey guys, welcome and welcome back to my channel, it's your girls and welcome lagalaga, and i'm back with another video for today's video. We are reviewing a weave from tinashe hair. It is actually my first time doing. Tinashe hair and i'm super excited to review their hair. It looks good, the hair looks fabulous, so i cannot wait to try it. I cannot wait for that reason, but before we go into the video you guys, please don't forget to like this video, please like it before you even watch it, and also please watch all the ads on this video. If you didn't know, that's how we as content creators, make money on this platform, so please make sure that you watch all the ads and also watch this video. So without no further ado, let's go straight into the sleeve. Let me show you, let me show you the good things that come with this week. This is the lovely box that tinashe hair comes in. Let me just show you: this is luxurious like the packaging child it is, it is stunning, it is luxurious. Look at how it opens ciao. Can you see the decor you guys like this? Is everything actually what's nice about this box? Is that it tells you the length of the wig? So it says here it is a 24 um wig and it is a 5x5 lace. Frontal wig, so that is perfect, and this is 200 density, which means child. The volume is giving this item that i received. Is this bonnet ciao i'm going to use this? The next item is this lovely chrome. This is definitely necessary when you're installing wigs next item is these wig caps over here these come. They are two wig caps inside they've also got lashes mmm. I will try them on as well. You guys know that i love these. I love each controls, especially for this wig. We are going to do some edges, so definitely we're going to need this. These are very effective, especially if you want to control your hair and, if you're busy, with um your installation, these are necessary or, if you're styling your hair. These are definitely necessary. The hair comes in this lovely bag. I love these bags and also the box as well. I love this because you can put your hair in here. You can store it in here in your cupboard. You can also use this box to store other hair as well, so these are going to serve as my story. These are curls and you guys know how much i enjoy curls. I love curls. I have already bleached my closure. You guys. The reason i did that is because you guys already know that i usually put on makeup over here, but when you wash the hair, you also need to put on the makeup of here. So that's why i decided to just bleach the space here. It'S bleached and you can see that there's a difference over here in color, but yeah this is it. Can you see yeah, you can definitely catch it over here. This is how the wig looks in the inside. You guys, i'm sure you already know how a wig looks inside got these um protective combs over here, so yeah these three combs and yeah. This is the wig in the inside and to identify where my wig is going to sit. I don't like my wig to sit a bit to the back, because i've got a big forehead. Maybe you don't like it when it's sitting in front, but because i have a big forehead. I like it to be like more in front like so i think it's going to be good like over here. I think that's perfect, i'm going to go in with my ghost bond over here. This is the ghost bond that i'm using i'm going to insert the picture so that you guys can also see it. I'M using the back of my comb over here going in with my first layer and then i'm also going to do the second layer when you're putting on your ghost bond. You guys make sure that you are you not take like you're, pushing it back properly and you're, not stacking it, because it takes a while to dry if you're gon na stack it um and if you're going to make it thick so make sure that you are Making thinner layers, i'm gon na wait for this one to dry off and then also i'm gon na go in with the second layer. The reason i'm going to go in with the second layer is because i do not like having a wig on for like a day i like to have it for, like let's say five days maximum, then i take it off and we're approaching the weekend. I think i'm gon na have this wig throughout the weekend. So that's what i wanted to be tight and i wanted to be stuck onto my head. So yeah, that's what i'm trying to achieve over here. You guys can already see that it is drying off. So i'm gon na go in with the second coat. You can see that it has dried off. It is important for you to wait for it to dry off properly and it is clear, don't wait for it, though, to be dry dry, dry dry as soon as it becomes clear, put on your wig, so yeah. Let'S do that now it's tacky and it is the correct time to put on the wig okay. You guys, i think, now it's stuck down properly. If it's not stuck down properly, then after cutting this part, we will just fix the parts that we can see cutting with the scissor. Please make sure that you cut this part like this part over here, because you just it does not look normal when you leave it or like it does not look cute at all. So please, when you're cutting make sure that this part you cut it out as well. These parts are up. Let me just try and make it more flatter in with a small amount of glue, because when you're doing this, you need to be like careful, careful careful. So that you don't put too much of the product really not sure if i want baby hair or not, because i feel like this hair looks good the way it is. If i had like an ear to ear, then i would do a baby ham, but because it's a five to five, it would mean if i want baby hairs. I should only have it here, because this side is hidden and that's how i want it. So i'm not sure, if should i do baby hairs, i'm not quite sure. Should i uh? Oh, this looks good guys. I haven't even put it on makeup, but this is how it looks. Okay, guys, i think i'm gon na do a baby hairs, but i'm just gon na have it here on the side, and that is about it. So we're done tying this up and yeah, let's open the hair now so so. This is how full the hair can get. It looks so good. It looks so good. Okay now we know how full the hair can get and i'm also going to go in with my water with foundation. This one is used to define the curls, and this one as well is also used to define the curls, but i find that this one is used more to define the curl. But if you want your hair to stay much longer when it is wet, this one is definitely the one to go with. So, if you're going out - and you don't have this spray - make sure that you put this on, it will last a bit longer so yeah. Let'S do that, i'm going in with the curl la la by auntie, jackie, make sure when you're using this, you guys you're very generous as well as when you're going in with the mousse, because we want to define those curls. We want them to pop. So make sure that you are very generous when it comes to these two okay, you guys we are done with this wig. I think i should perhaps put on some makeup and then come back onto the camera, but this is how the wig looks without makeup. This is how it looks on the front child - okay, hey guys. So this is what i like about bleaching. Your knots, you guys is that you don't need to put on any makeup on your hair. It already defines it for you, as you guys, can see here in the front if you're not paying attention over here. This wig is slayed. It is slid. I wonder how it's going to look when i have makeup on. Can you see that you cannot even see where the lace start and that's what we want? It is giving it's giving scalp it's giving everything gel, okay, cool, let's go on and put on some makeup and come back onto the camera. Otherwise, this is how it looks without makeup. Let'S do this, let me show you, i've finished styling, this wig and i've changed into another top. It is a beautiful weave, it has melted properly and it is to my satisfaction. In my personal opinion, this is perfect. This is a perfect melt. If you ask me ciao this weave is giving the inches it's giving inches it's giving scalp it's giving everything that it is supposed to give child. Can you guys see the mouth not sure if i mentioned on this video that i bleach my knots, but that's why it looks like this, and that is why it is giving this for my other wigs. That'S what i'm going to do exactly because i did not put on any makeup over here and also on the front as well. It looks proper and i also plucked the hair here in front, so it was already plugged, but i wanted to take it a bit further to my satisfaction. So that's what i also did with this wig. This wig is giving. It is a beautiful wig. It is stunning ciao, you can't even tell where this starts here. You guys are doing the most. You guys are. Definitely you guys are top tier. You are doing the most. Those of you would like to order this wig. I will definitely leave a link to their website on my description box. I also have an extra 15 discount for you guys. So if you want to purchase it use my 15 discount, this goes for all the hair that they have on their platform. Just use my discount code, i will leave it in my description box anyway. You guys thank you very much for tuning in. If you enjoyed this video, please don't forget to like comment and also subscribe. Also, please don't forget to click the notification bell to be notified of future uploads until next time it is peace from me going to enjoy this hair, especially because it's not an ear to ear, and you can style it just from here and it it's giving bump.


Comments
Esther Tibane: What a beautiful,neat and clean install
Maloh: Oh Zee you make these installation look so easy
Dee Luther: Almost To 50k Super Beautiful thumbnail tho Your Drop Dead Gorgeous Makeup always on Point Them Cute Nails❤❤ Nice Cheeks Structure EnJoy the rest of your Wonderful Week Happy Fabulous Weekend ahead Stay Bless n Be safe always
Sisipho Momoza: Thank you for this
Pamella Yantolo: Thanks for sharing sweetie
Praise Kate TV: Wow I will try this thanks darling
Nakatudde Winnie: Your videos are sooo nice and you are very beautiful
Nakatudde Winnie: I love these kindly share link from where i can get it. Im in uganda
nthabiseng makomo: What lace....you laid it nicely
uMama Ka Pozo Pozo: You are a gorgeous girl..❤️
Phindile Jeza:
Esther Tibane: Awusemhle awusababi❤❤
Mikhanyie The Reviewer.: Semhle
nicki snowbunny: Notification gang we up