Making Cheap Synthetic Wigs Look Natural! | Shein Wig Tutorial
- Posted on 04 March, 2022
- Clip-in Hair Extensions
- By Anonymous
In today's video I'm showing you how to make a cheap synthetic wig look natural! I get most of my wigs from Shein because they're really affordable and easy to work with. Let me know what you think!
--------------------------------------------------------------------------------------------------
►►MY LINKS:
YouTube: https://www.youtube.com/c/missemilyjan...
Etsy: https://www.etsy.com/au/shop/missemily...
Instagram: https://www.instagram.com/emilyyygambl...
TikTok: https://www.tiktok.com/@emilyyygamble
Twitter: https://twitter.com/emilyyygamble
Facebook: https://www.facebook.com/emilyyygamble...
Pinterest: https://www.pinterest.com.au/emilyyyga...
►►MY OTHER YOUTUBE CHANNEL:
E&Z Travels: https://www.youtube.com/channel/UCfUe2...
►►BUSINESS INQUIRIES:
Email: [email protected]
--------------------------------------------------------------------------------------------------
►►Sign up to Influenster for a chance at getting free products! www.influenster.com/r/4209327
►►*Love the music in this video? Sign up for Thematic and choose from a huge range of songs: https://app.hellothematic.com/?via=mis...
►►*Sign up for TubeBuddy for FREE: https://www.Tubebuddy.com/missemilyjan...
►►EQUIPMENT I USE:
*Soft box lights: https://amzn.to/37encEn
*Ring light: https://amzn.to/36WqN9D
*Ring light diffuser: https://amzn.to/3p3EOZq
*Rode videomic go: https://amzn.to/3a17UV0
*Camera: https://amzn.to/3p4Fwpa
*Lens: https://amzn.to/3jyTw9M
--------------------------------------------------------------------------------------------------
►►MUSIC:
I do not own the rights to the music used in this video
Music provided by YouTube Audio Library
Music by Taylor Belle - Real Ones - https://thmatc.co/?l=1F22FCF2
Music by Damien Sebe - Cherries - https://thmatc.co/?l=C3BD8F7A
--------------------------------------------------------------------------------------------------
►►ABOUT ME & MY CHANNEL:
Hi there! I'm Emily. I'm a 23 year old female from Canberra, Australia.
I make videos based on makeup, plus size fashion, lifestyle and more!
I post a new video every Friday, and sometimes Shorts on Tuesday's.
I live with my fiancé and my three adorable cats.
I'm a qualified Makeup Artist, and a self-taught Artist and Photographer.
If you enjoy HUGE try on hauls, awesome makeup tips, spreading positivity and being involved in a community of loving, friendly people, then this channel is for you!
Please subscribe if you enjoy my videos!
--------------------------------------------------------------------------------------------------
►►This video is not sponsored and all opinions are my own.
*This contains affiliate links. That means that if you click a link and decide to make a purchase I will receive a small commission at no extra cost to you. Those purchases help support this channel and my family. Thank you so much for your continuous support!
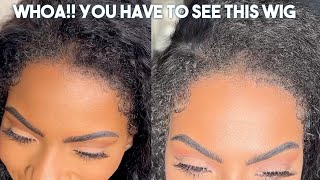
Hey friends, how's it going welcome back to another video, so in today's video i'm going to be showing you how to make a cheap synthetic wig look more natural. The colors i've chosen for my wigs aren't very like natural colors, so i'm making them about as natural as they can get um. I also haven't filmed in like a couple of weeks, so i keep looking at my laptop because i'm trying to get my mic and my camera settings and everything back to normal. Sorry, if my quality isn't as good in this video, it just always takes me a while when i take a break and then i come back um. I also haven't done my hair because i'm going to be trying on the wig to show you how it looks like straight out of the packet um, i do get my wigs from shane, but i know amazon is also a really popular choice. Oh, my god, i'm gon na sneeze, so yeah, amazon and shane are really good options. I find shane's quality is really good. I haven't bought wigs from amazon before just because i feel like shane is a lot more affordable and they also offer afterpay. So you can get like lots of them at once. I love watching these kind of videos where i learn how to make my wigs look better for pictures and everything um. I don't wear them out of the house much unless i'm gon na do like a photo shoot in the future or something other than that. I just wear them for, like tic tocs and i'm gon na be wearing them in youtube, videos and stuff. But i still want them to look like good quality. Wigs yeah they're, just in need of a haircut they're really really thick and the fringe is just way too long um. So we're going to be changing that up and i'm going to be teaching you how to do it. So i'm going to put the wig on now and i will show you how it looks okay. So this is how the wig looks straight out of the bag and, honestly, it's not terrible, but it could look a lot better. It definitely needs a haircut. The fringe i've like swept it out of my eyes, but it's like super long and sticking right into my eyeballs and also the part, isn't great. It'S like very thick up here and yeah. The back doesn't matter too much. I will trim the back, but at the moment i've just put my hair in a bun, so it's kind of like making a weird like bulge at the back at the moment. Um. This is a wig in all its glory. So now we're going to go and make it look more natural, okay, i haven't filmed in the kitchen before so i'm hoping the lighting and everything is okay. Also, i'm really sorry about the audio. If this audio isn't good, i'm going to be doing a voice over. So hi, if you're listening to this clip yeah just excuse the background. You'Ll, probably see my cats and stuff also, my belly is like sticking out, but we're just gon na deal with that. So i've put my wig on my canvas. Wig head, try and turn it around, so you can see. So this is the front. I got quite a big wig head because i have a large head um, so the wigs don't fit it completely. It looks a little bit weird, so she's pinned on this is what the front is looking like and we're going to start mostly in the back, so i'm going to be facing it this way. For you guys, these wig heads are really nice. If you're working on wigs, otherwise you can just do it while it's on your head or there's like different hacks, we can like make a paper mache um canvas head. The ones on amazon were too expensive for me. So i got this one on ebay, but it took like two months to arrive so yeah they're a little bit hard to find, which is weird um, but i'm gon na start with just combing it through with a wide tooth comb, because it's wavy and also synthetic Hair can break easily um i'm using a wide tooth comb. I got this on amazon for super cheap and i'm just gon na lightly detangle. It also, i recommend doing this on hardwood floors or tiles um rather than carpet or, if you're going to use carpet with a drop shade down, because there will be hair um falling it sheds a little bit is what i'm trying to say so when you're combing, It through it will shed a little bit um and obviously, when you're cutting it there's gon na be hair everywhere. So just do it somewhere, where it's easy to clean up. My cats think there's someone sitting at the bench yeah. So, as you can see, there's quite a lot of shedding already okay. So now i'm gon na be using some of this detangling spray. I got this off amazon um. It does say on the bottle that it makes the floor super slippery. So just be careful of that, if you are working on a hardwood floor, so i'm just gon na spray. This i'm gon na separate the hair roughly in half and i'm just gon na hold that up. While i spray the bottom section and then i'm going to let down this top section and just spray, some more, this stuff smells so nice and then i'm going to comb that through. If you get the sheen wigs, i don't know what the amazon ones are like, but you sort of have to put your comb on its side when you're brushing it rather than like going in like that, because it's like these tracks, i don't know if you can See that but there's like these holes in here with just a little bit of thread holding that together. So when you're brushing it through, the comb can get stuck in there. And you don't want to rip that because i feel like the hair is just going to fall apart about rips, so just be careful with it, so that detangler works really well and now you can run your fingers through it and it also calms down the frizz. As well because synthetic hair gets tangled super easily so using a detangler like that just makes us feel a lot more natural and a lot better quality. Okay, now we're going to start cutting. So i got these really cheap hairdressing scissors from kmart, i think um. So it's normal scissors and then there's some thinning shears as well. I just nearly cut myself trying to show you that um so yeah you can use like craft scissors or whatever if you want, but i have these to do my partner's hair. I had these to do my partner's hair anyway, so i'm just using them, so i don't really have a certain way of doing this, but i'm just basically gon na eyeball it and just leave it dry. Leave it wavy, because it's synthetic hair - i don't want to mess with it too much, i'm just going to cut like any straggly ends just parts that don't look that great. I'M also cutting some bits a little bit shorter. I'M really sorry, if you're cringing at this, but it blends in with the waves. I don't think you'd do this to a real head of hair, because some days you have it straight, so it wouldn't blend as well, but for the purpose of this wig always being wavy, it doesn't really matter too much and i'm only taking really small sections as Well: okay, so now we're going to take our thinning shears with the teeth part on the top and i'm just gon na go through and take like a centimeters worth of hair, and i'm just gon na run that through my fingers and then i'm just gon na Chop straight in the center - and i might need to do it a couple of times, because these scissors aren't very sharp, and this is going to help take away some of the bulk and also just blend the new cuts in a little bit better. And i'm also just going to thin out the ends a little bit as well. I just feel like they're, very chunky at the moment. Okay, so i don't know if you can really tell on camera, but i feel like that's already looking so much more natural, because i feel like we all have like breakage and like little bits of layers and stuff. I feel like no one's hair is really like as long and thick as what the week originally comes, as i might do a little bit of layering just because i just don't want it to feel so heavy and like bulky on my head, i'm also just going To do a little bit more trimming on the bottom, so i'm just gon na add some rough layers in just by taking a section, i'm pulling it to the top of the head, i'm just cutting diagonally and it just creates a little bit of a layer. Oh, my god, try not to flash everyone. Okay, i think i finished layering this hair all over the floor. Um i decided the ends are still a little bit too thick, so i'm basically just point cutting them again. If there's a hairdresser watching this you're, probably cringing, but it's a cheap wig, so i don't really need it. Perfect! Oh okay, don't be an idiot like me and be very careful when you're point cutting, because i just sliced my finger open. I also found like the last band-aid we have in the whole house, so it looks a little bit not symmetrical on the camera, but i'm pretty sure my tripod is like not even so in real life. It does look even okay. Now, let's work on the front. Okay, how even are we looking okay now to work on the fringe, so i'm gon na use this comb so okay, so i basically just point-cutted the fringe and used my thinning shears um. I'M pretty happy with this haircut now i'll have to keep playing around with the fringe when it's actually on my head, so i can get the length and everything, but now we're gon na work on the part and then we're finished okay. So it's kind of hard to see, but this is what the part looks like. So it's very thick there's not much skin showing through. So i'm basically just going to grab some tweezers and pick little bits of hair and you can just pull it out and you just want to widen the part a little bit. You want to be careful not to over. Pluck so just be careful, you don't overdo it, okay, so that's how the part is looking it's kind of hard to see on camera, but i've basically just thickened it and also made it a little bit longer, but you can keep going as much as you want, But i've been filming for ages now and my back's killing me. So that's gon na do um what i'm now gon na do is put some concealer on the part. So i've just got my concealer and a little brush and i'm just tapping a little bit on and just putting it along that part and then i'm going to take some a dark, eyeshadow and just sort of imitate like roots regrowing. So i'm going to use like this sort of brown and just picking that up and just dusting it along the roots, i'm also going to add a little bit of black. Of course, my cat has to sit right in front of my light, so i don't even know if you can see the difference on camera, but it's looking a lot more natural, it sort of looks like roots are re-growing and it doesn't look as like shiny on Top of the head: okay, now i'm gon na use some dry shampoo to try and get rid of some of the shine. I don't have any normal dry shampoo. I only have brunette dry shampoo, so i'm hoping this doesn't give it like a brown cast. Okay. So now final step, i'm just gon na add a little bit of hairspray to try and hold the curls a little bit more. So i'm using this one here, i'm also putting it at the roots and i'm gon na try and lay them flat. So the hairspray has really helped to die down some of the frizz and i feel like it just also makes it look a bit less shiny and more natural. So this is how it's looking so i'm gon na try it on and film the outro okay. So this is the final wig, i'm hoping you can see the difference in it on camera in real life. It looks a whole lot different, but it's always hard to like portray what something actually looks like on camera um. But this is how it's looking so the frizz has definitely gone down. Um, it's not as shiny, which is good um. The length is still good. I didn't have to touch up the fringe um, oh my god, my band-aid, i didn't have to touch up the fringe. When i put the wig on, i could probably trim it a little bit more, but i kind of like the look of it at the moment. I don't want it too short um, so this is how it's looking i'll, try and show you the part. So i could make it a little bit wider. Oh my god, this is so unattractive um, but yeah. I added the dark eyeshadow and i think it looks a lot more natural i'll, probably also work on trying to thin out this area a little bit, maybe pluck some more um from the top of the head, just because it's still a little bit bumpy. I might also try and get like a hot tool of some sort and try and flatten it down um, but other than that. It'S not too bad. You can sort of like ruffle it up and make it a bit more vuluminous. You can add volume so i'll. Try and put a before up on the screen somewhere. Editing emily can figure it out, but this is the final outcome. I really hope you enjoyed this video if you did make sure you give it a big thumbs up make sure you subscribe, i'm trying super hard to make it to 500 subscribers. So i'd really appreciate it. If you subscribed also leave me a comment down below - and i will see you all next week with another video bye, yeah you'll know that i only roll it real, quick, not the tactic cause. I got aspirations baby real ones, so you know i can't only


Comments
Fae Mari: I really appreciated this tutorial, will be using these tips when I get my shein wig!
Abby Jayne: You’re so cute