How To Wear Trendy Hair Clips Ft Allove Hair
- Posted on 09 January, 2021
- Clip-in Hair Extensions
- By Anonymous
ALLOVE hair official store($6 discount code: alloveyt): https://www.allovehair.com/?utm_source...
Get same hair in video: https://www.allovehair.com/collections...
Hair size: Allove straight lace frontal wig 22 inch .
Hot selling ombre brown blonde highlighted lace wig: https://www.allovehair.com/products/ho...
Allove human hair wig types: https://www.allovehair.com/collections...
Allove hair 3 bundles: https://www.Allovehair.com/collections...
Allove hair 3 bundles with closure: https://www.allovehair.com/collections...
Allove hair 3 bundles with frontal: https://www.Allovehair.com/collections...
Allove hair 4 bundles: https://www.allovehair.com/collections...
Allove hair 4 bundles with closure: https://www.allovehair.com/collections...
Contact Allove hair: [Email] [email protected]
[Whatsapp] + 86 18337410986
Follow us on social media:
Allove Youtube Page(@allovehair): https://www.youtube.com/channel/UCtN6F...
Allove Instagram Page (@allovehair): https://www.instagram.com/allovehair
Allove Facebook Page (@allovehairofficial): https://www.facebook.com/allovehairoff...
Allove Twitter Page(@allovehair): https://twitter.com/allovehair
#allovehair #hairclip #howto #humanhair #allovehairreview #lacewig #humanhairwig #frontalwig #straighthair #straightwig #lacefrontalwig #allovehairaliexpress #hairtrendy
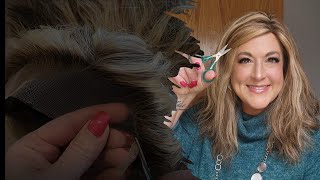
So, okay, so i really do a talk through so today we're going to do a talk through um. First of all, you guys seen i had on a different wig, so i'm going to start off by using a little bit of rubbing alcohol, and this is just a regular one from rite aid, 91 um, yeah, 91 alcohol and i like to just take and clean Up the area this here is pretty much just got to be glued free spray, which is pretty much my daily or adhesive choice. Whenever i um that's disgusting, whenever i do a wig, i usually do got to conclude free spray, because i do like to take my wigs off sometimes at night and if, even if i leave it on at night, i pretty much will reapply whenever i'm going somewhere. But normally on a day-to-day basis, i do wear a clueless install. This is the wig here, as i just showed you guys, and it does have two combs in the front one in the back. I never ever ever ever use the combs in the front and if i do use the comb in the back, it's literally what i'm going out somewhere and i want the extra security. But this is what the wig looks like on, as you guys can see. She'S super long um. I think the fullness is there for what we're going for normally, if i'm gon na wear straight hair, i really don't want it too, thick and bulky. I really want it to just look natural for the most part, so pretty much to let you know what we're going for. I ordered these off of amazon um, and these were super popular all over the instagram. I believe they were like under 10 bucks. Maybe like six or seven bucks a pack, so i did order two packs just because i wasn't sure what i was gon na do or how i was gon na. Do it, but pretty much they're these uh bobby pins that are full of pearls and they actually are bigger than what i thought they would be, which is a good thing, because i really like these to be super massive. As you guys can see, this one was already pre-parted with some baby hair and let's see how much parting space we have oh yeah. This is gon na look good because we're gon na do probably like a center part, or should we do the side part with some bobby pins here? I think we should do the center part. So, let's work on the install we're gon na pull the baby hair back. I'M gon na take two clips and pretty much pin all that back. I'M just going to go ahead and cut off. You guys can see. The knots are not bleached, and that is okay. For today, of course, i do have tutorials on how to bleach knots. I do know how to bleach knots actually very well. So, if that's something that you want to do definitely go ahead and be my guest, but honestly because i switch my wigs out so much - i don't always find it necessary. So you see how we go around the ear, but the ear it kind of overlaps. The ear a little bit, i'm just going to line the scissors with my ear, which is pretty much here and then i'm gon na start cutting basically to trim it perfectly around my ear. Then i'll lift and just go around the back. And if that's how i wanted to wear the wig, it would lay perfectly like this that way you can like pull tons of baby hair down like that. I probably will go ahead and cut off more because you guys know i do not like to bond down around my sideburns just because i do have rather thick sideburns and it never sticks so we'll make that blend super nice in just a moment. So this is how the wig fits. It'S almost glue this. It definitely lays flat, but it definitely will slide back or move if i decided to go ahead and wear it out. Just like this. So, of course, majority of the time i will add an elastic band and that's going to make the wig glued so that i don't have to apply any adhesive at all on any day. But today, since i am applying adhesive i'll save the elastic band for another day so because i do um take my wigs off at night um and i'm not really going anywhere. I don't apply a thick coat of my adhesive, but i will take a rag under my finger and just or over my finger and just clean up any excess adhesive kind of that they get tacky for about 15 to 20 seconds, and then i will pull the Lace directly on top and just hold it down when you hold it down, you kind of do, pull it tight. So it's going to make the lace like if it's tweezed or plucked that's going to look a lot more pronounced. It'S going to look more like! Oh! It is please, whereas before it didn't, because we kind of pulled on the lace now you kind of just let that um dry, you can take a scarf and go ahead and allow that to get dry with a scarf on top and that's going to let it Lay super flat or you could use a blow dryer on the cool setting. I find that when i do the blow dryer on the cool setting method, it definitely um sometimes will come up a little bit white, which is why i prefer to let it air dry. Now i'm going to go ahead and do the baby hair. If you don't want baby hair, you could have just brushed this all completely back without clipping the baby hair short um. I like to use wax once i brush everything back, use the wrap to kind of set it and make it um like stay going that way and look really nice, but because i'm not doing that. We'Re gon na go ahead and just make some nice baby hair and i think the baby hair will look good these little bobby pins. So hopefully, i'm right - and i just like to go ahead and load my brush with foam motion and then i'll just go ahead from there and like put a little back here first, so that the brush is not completely full of the phone and then i swoop Super simple, so i see you take it backwards and then i swoop fill it up, take it backwards first, and then i swoop now that that's done, i'm going to take a rat tail comb and part. I line the comb of i land, the comb in the center of my nose to find the center of my face. Sometimes i definitely feel like my face is crooked, so if i just try to do it um without doing that, it always comes out crooked, then i'm just going to go in and clean it up as much as possible a lot of the times i feel like It takes forever to get the parting right, so it feels like the parting is a little bit crooked, but i'm getting frustrated, especially because you can see there are little flyaways there. It'S going to prevent it from being perfect, so i take the wax and i'll lay it down. Even if it's imperfect and then i get my brush now, i like the heart, really really hard. This brush is like really really really tough, and i find it to be one of the best for um, installing my wigs and like styling, my wigs, because it really really really brushes the hair down. So if you don't have a really really hard brush, i got this one i think from sally's, but i'll have one similar linked down below and now i should be able to go back in and clean up the parting and it should be a little bit easier. Still not perfect, but easier. That should be good enough. For now i have my hot hot comb and i'm just gon na go ahead and take my time and just make this flat. The key to a good silk press on straight hair is to make sure this is literally as flat as possible, so i'll literally finesse and just press this out back and forth. Until i get it right and if it gets frustrating i'll go in with more product and if it's still not getting flat i'll go in and just give it time to flatten out, naturally the scarf over it, and now we can really see the parting. It'S kind of cricket, but that's okay, we'll work off that later, because again, a lot of times, if you worry about stuff like that you'll just get frustrated. But again this is what the hair looks like. So it really doesn't need to be straightened much, but i am going to go ahead and add a heat protectant. Sometimes i forget to put the heat protectant before i do the crown of my head, but i'm pretty generous with this, especially because the hair is low. It smells really good. It'S going to add a nice shine, it's going to cancel out frizz and i know right now it looks shiny, but it absorbs into the hair super nice. So, by the time the hair is pressed, it's going to be super flawless without being too weighed down, and if you want to suppress, you just chase the flat iron and trace the rattle comb with the flat iron and then i kind of just will go in And just literally go behind like this. In this case, when you have nice hair, you can kind of finesse and not necessarily do the chase method. But if you are coming from like blow dried, hair or curly textured hair, you definitely will have to chase the red. So comb with the flat iron, but again all i need to do really with this hair is run the flat iron through because it is straight, we add that heat protectant. So it's not gon na mess up the texture of the hair or the quality of the hair, and then we add it also add the heat protectant. So it's not gon na make or it's gon na, cancel out and frizz and prevent future damage. So i'm going to take a brush, it's straight hair, so you can use any brush that you have on hand and just make sure that i got it all whenever i'm looking down, i'm always obviously looking at a mirror. Let me just take the clips. Okay. So really quick update. I did go ahead and make more baby hair this way and put the hair back. Also, i do have a little bit of flyaways, i'm just going to take some foam lotion and attempt to lay that down a little bit better. I want the top to be super flat and don't worry about how it doesn't match my um complexion. As far as the lace goes, i will fix that in just a moment, but i did want to re-attempt this part on camera. My camera's gon na cut off. So if it does i'll be right back, i'm gon na do the same on the opposite side. Actually now, should it be up here or should it be down here? Oh that looks so cute now. Should it be on both sides, or is that too much? I'M gon na put all four of these on this side. I am going to switch up the pattern, so i'm going to match them up like so, but i'm going to switch up, which ones go where be sure to push them back. Oh yeah, that's so duper cute, so this is pretty much the look. I absolutely love the way this came out. You can go ahead and push it all the way back like this, for a more chic look or you can go ahead and put it in a little ponytail. I even think a little braid would be cute or push it all to one side or you can do like a mid ponytail kind of like this, but messy or you can take instead of parting, the hair in the center. You put it on the side and have it all flat this way and just have all of them across the front of your head. I kind of wish i would have done that, but this looks gorgeous. I did take out my earrings, so it wouldn't take away from the look and i think that turned out great you just kind of got ta mold them to the way you want them to go. So i'm going to go ahead and add the powder to the parting and i'm pretty much done um. This is the one that i use, and i mix this one this one this one to get my color, so this one this one this one. I know that seems weird, but i just mix them to get the color that i like and i kind of switch up which brush i use. So i'm just going to literally go boop and i just kind of like load it up really good and i just dab it in there. So this is pretty much the final result. I absolutely love the way it came out. First of all, the hair is absolutely flawless. I really didn't have any complaints and, as you guys can see, the install was super minimal. It didn't really take a lot of products a lot of time or anything like that. I did not have to soak press the hair. I was literally able to run the flat iron through and it got bone straight because it was already straight. I just kind of wanted to add that you know salon quality. As far as the style, i've been dying to wear these pins and i do have them in my amazon store and i'll also have them linked in the description bar um. My amazon store is always linked in the description bar and there you'll find all of these products and tools that i use to style. My hair, like my electric hot comb, my flat iron, my curling wand, what mousse i use what adhesive i use like literally alcohol. All the brushes i use the powder for the parting. Everything that i use is in my amazon store and i also have a few different sections of the store i'll continue to add different stores, as you guys request, different things from me, um so yeah. I absolutely love the way this came out. They are pretty much two packs of the same pins. Just re um, styled on different sides like this one is here and it's up here. This one is here and the matching one is down here. So i kind of switched it up in that way and it looks super good. So i think i forgot to show you from the beginning, but this is the packaging that we came with um this nice purple box and then, when you open it inside, of course there was a wig. They also included some lashes um and they also included a wig grip, which i do sometimes like to use um this net for your hair and then also like this little hair tie. So that was cool, that you got a few free gifts and then this is the bag that the box came in, so your bag is literally in this nice little box like such, which is super cool, and of course this has their logo on it as well. So yeah, thank you guys. So much for watching, don't forget to like comment, subscribe check the description bar for all links to shop and, as always i'll see you in the next one swooshes you


Comments
Es Beauty: Interested interview your hair!