Diy Pocket Satin Bonnet, Long Satin Bonnet For Braids- Yele Stitches Tutorial
- Posted on 07 November, 2021
- Long Hair
- By Anonymous
In this video I show how to make a long pocket satin bonnet with a the headband straps you can tie at the back for firmness. I have made other bonnet videos and satin hair accessories videos which you can watch here: https://www.youtube.com/watch?v=t36fWg...
Satin lined bonnets are known to be great for natural and curly hair as they promote moisture retention and prevent breakage. The smooth texture allows for little to no friction on your hair.
Let us connect!
IG: @yelestitches
Website: yelestitches.com
Etsy Shop: etsy.com/shop/yelestitches
Materials
African print Fabric ; https://www.etsy.com/listing/964404816...
Satin lining; etsy.com
Sewing machine; singer.com
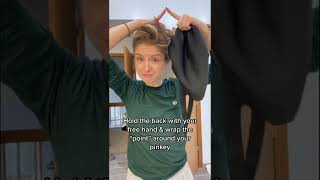
Hi, i hope you all are having a great day as requested by cheryl i'm making this beautiful satin line pocket bunny. I know you are used to seeing just one layer of pocket bunny, but i wanted to teach you how to make one that is satin line completely reversible, beautiful okay. So let's do it. The first thing that we need is our fabric and our lining and because camber said my drawing skill is top notch. I decided to draw what a pocket bunny looks like it's like when a long bonee and a durac decided to get married and give birth to a baby. That'S exactly what a pocket bunny looks like and that's the shape of it that i just drew out. That'S the shape we're trying to accomplish so. The first thing that i'm gon na do is to fold my fabric like so, and i'm also then going to take my satin lining or the solid color and place it on the for my pattern. Color like the way i just did it and then one side is unfold and the other three sides are opened. Then i'm going to measure the circumference of my head, i'm using 11 inches uh because it's on fold that's 22 inches. But since the foot i'm using 11 inches and on the side, i'm using 20 inches know that this uh measurements are not standard. If you are having braids on your head, you should just make the uh the head circumference at least two inches bigger than your normal edge circumference, and you can make it longer than 20 inches if you want, but for the purpose of this video i am using 11 by 20 inches go now at that uh, the joining i'm trying to create a curve - and i just mentioned two inches on either side and joined the curve on that those two points, and i have a nice looking curve. You see the nice curve. So now i can then cut out my piece and you see that we are already creating the pattern of the picture that we already talked about before. So now i'm going to cut it out with my small but mighty scissors, my normal scissors broke and i haven't gotten the new one. Yet so i'm using my mighty scissors and he's doing a pretty good job he's doing a decent job. Okay. So after cutting out my shape, the next thing we're going to talk about is our ties like the tie that we're going to put round to our heads too tight at the back or whatever. If you want a short tie, you can measure 35 to 40 inches. But if you want long ties, you have to measure about 55 to 60 inches for the purpose of this video, i'm just using the short ties, because nobody got time to make a long tie right now. Okay, so since my fabric is unfold, i measured 18 inches by 5.5 inches, okay, so 18 inches multiplied by 2 is 36 inches, and that is why i used 18, because one inch would be for my allowance since i'm going for 35 inches length. I hope you understand the math. Ask me any question in the comment section. You know i got you, i will reply, so it is 5.5 inches in uh width and the entire length of it is 36 inches, because i need one inch for seam allowance. Okay, so now after i cut my straps, i have my the body of my pocket bonnet. The next thing is to sew along the side like so so before i sew along the side, i'm going to go down by four inches to create a little opening at the back, so they'll be ease when you want to wear the cap on your head from That opening or from that four inches mark that i made i'm then going to sew round about it. So i finished sewing rounds about the pocket bonnet and you see that i left the four inches mark on both the lining and the colored pattern fabric. And you see that our shape is already coming out: she's looking very nice and lovely, so i'm then going to put my um black satin inside the multicolored satin like so, and i'm going to make that three inches mark i'm going to try to make that area. Neat by by facing the right sides to each other on both ends of the opening, so on one end, i'm facing the right sides to each other and i'm going to sew. On the other end, i'm also going to face the right sides to each other and sew okay, so i'm showing you how i'm doing it right now. I hope you can see it very clearly and then you see the way i face them to each other on either side and then i'm just going to stitch it down. But in the case where you know using satin lining and it's just one layer of pocket. Bunny you're making all you have to do is just fold that side into two like that and just stitch with a seam allowance of 0.25 and 0.25. That'S 0.5 inches in pluto. But since we are lining it, we are not doing having one layer of pokemon. We are doing this sophisticated fine metal, i'm just going to take the the ends of the black and the colored stitch it down and do that for both sides now after sony. This is what we have. You see that that's two sides are looking very neat now. I'M showing you what it looks like on the other side, where i stitched it and i'm going to use the black part. So it is very obvious what i did so i stitched it down to the right before the joining of the seam. So i don't make. I don't make the new stitch that i did to join the former scene. If not it's going to buckle up and it won't look neat. It will be a little bit raw food at that edge. So now the next thing that we have to do is to put in our ties the hour short or long times, depending on the preference or depending on what you like, or what you want to do. So i set the time in such a way so that i'll know exactly where my stitching was stopped. So i notched that part and then i'm going to stitch the ties turn it inside out and stitch that tie all the way to the notch that i made and i'm going to do it for the other side. Also, all the way to the nut i made so after stitching it i'm going to turn it inside out now and then i'm going to show you how to stitch it to your cap. Now, after turning inside out, i'm going to stitch it to normally i'm going to take just one side and stitch the to the front of the cap, but i realized that it's better to take one side and stitch it to the back of the cap. So let it be that you are stitching down one side to the black side or to the lining of your fabric. I'M going to explain later why i want you to do it under and not on top okay. So so you take just one side of your uh, strap and stitch it round like that. So i have finished stitching the one side and i'm trying to make put the other layer on top of it, and then i realized that, because this fabric is satin, it does not shrink on the top. So i will have a little bit excess at this point and we want to get rid of that excess if it was cutting once you iron it. It'S going to like shrink a little bit and you'll be able to sew on it directly, but because it's satin there's no shrinkage, so we're going to create a sort of like that. A very tiny! That'S maybe 0.25 inches that on that on the middle of our strap, so that when we then layer it on top of it now there will be no excess. So that's the tiny little trick that we can do to create to create a seamless band for our um, our pocket bonnie. Now this saturn is refusing to shrink. It did not shrink when i hired it. So that's why i'm creating that that you might not have the same issue as me, but if you do, that is a nice trick that you can do to eliminate any gaping or extra excess on your uh strap. So now i'm just ironing my satin and i'm ironing the black side iron everything. So when i lay my fabric, it will look. Oh sorry, when i lay my band, it will be neat and it will look beautiful and mesmerizing. Okay, okay! So after folding, my band, i'm ironing it step by step, so i am folding my band on the layer and iron it step by step. So this is the reason why i want. I wanted you to sew the sew, the band to the black side, so that you can see exactly what you are doing on the right side, because this right side is the part that is going to face everybody. That'S the part that everyone is going to see. So you want that part to be very, very neat, and that is why i said you should switch to the black side and not to the up the upper side. First, okay, so now we are going to top stitch. This part that we have ironed. We have iron, it is looking really nice and there is no extra. There is no excess because we are putting out that so now, i'm going to take it back to the sewing machine and and sew it on the first trick again. Another trick again is to change my presser foot to my zipper presser foot now. The reason why i'm changing my zipper presser foot is so that i can see exactly what i am sewing like, so that the normals, the normal presser foot will not cover what i'm doing, and i will not see that i'm swinging on a straight line or i Won'T see you know what i'm saying anyways just to make it neat. If you get my point, you get my point so now, i'm just going to take make a stop stitch, a nice top stitch that is very close to the edge of my of my band. That joining between my band and the cap itself is very, very close to it. You almost not notice it, and that is the reason why i said you should sew on this side instead of on the other side. So now you see the front is neat. The back is neat, everything is looking so beautiful and so nice, with our pocket, bunny our pocket bunny, is ready to be worn, is ready to be rocked everywhere wherever any time but whomever hey. So now, after that, i'm going to wait on my mannequin head, my mannequin doesn't have any air. So it's a little bit just a tiny bit big on my mannequin head and then i'm going to tie the straps at the back. You see that the straps are pretty short, that's the touch. Five inch strap. If you want to be able to tie it at the front, then you want your strap to be at least 60 inches long now. I hope you have enjoyed this tutorial and you have learnt a lot. Thank you very much for your time. Thank you very much for your support. Thank you for your comments. Make sure you like you subscribe. You share this bye.


Comments
Tema Jones: I made one and I love it. I’m a loctician and have been looking for some thing for my clients. This is perfect. Thank you
Kemba Kirton: Thank you for shouting me out! You are too much this fabric is so beautiful. I love this will give it a try soon!
Karen Williams: Blessings from Brooklyn Ny I am loveing it so much it is so different and very easy for you to sew will be making some for my dreads can I use cotton for this project thanks for sharing
cheryl schrikker: Luv that explanation of marriage and giving birth … your the bomb gurl
Adwoa Aninkora: Pretty
Rachel Julius: Thank you for the video...nice like it..
cheryl schrikker: Yaaaaaaaaaaaayyyyyyy♂️ it’s your gurl Cheryl thank you Gorgeous Yele … your amaizzzzzzzzing. Luv luv luvit. Absolutely gorgeous and thank you for the tip. Oooooohhhh I luv that satin material you used what a top notch pillow bonnet . Definitely gonna do this and make you proud❤️
Delolu tv: Who rocks better than