Crochet Ponytail Hat Tutorial // Ponytail-Messy Bun Hat // Ophelia Talks Crochet
- Posted on 17 December, 2016
- Ponytail Hairstyles
- By Anonymous
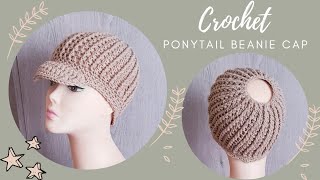
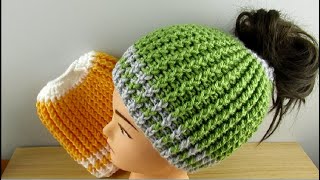
Well, it had to be done!! In this crochet ponytail hat tutorial, I am going to show you how to crochet a hat with a hole on top, a hat so my ponytail can peek through! AKA Messy bun hat! This is my own pattern, there is no written pattern, just watch the video and you will know how to go about making it! Thanks for watching, Anja xx
#OpheliaTalksCrochet #ponytailhat #Crochet
Check out some of my other Crochet videos and playlists linked below:
RAINBOW PROJECTS: https://bit.ly/rainbowplaylist
CROCHET BLANKETS: https://bit.ly/CrochetBlankets
POPULAR UPLOADS: https://bit.ly/Popularcrochet
BEGINNERS CROCHET: https://bit.ly/StartCrochet
*** PLEASE SUBSCRIBE *** https://bit.ly/OpheliaTalksSub
*** AMAZON SHOP ***
https://www.amazon.co.uk/shop/opheliat...
*** MERCHANDISE *** https://bit.ly/OTmerchandise
*** CROCHET PATTERNS *** https://bit.ly/buypatterns
*** CONNECT WITH ME ***
Facebook: https://www.facebook.com/opheliatalks/...
Instagram: https://www.instagram.com/opheliatalks...
Twitter: https://twitter.com/Ophelia_Talks
***MORE ABOUT ME***
Do you love crochet and crochet blankets, yarn projects, and all things wool?
My name is Anja and I love making videos for my Ophelia Talks Channel. I do mainly crochet tutorials with live videos every Sunday evening, I also vlog when I am out and about or on holiday to show you the beautiful places I visit.
If you would like to talk about and show off your Ophelia Talks crochet projects I invite you to become a member of my Facebook group https://bit.ly/CrochetGroup
Please remember to answer the three entry questions and you're in! See you there???
Thanks for watching. Anja xx
Hi everyone, its onion here, I'm back with another video for affiliate talks and today we are making yay the messy bun hat. But actually that's not what I call it. I call it my ponytail hat because I like putting my ponytail through it and it doesn't necessarily look messy, but it keeps your head warm and it's much easier than having all your hair in your hat. So that's my plan behind that now. The will I use today, I have to admit this - is a leftover from another project and the wool came from hobby crafts and unfortunately they don't have it anymore. So this is the wool. This is the hobby craft website. This is the wool from the Women's Institute. Soft and chunky yarn 100 grams - and this is a purple one - I'm showing you there's lots of other colors. They don't do the variegated one anymore, but it's 70 % acrylic and 30 % marina. So it's nice and warm and unfortunately yeah like I said they don't do this very gated one anymore, but that's the one that I use so that you know which one now on this it says you need a hook 9, but I've done the Hat. The project that I origin did, I did do with a 9, but I've done the Hat with a 6 because I wanted it to be nice and dense. So let's get started now. I found this to be the sort of the easiest pattern that I could come up with. I have a designed this myself. I looked at a few patterns, but they all had the ribbed and then they went into the different direction and I thought well then you have to start increasing decreasing, I'm not interested in that because that's too complicated. So what I did I just did up and down this will stretch. This will stay normal and this will come together and that's my hat. Ok! So let's get started, you need your Slipknot first. So this is how I do mine. Then you take your hook. 6 and you'd put it nice and close around your hook and then you're going to chain 20. So 1. 2. 3. Oh six, seven, eight! Nine! Ten, one! Two: three! Oh five: six, seven, eight nine ten! So that should be twenty V's. So that's just how account two four six, eight ten, two four six, eight ten now you're going to do an extra fee or an extra chain! Sorry, because that's your turning chain! Okay! So not this chain to be used in the next stitch! So you're going to yarn over leave this turning chain and go into your 20th stitch, pick up the top of the stitch and do a half double crochet. Okay, so yarn over into the next stitch: half double crochet yarn over into the next chain: half double crochet and you do that all the way along until you have 20 V's. Okay, so I'll see you at the end, okay, so I have 20 fees on the top of my work here. 2. 4. 2. 4. 6. 8. 10. 2. 4. 6. 8. 10. Now you're going to do a turning chain like so then you turn and you're going to do half double crochets all the way along, but not in the V's, as we usually do in the back loops so yarn over and then into the back loop. There pull up a loop and then pull back 3. So let me show you that again, so you yarn over and instead of hang on. Let me just show you: instead of picking up both fees here, like so you're, not going to do that, you're going to pick up the back V there, the back loop, okay! So, let's get back into my stitch there: okay, yarn over into the back fee, pull up a loop and pull through three yarn over into the back loop, and this basically, is what you're going to do all the way along this work and you're going to make It as long as you need it now. How long do you need it? That is, of course, the question. What I did I kept measuring it around my head, which is most sensible, because, if you're making it for yourself, that's what you do, if you don't make it for yourself, you will have to either get the measurements or just guess. Obviously, the way I measured it. I measured it on my head, not on you around your ears, not on the top of head, but in the middle, so the middle of my head. I measured that sircumference and that was about 47 centimeters. So I'm going to make this 47 centimeters long and then I will show you what to do but do go ahead and work your way up and make sure you fit it around your head and so that it meets in the middle of where it's supposed to Be meeting: do you understand where I want it to meet? So if this is your hat, I want you to meet it. That measure it there and it needs to meet there. Okay, so not on the top of your hat, not on the bottom. This will meet up and then this will be taken in and this will stretch out. Okay, do you understand okay, so we're going to work our way up? Okay, so I've now done my whole bit here. Okay and my this length is 47 centimeters. My head is 55 centimeters, but where it fits on my head, let me just try it 47, we're sort of in the middle where it fits on my head. That'S where it's 47 centimeters, okay, so in between sort of the middle of your ears and where your ponytail would be that middle. That'S 47, centimeters, and this here in the middle is 47 centimeters. So now we are going to take. This is our last row. We'Re going to take our first row, okay and I've made sure that this was at the end first row do a turning chain and bring your work together like this and now you're going to do single crochets. Let me just get hold of my yarn here: single crochets into the middle loops see so the loop. This is the back loop. This is a front loop, so loop loop and do a single crochet. So you do this loop here from your starting train. That is you remember. We left that unused, then the top of the chain there right and another one into there and you do that all the way along and that hats then closed up your hat. That'S the same one. This is two one: okay, all right, so I'll meet you at the end of the road okay. So I've now come to the end of the row in at the end. I did another one in there just to make sure it was nice and closed up. This is our starting change, so that's just gon na be sewn in later on and now what I did I went along and I did a single crochet into these loops and into those loops. So let's do a chain, then a single crochet into here and another one into there see just into those loops that you see on the end of your rows and I went all the way around now. I don't know how many rows I did because, like I said, I measured it and it will be different for everybody and also this hat. To be honest, it's so easy. You know to adapt it to your own specifications, so just make sure that you try it on or hold it around your head before you, you know, set anything in stone, so to speak right, so my color has changed and you know obviously, like I said this Yarn isn't available anymore. If you don't like the variegated, because it does change then yeah, just the uniform colored one is probably better. So I'm just doing chain and single crochets all around because in a moment we're going to start reducing and we will reduce quite a lot. So this is just to make the base for no, perhaps with a hole in who'da thought: hey, okay, so we're back! Oh, no, no, we're back we're back so where's my chain here. So let's just go in to ther! That'S my train there! So, let's just go into there and do a slip stitch to finish off the round nicely. Why is that not working? What can I not go in there come on there? We go first and second bit of that stitch. Okay, so again a chain, and this time as you can see all your visa round, it works much easier. We are going to go into a V, pull up a loop go into the next. We pull up a loop and then pull through three okay, so into the V, pull up a loop into the next V up a loop pull through three. So what we're doing is doing two single crochets together and that's called decreasing, because in at the end of this row we will end up with half of our stitches and that's quite a drastic reduction. It'S 50 % off 50 % of your stitches. So that means it won't take you. It will only take you're half as long to get round around because you're doing half the amount of stitches, and can you see I'm always tugging after my listen? I do a little tug just to make it nice and tight there we go see. Can you see it's going in already now we keep going and we keep talking and we do it again here. It'S not such a nice day out there today. So it's perfect for making this hat and, to be honest, you don't need a lot of wool. So, yes, we got to the end. So let's do a slip stitch there. It doesn't have to it's not rocket science days. It doesn't have to be all that. So now I have a I hold this big, but I think probably I might make it smaller again so train like I said, we've only got half our stitches left and that's exactly what we're doing again, so we're reducing again by half and you will see or Notice in the video that this row is even quicker to do so into the stitch into the next stitch and pull through three into there into there and pull through. No, you don't lose it. Okay, let's try again into there into there and pull through three into there and pull through thick. Now, if you have a bigger head and the bigger oh look, you might just need to keep going for another row, but I think for me I think this is perfect into there Oh into there, and pull up again how many stitches have I got left. I'Ve got two left so one two and pull it up and tug it, and then we do a slip stitch into that chain that we did at the beginning and there you have it my hat, with a hole for my pony tail. Okay. So now we need to finish off our ends, so we cut off the wool at a length you pull it through and then we are going to create, like I said, a little fake stitch. That'S what I always call it you sort of go through the next stitch. I mean it's not like it's going to be visible at all, because obviously it's going to be under your hair, then I get the wool back through a stitch that the last sort of stitch I did pull through there and then that's gone okay and then all We need to do is weave in the ends both that are here. So, if you do that, I will show you what it looks like. I hope you enjoyed this tutorial. Thank you very much for watching and I'll see you next time. Bye.


Comments
Ophelia Talks: In this video, I tell you how to crochet a hat with a hole on top, a hat so my ponytail can peek through! AKA Messy bun hat! This is my own pattern, there is no written pattern, just watch the video and you will know how to go about making it! It's so easy to make. Enjoy! Anja xx
Tess Vowels: I love love love your pattern!!! Been studying for days & this will be my choice :) Thanks so much for sharing!!!
Jade Campbell: looks simple enough - will definitely have a go !!
L J Soucy: Haven't tried your pattern yet but think it will absolutely be the easiest one to do. Going to give it a try a little later today. Thanks for sharing!
Jenniveve Liverpool: I love your hat pattern , very nice , I will make it one day
T Cup: I will certainly try this , thank you .
Delerious Khoas: love it! writing as I go. trying with a #6 chunky yarn and size k 6.5mm hook
Joy Laurie: Great video
Thelma Thoman: Thanks for sharing i will try it
Delerious Khoas: I do not know how to upload pics! but this is the favorite hat of my 3 daughters and myself!!!
Lindsayy Kayy: Is it making ridges ?
juanita benson: do u have a video to make a scarf to match the poneytail hat or messy hat
Lisa Anderson: Do you think a hair band could be crocheted into the last row where the ponytail hole is?
Zully Amarilla: En español por fabor