Y2K Spiked Bun Hair Tutorial | Beginner Friendly
- Posted on 07 February, 2023
- Short Hair
- By Anonymous
YALL I have been in love with this y2k spiked bun hair style. This tutorial is beginner friendly. Ive been enjoying the y2k hair styles for sure lol. so enjoy!
୨⎯ FOLLOW MY SOCIALS ⎯୧
◦ Instagram: @mmj.co
◦Twitter: @mmj_co
◦ BUSINESS: [email protected]
୨⎯ FAQ ⎯୧
◦ Age: 23
◦ Camera: Sony ZV1
◦ Editor: Final Cut Pro X
◦ School: Hampton University
YT subby count: 10,600
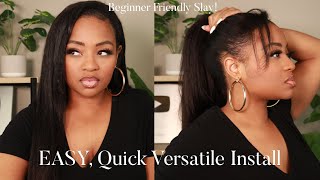
Pushing them to identify please we are the most beautiful creatures in the whole world, black people I mean, and I mean that in every every sense, what's up y'all welcome back to my channel, it's your girl, my Michelle, and I'm back to you guys with another video. I was inspired by this um personalizing on Instagram. She does a bomb job with her. This style is so so so so cute, it's like a two space buns like a Y2K. Look a braid coming down the side, and I tell you: I've been in love with this hairstyle I've been in love this hairstyle because all 2023 I'm trying different and new hairstyles. Please do not forget to like comment and subscribe. If you guys want to see more of mwah, don't forget to follow me on my Instagram mmj.co. Don'T forget! The period is before the C and the O without further Ado, let's head right on into the video all right, y'all, let's get straight into it. So I flat ironed and blow dried out my hair, so it could look as Sleek as possible and then what I'm doing right now is I'm parting, my head straight down the middle from the right sides to the left sides, and - and so we can work with Those Sexes make sure the pardon is good y'all now right here right here, I am just parting out the small pieces that I am going to braid very last um. I parted in, like a triangle section, so it'll lay flat, easier and plus the inspo picture that I had went off of. I could see that she parted it in the Triangle section and then, when I parted that out the way I just rubber, banded tied it out the way and did the same thing for the other side and we're not gon na worry about that part to last. But it's good to separate that part. Now, foreign look it's best to work in sections, so I think this is my right side, I'm taking my right side splitting that into two halves and then I'm gon na go ahead and start working on the back section. So what I use with this got to be insta Flex hold and my Holy Grail Pump. It Up spray y'all, these two together boy and I'm usually stopped using the got to be hair products was because they smelled bad to me like the black one, the red one, they all smell, really bad, but this one actually smells really good, and this hold was The best hole out of any other hole that I've used so yeah, so I used a mixture of those two I'll spray and then I'll use the blow dryer just so it can dry the spray and it will hold my hair in place once that done. I'Ll tie that away with a small rubber band, so it won't be too much tension on my hair and I'll do the same thing with the front half of this section again can't hide, but you can't hide, but you can't remember foreign, but you can't hide okay. So I already did one side of the braid, and now I'm going to attempt to teach you how I did the other side. It'S really simple, so you get your connect! A line get your horse, her and you're gon na take a really tiny section: okay and you're gon na split that tiny section into three mode, tinier sections about that size of what I got split up, split it up split it up. So then, you're going to part your hair into three different sections as well, because this is what you're going to start: braiding: okay, okay, so I'm gon na go ahead and you're gon na braid it without the kanka line. I'D say maybe like one times twice that I braided once okay, then I'm gon na go again and braid a little bit more. Then I'ma braid a little bit more okay, nice, so yeah. This is gon na be kind of hard to see. So I'm taking that piece right, my first braid piece and I'm just going to stretch it straight across and just braid it and it's gon na you're, just gon na attach and braid. Now one of those pieces are not going to have a braid. As you can see, my middle piece doesn't have a braid, so what I did is I took my second piece and I attached it to the middle piece and the outside piece and just started it braiding it again and now all three pieces have a section and Then I'm just going to take one more braiding piece and I mainly attach that to the middle and the end and that's kind of how I braided it in. I know it's not 100 perfect, but it does. It does good enough to the point where, like it looks still cute, though so y'all get what I'm saying so, then I sprayed a little bit of hairspray just so the flyaways all stick together and I'm braiding it all the way down. Now in my head I was like oh, I should break this all the way down to my waist, but then, when I really saw how long it was I was like um uh. I don't know if I like it that long. So I cut it to about a shorter length off camera, but you could really do it out long as long as you want. So then, I'm going to take my pack hair um. This is the Packer. I got from the beauty, supply store, it's 12 inches and it it was only like ten dollars. So it's some good pack here for for ten dollars. It does its job. So what I'm gon na do is. I have split that pack hair in half, because I feel like one whole pack here on each side, would be too much okay, so I split in half unraveled it and I took a little bit of glue and I stuck that hair glue on the rubber band. Only mainly so um it won't, the tracks won't slip as I'm wrapping it around and twisting it now. If you don't, if you're scared of getting glue on your hair, I would say just get one of those paper strips wrap it around your ponytail first and then go ahead and attach that track. But as you can see right now, I am just wrapping it around and around around until I get to like a decent enough amount and then we're gon na go from there. Big high had whatever see it's not too full. You know, and not you know not too thick. This is like the size that I want it to be. So then, I'm just going to be doing the same thing on the other side of my head again: okay, so now taking one side, I am just going to be twisting it, and I don't know if I got this on camera now, but I added a lot Of hairspray as well, so I'm just going to be twisting it and hairspraying it and I'm twisting it and kind of wrapping it around in a form of a bun formation. Sometimes you might have to do this a couple of times, because you know it's. It gets kind of slick um, but using pins and pinning it in place helps a whole lot as well as y'all can see that I'm doing right here as well and then I'll just take a rubber band and tie it around once I get it. You know to look how I like for it to look so yeah. I even contemplated leaving it straight up like this. It was low-key kind of cute, but you know I had to flat iron it because yeah I just wanted to come down just a little bit, but next time I might leave it spiked up like that. Spiked up, don't look too too bad. So what I did was I flat ironed it now yeah. I forgot this was ten dollar hair and I'm flat ironing this on 450 degree heat, look what it did. It basically melted the freaking hair, but it's okay, because I figured out a way to make it work. But yeah I read on the pack that it only goes up to 400 degree heat and I had it on 450. So that's why I basically almost melted it. So I kind of teased it up a little bit while I'm waiting for the flat iron heat to cool down a little bit, because it was just way too high and y'all. This is so fire like I'm just in love, so basically we're gon na repeat the step on the same thing. On the other side, go ahead and use your pins, pin it in place to help it stick and stay down and then use a little hair tie. A hair tie that on down foreign, so yeah y'all, that's pretty much the end of this. Look. It'S actually a lot more simple than it looks, but it's so cute y'all like I'm so in love with this hairstyle, so yeah. Thank you guys so much for watching. My video, I really hope that y'all learned how to do this bomb hairstyle and honestly. I really want to see more people. Do this hairstyle, just my personal preference, oh but yeah. I am having a ball and y'all so is. Please do not forget to like comment and subscribe and I'll see you in my next video bye, love, y'all
Comments
KIERRA: This is soooo cute the braid really makes it ❤️❤️