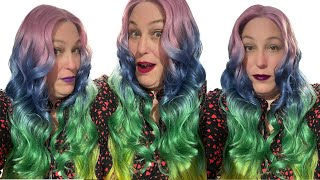
Pink And Green Rainbow Hair Tutorial // Madebybabe.Co Lion Babe Hair (Blonde Kinky Straight)
- Posted on 15 July, 2019
- 360 Lace Wig
- By Anonymous
✨ Hey Moon Babes ! ✨
Ah! It's been so long since I've made a video and I'm so sorry! But ya'll are total in for a treat today! Today's video will be all about dying my Blonde Kinky Straight hair from my very own Lion Babe Collection from my hair company www.madebybabe.co . I've want to open an online hair store for so long and It's been so much work and money, lots of stops and goes throughout the entire process, but I've been able to keep going and keep pushing thanks to so many of you! Every time I was asked where my hair was from, or what hair I was wearing was a push to keep going, so from the depths of my heart THANK YOU!
WHEW-! Okay now that that's out of the way, here's all the details from today's video!
Hair
- Lion Babe Collection from www.madebybabe.co
- Lengths : 30" (3x) and 20" matching 360 frontal.
- Use code: MOONBABE for an exclusive 10% off!
Hair dye used:
- Crazy Color in shades: Bubblegum blue, Candy floss, and lime twist.
-Underground cosmetics in shades: Pastel coral, peach, lavender and teal. (these were the best colors!)
Everything used can be purchased from Nigel's Beauty Emporium in North Hollywood, California (they offer a NICE discount if you're a pro-MUA or hair professional)
Hey my babes welcome back to my channel. I haven't been here in a while and thank you guys so much for. Thank you guys so much for continuing to support this channel and follow me and subscribe to my videos and like them and share them. I see all of those legs notifications. I forgot the word for a second and just means so much that you guys are still supported me even without putting up content. So thank you guys, all so much. Today'S video I'll be showing you guys how I got this hair, where I got it from how you can get it the colors that I use the styling the gluing down. Actually, I never thought myself going to do because I have other videos going down. It'S the same but yeah, so this is what this video will be about. If you are curious on how I've got the rest of my face together, then head on over to my Instagram, where you can check out a lg tv tutorial of me doing my eyeballs and if you're interested on how about the rest of my face, you can Watch my other youtube video. Where I will be shutting out. I got the rest of my face as well as my outfits and everything so yeah you wan na see. I got something keep on watching so today I will be using crazy color in the shade bubblegum blue candy, floss and lime twist, and I'm also going to be using underground, cosmetics and pasta, coral lavender peach and teal. When I originally did this video, I did it with all underground cosmetics, pastel shades and it came out so pretty, unfortunately, they didn't have those shades and stock. The second time I filmed this, so I had to use the crazy color colors and, to be honest, I'm not a big fan of them, as you guys can see. The formulas super super liquidy and it just feels like like water in the scent and they drip really bad. So what I ended up doing for the lime green shade was adding conditioner and that really helped with thickening the color up, and you know helping the formula, because the watery part of it is just like not a fan. I think it'd be great for someone who is, you know putting straight onto the scalp, like you know, putting that light, hair color right onto your head, but if you're applying it with a brush, it drips really really really bad. So, as you guys can see here, I'm going I'm adding the lime green into the cup and that's how it looks - and I was really hoping to put a lot of conditioner in there and hope things to lighten it up. But the pigment in these colors are is just so strong that I would have had to use. You know, probably an entire tub of conditioner to get it at a lighter shade. Instead of this, like super bright lime, green, which in the end up in the end, ended up being fine, but you know just just so you know: what's what's it's gon na look like and so right now, I'm just mixing it and if you don't have a Whisk, you should totally get one and here's what the color is looking like. It'S still super lime, green, my conditioner really didn't add anything for the color just really help the formula change get from super liquid eat a little bit thicker, and what I'm doing now is just organizing my colors in the way that I'm going to apply it. So I have all my cool shades on one side and all my warm shades on the other, so shades from red orange, yellow green are all on the right and then everything else left. So this is what the hair originally looked like it's super pastel. You know, like a soft soft rainbow, that I absolutely loved and you know and totally missing it right now. Although I love the end result, I still just really wanted this rainbow color. I just wanted to show you guys what it looked like, whose absolutely gorgeous okay. So now, I'm applying the pastel coral and the way that I'm going to be applying the haircolor is warm shades on the outside and cool shades on the inside. When I originally did this, I put a lot of time and energy into it, and you know added a lot of unique colors to, like you know, every inch and a half of hair. But this time was my second time dyeing it, and I really just wanted it done so I was, you know, innocence kind of rushing through it, but I started off with that coral that peso coral on the outside. Then I went to the pastel teal, which is the kind of dark, green or pastel green and then put lime on the end and then transitioned into lime. This color I'm playing right now, is actually the blue and it looks totally purple when I first came out. I was like, oh my god, like this looks like toner like I just bought toner, but it came out pretty pretty vibrant, so the color is a little. You know kind of fool you and I'm trying my best to keep the frontal part of the wig. You know separate because it's going to be dyed a different way, so I'm putting the lime green on top of the teal and then I'm gon na go back into the pink. I think this was a bubblegum pink. In the end, they kind of just looked the same. I guess because you know it wasn't being put straight on some blonde hair, but I'm still here that was already died, so I'm just going through this process again starting off with that, or I mean that orange. It'S not orange that pesto, coral and then you know putting in the bubblegum pink and then I think I put that pesto peach on the ends which didn't really show up that much. The pastel shades are so light and they really only work on blonde hair, and so I think, putting it on to hair that was already dyed, just kind of killed it. The lime green. I think I put way too much lime green on this wig and I didn't really realize that until it was over, but there's so much green on there and it's not that the color isn't pretty it. Just totally is not what I wanted to do. So if you are really really really really trying to get like a pastel color, then personally, I wouldn't use the crazy color that I picked. I don't believe that range even has pastels or maybe, if they do, they just didn't, have them at the store that I went to by the way I got all this stuff from what is that store called Nigel's Inn in North Hollywood? So if you're in the Southern California area or if you're in LA you're looking to get these actual colors that I used in store and then you can go to Nigel's and get all these shades in stores, hopefully underground cosmetics will have their stuff restocked. If you do decide to go pick it up, because their colors are perfect and I'm totally having remorse watching myself read I've this way and it's just like Oh goodbye, sweet pastels, so you guys can probably see it a little bit better now, but seeing how the Rainbow kind of starts with you know the red, quote-unquote, red orange, yellow, green blue purple, and then I go back from the purple to the green and then to the Reds and the Pink's. So that was kind of the idea with how I was placing the haircolor at least a second time around the first time I did it. I it was way more intricate and maybe I'll throw up the video another time of showing you guys how I dyed it. Originally cuz, it was just such a pretty color or you know, like the colors came out really really pretty. So I think maybe either all make another wig and just diet how to rigidly dyed it or just throw up the video. So you guys can see and then we're getting to the front again. Oh, I also use yellow the first time. That was another thing that that really helped was using yellow and the second time around I was like. I don't want to use yellow because it didn't look as pretty, but it's not because the color was ugly. It'S just because I didn't leave it on long enough for it to really sink into the hair, and so just looked like. I had random blonde strips, I'm like no, that's not what I want and then for the front. I really wanted the front to be pink because it's my personal favorite color, but you can totally put whatever color you want. That'S your favorite! You put the blue in the front or the green. You can totally flop these colors and have all the warm shades in the center and all the cool shades on the outside. You know like it's really your preference. These are just my favorite colors, so I want them closer to my face, and so here is how the first two rows are looking and it looks so pretty when it's white, like I feel like the color, they're, so saturated and then here's the top. So the top kind of reflects the bottom trying to have all the pinks and the greens and the blues and the purples on the same spot. I really wish I put more purple in there. I did not put enough purple, I don't like purple and green together, because it's like Barney colors and I put so much green - that I was just like there's no way to put purple so right here, I'm just like showing you guys how I'm going to color It so I'm gon na put the darkest pink at the bottom and then the lightest pink at the top, and then I'm going to move into the greens and the blue and then the purple all the way in the back. I spread this process up, so it wouldn't look like it's taking so long but like as I'm watching it now and like doing the voiceover to it. I'M like. Oh, my god. This is such a long video and I was really hoping it wouldn't be okay. So this next part I'm just gon na. Let you guys watch it, I'm not going to talk just you guys can just enjoy it. Okay, so here is the hair the very next day air-dried. I did let it air dry in like any particular position, just like flop it on the couch and let it dry, and you guys can see how vibrant that green is like it's so vibrant. So it was a purple. I mean not the purple with the blue, but you see how pretty the purple is and like. I wish I put more purple in there, so I'm getting ready to blow-dry it and if you've watched my videos before you know that it's a 10 Brant is my favorite. I'M using the silk express whatever this is serum. As a heat, protectant and just overall little shield for the hair, I'm not going in trying to get it bone straight because I'm going to crimp it. But you guys see how pretty the texture is closed up and like even on top of already dyed hair. Like the color deposited so well, okay, do you guys see like the pink and the green, like? I feel like a watermelon. This, like blue and green section, just feels like one giant mermaid, wig kind of makes me want just a blue and straight wig on me, and this is what I'm using to crimp my hair. I wanted the hair to be really really really big, with a lot of texture that it doesn't come with already, which is perfectly fine, because using the crimps and getting it even like kinkier and fluffier really really takes a lot of work and it you know really. Ups, the like caring of the hair, so I'm using the crimping tool on maybe for 30 or for ten something like that and I'm trying to use small pieces because it's not a really big crimping tool which is kind of annoying because it's really small crimps. So I feel like it would make sense to make like you know the plates bigger because of how much space you have to cover. But you know whatever I'm gon na how tools do what they want and I'm not gon na. Allow you guys, like this process, took all night like you can kind of see outside the window. Like it's daytime. You know the Sun is still out. The birds are chirping by the time I was done with this. It was, I don't know, maybe 10 o'clock at night it. This is. This, takes a super long process and the week itself is 30 inches and you know it's. It is not quick y'all, so I mean if you plan on crimping your hair and and doing this just be prepared, like you are not going anywhere tonight, but this is how the crimps are looking, so you can see compared to its natural texture. It'S really tight. I thought I had another clip in there. I guess I took it out alright guys anyway, so this is the next day. Don'T judge me, alright, we all look crazy when we take off that wig or that that scarf you know. So all I'm gon na do right now is just style. The hair get it ready, blew the back down, so I'm just gon na put that down really really quickly. So I'm just gon na go in and pluck some more um shoot the baby here, such I'm, not a pro at some people are so good at sleeping baby hairs, but I've noticed that when it comes to blonde frontals the way that they make blonde frontals, like I haven't seen anyone else, you know change my mind, but the way that blonde frontals are made is always different than black Fred's holes. I don't know, I don't know what it is, but I've noticed it like every single person who has a blonde frontal that dies. It it's just it does. The hair doesn't lay the same as when the frontal is black or the hair is black. I don't know what it is um, but I'm gon na find out I'll. Tell you that much. So all I'm doing right now is just taking the front part of the wig and putting it into a ponytail, and you guys the hair is so thick, my fake. When I say it took all of my energy and time yeah girl. I mean that was that was the workout right there. I skip the gym that day and I'm just getting out my little sideburns. I don't know what it is about sideburns, but they just they're just everything on a wig, so I'm just sharing. Where is my words right now, I'm two strand twisting the little ponytail that I made and you guys can see how like thick and kinky those crimps really made the hair. So if you are someone who loves all that extra texture, I would told the invest in buying a crimp. I think it was like 40 bucks or something so, if totally worth it and then I'm just tying it up into a little knot and I'm going to secure it with a bobby pin. I don't think I put the bobby pin on camera, but yeah I'm gon na secure it with a bobby pin, and this is pretty much the style. Oh yeah, I had listened when I be going down my wig cap, I be using the spray and sometimes it's gets a little excited and gets along the ear. So don't judge me. Oh okay, I didn't know it was Campos, okay and got no makeup on, but feeling yourself. Okay, all right! Go ahead! Yes, okay! I don't know that. Was there all right all right, you guys this pretty much wraps up the video. Thank you guys so much for watching. I hope you guys enjoyed this video as much as I enjoyed making it. This hair was a total oops color and did not end up the way that I thought it was gon na end up. This is the life to the life, but then you guys so much for watching if you're curious, on where I thought this hair from this hair, it's actually from my own hair company, which, hopefully, by the time this video goes, live, we'll be up and running. If not, then just keep watching my videos, I will let you guys know the minute that it's up and running feel free to follow. My hair page at made by Dave co on Instagram was like. I was missing something after that, but I totally forgot, if you aren't already please consider subscribing to the channel, it means so much to me and wash you guys, click subscribe or like see notification that I get when you guys do subscribe. I totally encourage me to keep making more videos like such I've been shooting some once today. I'M just like. Let me wait you guys so much for watching and if you have any suggestions in you want to see hair colors. Let me know in the comments down below what did you think of this hair color? It'S definitely not what I was going for and not something I thought I would ever make, but it's here and I do enjoy it and I do like it. It'S hot. As hell what that side, I still really really like this here and yeah I'll see you guys in the next video bye
Comments
Chelsey: Where you get the hair from?