How To Make A Wig (Very Detailed!) More Free Bundles
- Posted on 30 October, 2017
- Closure Wig
- By Anonymous
Website link: http://www.eullair.com
Indian body wave hair link:
3 bundles:https://goo.gl/o8hyEQ
4 bundles:https://goo.gl/5cvmy1
Hair bundles with closure:https://goo.gl/SDd4Vb
SHOP MY STORE
@SHOPGLAMAZONTAY
FOLLOW MY Vlog CHANNEL
▷SEND ME STUFF TO MY P.O BOX
OCTAVIA OUTLAW
819 West Washington Blvd #151922
Los Angeles , CA 90015
▷FOLLOW ME!
INSTAGRAM ‣ https://instagram.com/Glamazontay_
SNAPCHAT ‣ @Glamazon_Outlaw
TWITTER ‣ http://www.twitter.com/Glamazontay
For Advice EMAIL : [email protected]
For business inquires ONLY Email [email protected]
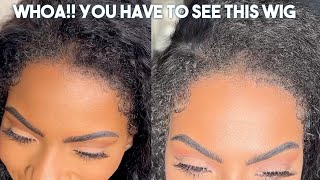
Hey you guys, so this is glamazon 10 and I'm back with a new hair video. Now today, I'm gon na be showing you guys exactly how I made this wig with this closure. Now, when I say this is one of the easiest wings I mean this is one of the easiest ways I've made, and this is good for be kiner's. Now, first thing: starting off you guys, I definitely love how natural his hair is and the curls - and you guys know I normally don't be wearing no black hair, but today honey. I had to pull out some black hair for the girls cuz. They wanted me to give them that okay, so first starting off you're gon na go ahead and need a wig head. You'Re. Definitely gon na need some scissors you're also gon na need some thread and a needle as well as some bleaching powder and some developer. I use 40 and 10 to make 30 a little bit and then I also use sure Malaysian shampoo, as well as a brush for application and also don't forget your luminous oil, for when it gets messy. Now I'm gon na use this wig cap today. This is the dome style wig cap, just because I felt like it would be a little bit more easier and I want it to be more secure, and today you guys I'm definitely gon na be using your hair. This is an Indian body way. It'S four bundles of twenty eight inch and it's a 20 inch closure 4x4 as well, and you guys when I say I haven't - had no Indian hair in a long time. But this hair was so soft. Look at the dimensions of the color and it just looks so natural and so pretty now the ends of it is a little. You know something, but I've think I've blessed and I had Indian hair. I was like this as well, but I didn't have any shedding really - and you guys see it's just so soft and so luxury, but let's get into making this way baby girl. So first things I'm gon na go ahead and use a cup, and I'm gon na put my developer in it in my bleach, and this is gon na - be my mixture to put on the actual closure. Now I want this really thick like cake batter and I'm actually gon na make it as thick as possible with just a little drip, because I don't want to seep in through on the actual closure. But, as you guys see, I'm just going to take my time. Not really pushing into it I'm trying to glide across it, and this is just to bleach the knot so that everything looks a little bit more natural now. This is me doing in the sink after doing this about you know about 15 minutes, and I'm just gon na go ahead and rinse that off and wash it with my shimmer light shampoo, because that helps to tone down a little bit of the brassiness inside of The closure now here's my little wig head. This is the actual cap I'm going to use and you see it's no net on it. This is basically just a regular dome cat. Now you guys see how much more natural my closure looks like. It looks really good. Now, with this I said it's pretty easy because with the frontal, you have to basically measure things out and do things a certain way, but, as you guys can definitely tell this - is just I'm gon na take my closure and actually put it into a little ponytail. So when I do that, it makes it way easier to slow it down, so none of the hair is in my way and when I put it down basically literally just gon na, be laying the closure onto the wig cap as flat and firm as possible, like It'S not like the frontal at all. This is basically laying it flat and firm. Now with me, I've made so many ways like this making closures its pretty easy to me. So I normally don't, pin it down, but if you were to pin it down you're actually going to go ahead and pin it down on each four of the corners. So what like, I said, I didn't really have any pins with me at this time, so I just went ahead and did it for what I know, but normally you would just do that and you see you lay it flat and that's when I'm sewing it. You see I'm pulling it cause it's just laying flat now with this needle. This is one of my sewing needles. I'M. I prefer this because it's a little bit bigger, but it definitely don't get it twisted. You guys can definitely definitely use a needle from that beauty. Supply store, they're fairly, a little bit more easier because they're curved for certain people, but I like to go back and forth and on this side you actually could see where I took the needles and use them as a base to hold the closure down firm. Because I didn't have T pins, so that's the only reason I use these needles on this side because it's holding it down and with this I'm actually gon na stitch through the elastic band. So when I cut it, I'm going all the way through. So I'm going through all those layers of the band, I'm not going through just the top layer, I'm going through all of its layers. Now you see the closure is pretty much flat. It looks really really good. I'M just gon na go ahead and put that in a bun, so I can stay out of my way, but everything is laying flat. It looks really good and I am very satisfied with the way it came out now with sewing. My bundles in I am gon na double up my bundles, and I do sometimes tend to go above the band now with this one. If you were to sew where the band is you wouldn't go through all those layers of the band, you will only go through the top layer because, with the fan it actually has three layers, the dome part of the cat, just elastic band, and then it's actually Another you know layer for the dome cap but, like I said, I'm just going above it and I kind of start around that area. I'M you can pretty much start at where you want, but that's the way I'd like to do it and I'll just keep it going in that you shape you know and right now, as you see I'm going through the top layer band, I'm not going through all Three layers of the band now after doing that repeatedly, it turns out to, like I said, a little u-shape and everything's starting to match up and add up, and I, like, I said, I'm doing double stitching. So basically, I'm gon na go ahead and lay both west down and stitch it. Now, as I get to the top, I do tend to use only one layer of West, but um. You know right around this area is where I stop. This is so probably the last one. I do. That'S gon na be two things of track being stitched at the same time, and then I like to cut them now. I don't really do too much of the flip over method and at the top cause it tends to be a little bit bulky. Now I see everything adds up. Everything is basically really really tight-knit in his soul, all the way to the top of the frontal. So I'm actually gon na go ahead and cut through it. Now you guys are gon na cut through your whole band, but just be very careful not to mess up your stitching with doing this, and it looks really good. I was really really surprised you guys cuz. Like I said last time, I thought I lost my touch by baby Here. I am still here. I'M still doing my thing, okay, I was like oh deep though myself right, so I thought wash my way. I just glad and watch the whole entire way and when I do that, let it air dry, I never blow dry. My wigs and less really need be, but I let it air dry, and this is the look if you guys want me to show you how to be Beach wave with curls or whatever you want to call them. You guys the volume and all that - and I definitely do a video on that, but this is how do we turn now? I'M very pleased - and I love it, so I hope you guys enjoy this video don't forget to comment like and subscribe, and the hair details will be in the bio and I'll see you guys.


Comments
Brook-lynn Titus: I watched your video once and my wig came out perfectly for my first time making one thank youuu!!
Life with Serwa: Omg thank youuu!!! To think I've been paying $150 & UP to have a wig made!!!! This was HELLA easy. Thank you Tay
Ptrbxwvz: Not understanding what wasn’t to love! You did awesome and I now feel very confident on making my first wig!
J: This is brilliant, absolutely stunning! Very inspiring
Angeline Luxe: I'm trying to make my first sew in wig, and this video was super helpful!
Wadzi's World: I've been putting off making my own wig for the longest time, this made it seem so easy! Thank you!
J DEVINCI: I loved how easy and beginner friendly this tutorial was!
Max Ramsey: Wow.. I have never seen a wig made that simple. You inspired me to try it. Thanks .. wig looks awesome
Tomie P: Thank you!! Very detailed and easy to follow
Yup, Lynn: This was literally the best and easiest wig tutorials I’ve ever seen! New subbie! ❤️
Amianna Gale: The hair itself looks so nice and silk ! And the way you styled it was dope too i love this
C. Osemwegie: This looks so easy! Thank you
Noname Foru: Wow! I am amazed. I’ve never seen this done before. I’m going to make a wig now!
Alexis Brokenberry: I think I can successfully attempt this lol THANKS GIRL!
Justice Jhaë: Ig- x_hustlequeen I love just the bundles and closure you used to make this wig. Btw, black hair looks bomb on you. Great video! Very detailed and easy to follow.
Yotianna Robbins: I watched this video when making my first wig and my wig turned out really cute thanks girl ♀️
Tornika Sharvae: I love this video very detail and I think it’s going to help me when I do my first wig thank you
Tina Tina: YESS SIS!! You did that!!! Looks amazing! Beautiful
MCNaturall: Your video was excellent, simple and to the point. Thanks!
Stacy Perry: Watching you do this so effortlessly! Gives me hope.
KEAK: Thanks for the video. I’m going to try to attempt to make my first wig . I’m tired of people over charging me for a weave . Plus I want to do the big chop and wigs will be a must lol
Kamie: You did so good the wig came out so amazing l love it great job
Nettie Jayy: I love how neatly you made this♥️
Jasmine Fairley: Yes Ma’am video was very detailed and straight to the point. ❤️
Authavia Dos Santos: I love this look on you very informative for when im gonna try to make my next wig xoxox u always popping
Brittany Lashell: I love the black hair on you !!! So bomb ❤️ I honestly don’t care what hair I were to win, since your nice enough to do a giveaway I will not be picky !! These bundles look really good ! IG : _brittany_Jae
Cleopatra Jones: I'm following your method this is great helped me a lot!thanks❤️
Lady Cyberella: You slayed this tutorial! Thank you hon!
Sophia Carvalho: Super me identifiquei com a falhinha no dente que ela tem ....eu tbm tenho...me faz me sentir unica diferente dos outros .tipo uma marca da gente parabens pelo canal linda ...ass.. jessica
Indiaaaa: #NEWSUBBIE You’re video was straight to the point and very detailed ❤️ thank you so much!
Kadesha Lafeuillee: Yess sis!! I loved this tutorial, I need these bundles though IG: Kae.giselle
Mor-Gan's: This video helped me tremendously!! Out of all the videos I’ve watched for YEARS this is the easiest one to look at and follow.
Carrie M: Cute n easy!! I love it
rothegem: Made it look so easy!
Ms Myi: Definitely doing this Thanks sis Looks great
taijah smith: Yasss I love you ! ❤️ this tutorial just saved my life lmao leaving leave-out in 2018
Natalie Virgin Bundles: I just started my YouTube channel ; started a few videos . I’m still trying to figure out what direction I would like to go in ! I sell hair and make wigs but I also want my page to be about the fun side of me and not only business ! But this video DEFF helps ! Thank You so much ❤️❤️❤️
Sunshyne: She’s So Pretty! I Used A 22 inch wig head and it worked! Thank you!
Tiyana: Indian body wave! Girl I actually feel like I can make a wig now! This was so easy to follow IG: Tiyana_f
Autumn Gem Awakens: Great work hun! You look amazing!
Zana Turner: Simple and slayed! Do the curl tutorial
Ilicia Bohannon: LOVE when u wear the black. . . wig is bomb!!! would love for you to show how u get the volume and curl!!
CARON: Wow thank you this helped me a lot I’m going to make me one
Demia Eubanks: Absolutely loooove it! And yaassss we gonna need that tutorial hunty!!
Breezy's Corner: This was so helpful! Thank you sm
Shanae Moore: Hey!! I love your channel by the way. Keep slaying!! Question: How long did it take you to receive this hair? I ordered mines on September 1..
FunkyFlyy Conway: very pretty! trying this soon
Just Minxy: perfect, detailed, not long, pretty, funny. Well done!
PurpleKisses ASMR: Beautiful!!! I love this
MsArsenicangel: idk how you do it...you taught me years ago, how to make my 1st wig..and you STILL manage to teach me new shyt to this day!!♀️♀️ i would loove to win some bundles. I would be grateful for anything IG: arsenic.qt
Shawna Badd: Oh And Tay Thanks For Really Going Into Detail About Making A Wig...I Will Be Tryna Make My Own Soon Girl...
MyLifeDiary: Loved the video! Great tutorial. I would love to win the Indian body wave 3 bundles plus lace closure in 20 20 22 + 18 inch closure. My IG is l_patrice! Thank you!
Kammilove: I’m here for the long black hair ❤️ you’re everything as usual
Angellica Jimenez: Love this look on you! I would totally want to win the same hair you have on, plus I've never tried Indian hair before! IG: angellijim
JCTAyitian: You did that it looks so goood
Shalair Wright: FINALLY! An actual DETAILED video everyone literally!!! Just shows details through sewing but never the cutting of the cap or the taking down the bun of the frontal as a beginner whole time I’m thinking you just put it on your head and go smh thaanx queen!
Fenty Mi’amor: This video was so helpful ❤️❤️
Gypsy Jane: wow that came out amazing. thanks for making this video short too lol, perfect!
Lian Bailey: Yassss the Glam Queen is backkkkkk. I love these videos! IG:@ lian.bailey those bundles look bomb
kyrsten miles: How did you ensure the wig fit after you made it? I made my first wig yesterday and it was too small.
Samuola: thanks so much for sharing this video, I did not know how to do this now I do. Thanks for your help!
Pretty Girl Nae: Thanks for video this gave me lot of confidence to giving it a try to make me a wig ✨.
Chanda C: YASSSS! TAY YASSSS! LOVE EVERYTHING ABOUT YA GIRL! Hair or not keep inspiring boo!!!!!!!
Mimi Julien: Love this step I posted my first video on making my own wig
Halle McQueen: Best Video Hands Down For A Newbie Wig Maker
Michelle W: FABULOUS !!!!!!!!!!!! LOOKS REALLY GOOD ON YOU!!!!!!!!!!!!
Yanna Andrea: You laid this wig out sis
Rachel Scruggs: This video just motivated me to make my own wig for my birthday
sweetcountrybear: Beautiful and helpful vid thanks!
It’s Ashli: Show us how to customize the closure ! ❤️
KaylanLashaun: Love it
amiah keith: Very helpful thank you !
msjaneofalltrades: Please forgive dumb questions... Does the foam head come in different sizes? I attempted to make a wig on a foam head (using glue) and when I put it on there was no stretch to it and it was too small/tight. Also after you cut out that piece under the closure what keeps the rest of the wig tight around your head so It doesn't shift etc. Do you use pins or anything to keep it in place? You did a great job everything looks beautiful.
Chani G: I would love that body wave and I love all your work and story times
Zaria G.: It’s something about black hair that brings out your features like your eyebrows and eyes. my lord
Jena Marie: You really are a wig slayer lol I'd love to win the Indian body wave hair! Instagram: @thejenamarie
Madison Figaniak: Thank you I'm learning off this !!
Velece Baxter: Thank you for this tutorial
Vivalakayyy: I needed this!!!
Gracie M: ig: @pyaaragrace omggg those bundles are beautiful! you did thatttt sis!!!! indian body wave rockinnnnn i need the slayageee
Kae Buka: That hair looks amazing girl
Diamond B.: HUNNYYY MY EDGES ARE SNATCHED YET AGAIN!! I'd like to win the Indian Body Wave (3 Bundles w the closure). My IG is @itsdiamondb_ Thanks Tay <3
Essence Liddell: Thanks girl for this video!!!!
Mimi Stennett: I’m loving this hair!!!
Jasmine K: Definitely would love to win those 3 bundles and a closure ig: ohjasmine_
Stefanie Servance: Yes love when you make the wig be slaying as always
Liv'in: Very helpful thank ya baby!
Martina Franklin: Had to watch this video twice, I ace everything I just appreciate how the back part of sewing the wig cap is always tight for me maybe I need a bigger foam head..Thanks slayer
Adore Jayy: looks amazing
Daisy John: Great video!!! Now I know how the magic is done. Girl you're so pretty and I love your gap teeth it's just like my sisters'. You just gained a new subscriber ☺ .
Still Mylarh: I loved your video... you’re the only one who remembered to cut the cap under the closure .... you’re actually here to teach not just to Show off your make up and pretty face like other beauty YouTubers ❤️❤️ Just subscribed
rara: girl, lemme cop this wig up off you. this is beautiful. you're shinning as usual tay!
Y’all Poor 504: You made this so simple lol thanksssss
Marissa LaChelle: I’d love to have this Indian body wave look! Ig: glamarissa
Daijia Moody: I would love the Indian body wave it’s beautiful. IG: @dai.jiaa
Sade Leigh: Please make a tutorial showing how you got the Closure to look so good especially with the edges/baby hairs. ! !
Breanna Smith: When making a wig with multiple lengths. Which length do you start on the nape with?
Lavina King: I love this ❤
Diamond Monae: You're the best teacher! Please show how you got the waves!
J Williams: OoOh Tay ! Slay hunntiiiiiiii. Love ur videos I'd like to enter this contest, with the hair from this video ( u sold me with the Farrah Fawcett realness) and my IG is: jayemmdoubleyou