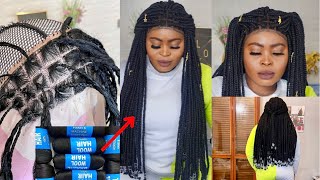
Diy Crochet Butterfly Locs Wig Tutorial | **Easy And Detailed**
- Posted on 28 September, 2022
- T Part Wig
- By Anonymous
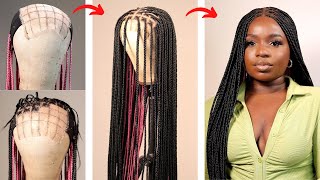
Hey Lovelies, In today's video we are going to be making a diy crochet butterfly locs wig. I'm so excited about this tutorial and I hope you love it also. In this tutorial, I shared how I create my boxes before ventilating my frontal and how to create a good butterfly locs wig.
#diybutterflylocs #locs
Locs from @nigerianbraids hair on IG
Small crochet ventilating neeele : https://amzn.to/3fNj9lO
INTRO: 00:00 - 00:50
HOW TO CREATE YOUR BOXES: 00:51 - 04:03
CUTTING HAIR FOR VENTILATING: 04:04 - 05:13
LOCS TUTORIAL ON FRONTAL: 05:14 - 14:21
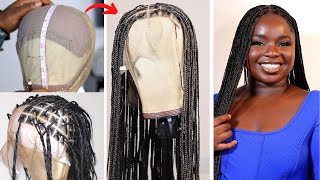
COVERING THE BACK: 14:22 - 16:54
INSTALLING LOCS ON WIG CAP: 16:55 - 19:31
INSTALLING LOCS WIG: 19:32 - 21:16
FREQUENTLY ASKED QUESTION: 21:17 - 23:45
Order to watch previous videos for better understanding;
HOW TO PREP YOUR WIG CAP FOR A WELL FITTED BRAIDED WIG (CLOSURE &FRONTAL):
DIY CROCHET CLOSURE BRAIDED WIG USING EXPRESSION ATTACHMENT:
DIY CROCHET KNOTLESS FRONTAL BRAIDED WIG USING EXPRESSION ATTACHMENT:
DIY CROCHET KNOTLESS FULL LACE BRAIDED WIG - HOW TO DIY A BRAIDED WIG;
HOW TO VENTILATE WITH A LATCH HOOK: https://youtu.be/5lo43znP9H8
+ FILMING EQUIPMENT
- Canon 750D
- Ringlight
- 2 LED LIGHTS
_______________
+ PLACES TO FIND ME
INSTAGRAM: https://www.instagram.com/the_basil_me...
EMAIL: [email protected]
Foreign case you don't already know, and today today I'm going to be showing you how to achieve this gorgeous wig. I have on all right. So it's a DIY, crochet butterfly locks wig, all right, you can see it and it's so pretty and came out so gorgeous and one thing we're going to be doing we're going to be doing this week from scratch. I'M going to show you how to save your money, all right, how to achieve this by yourself at the comfort of your home and how to get it to fit. You perfectly all right. That sounds like something interested in them make sure to keep on watching love. You mwah foreign before you start any week. Obviously it's going to be your week up. I have a detailed video already on that, so I didn't do it on screen, so I'm showing you the already made one. I have a whole detailed video for any size of head all right for your clients. For you, I have a video, so I'm gon na link it down below and I'm also going to link it up here, so go ahead to check that out next thing you want to go ahead to do. I think this is super important, because a lot of people ask me this is to create your boxes because we're starting this week from scratch, we already have our frontal down. The frontal was not ventilated, so the next thing you want to do is create your boxes and before you create your boxes, you want to consider how big you want your you know whatever you're working on, but in this case our locks, how big it is or How small it is for this wig? I decided to go with five boxes on each side that makes it 10 in a row. So I decided to go with that and for to make that easy for you or to make that so you can do your own boxes with every size. You want all right. Whatever number you want, I'm going to go ahead to take my tape very important, so normally I do like from the middle right so from the middle to here. My whole front, ear to ear is 13 inches, so normally from the middle to the ear will be 6.5 right. I hope this makes sense, so I take my tape right. I count this small like these small lines right, so you just. There are eight lines that make one inch right. It'S times 6.5 will give you 52 all right. So what eight lines on the tape gives you one inch, so you go ahead to count 16 6.5. I don't know if that makes sense so because you have 52 52 lines, you want to go ahead to divide it with the number of um rows you want and they have portion. So I wanted five half portion, so I went ahead to do like six. Sorry I went ahead to do 52 divided by five, and that is 10.4. So now you know that for every 10 line you're going to go ahead to create your box with it. I hope this makes sense because it's a bit complex, but for every 10 lines I knew I had to Mark the 0.4 doesn't really matter because you can use it for your spacing, so it doesn't really matter per se all right, so the whole number is what's Important so let's say you know 52, and you want to go ahead to make four boxes. You want it to be like major like jumbo right, then guys make four boxes, so you just do 15 2 divided by four right. So you know that for every 13, so you count it so one two three four like that. Like that for every 13th line you mark your inches. I hope that makes sense, because this is a very frequently Asked question, so I just want to clear that up before we get into the video. So that's what I did for the row for the column. I just went ahead to kind of Mark every one inch because I was just doing one inch all right. So if you're not doing one inch, you can go ahead to do that. If you're doing like one inch, you don't have to divide, because it's just there you kind of just mark it, but for the others, you kind of go ahead to divide so after you're done, drawing your boxes after you're drawn drawing your columns and rolls the next Thing you want to go ahead to do is cut your attachments, obviously, and you want to cut the attachment into five or into six. I went ahead to put this attachment into five because that's just what I felt, but you can cut it into six because it's going to work too, but I cut mine into five so into five or six. That'S what I would advise that. So if you don't know I braid with the cannoli hair, I don't I braid with cannoli, ideally time I use human hair is when I'm doing my edges, like you know, so, I've gone ahead to ventilate the frontal off camera. I did this off camera because I have a lot of videos where I ventilated already. I have a detailed ventilating video and then I have a front event. Listen video already before so I just did it off camera. Just you know to kind of save time. For us, so I'm going to go ahead to link that in the description box, I'm going to link it in the comment section and I'm also going to link it up here. So you can go ahead to check it out. If you have not checked it out. It'S going to help you understand what we've done. So this is what the wig cap looks like once we're done, ventilating the front, so we have the back to fill and then I'm just going to go ahead and start our week. So for this week today, I'm going to be using these three colors of butterfly locks, all right, I'm going to be using this three. So the first one is like this brown mixed with a lighter brown. Then the second one is like a golden color kind of yellowish. I don't know but you're seeing it on the screen. Then the third one is kind of a lighter brown. I don't know why I picked these three colors. I just felt they'll go well together. Let me know your opinion on that. So now on to the wig, I'm just gon na go ahead to comb that braid out after losing it. Then I'm just gon na go ahead to use my razor comb to kind of take some inches away from the hair, because I felt it was too long when I was working on it. But I did find the solution for that which I'm going to show you later on. So I'm going to take my Shannon jam and then I'm just going to go ahead to wrap that around the hair kind of massage that into the hair. If you're not new. To my channel you know I do love braiding with shine and jam. If I don't have a shine and jam, I go ahead to use any mousse of choice and it just works perfectly for me. So I'm going to go ahead and start braiding as normal. Then I'm going to take the look of my locks and then I'm just going to pass it into one strand of my braids and continue braiding as I would normally braid. So I'm going to braid that to the tip of the braid, then I'm going to go ahead to crochet that braid into the hair. All right, so I passed the crochet pin, I'm using the crochet pin I use for ventilating, I'm using the biggest needle. That comes with it. I just kind of pass that through the bottom of the braid, and then I just Loop it out so this wraps, I'm showing you came with the locks I didn't purchase this. It came already with the locks, so I'm just going to go ahead and use that to wrap, as I would normally do, there's really no trick to wrapping the hair. I would say see that you kind of just want to find your flow and kind of find what works for you and what you like. Alright. So I do like a lock, that's kind of thick from the start to the Finish, but some people do like it. Starting from being thin and kind of become Fuller, so you kind of just want to find what works for you and kind of put some Ruffles in there to kind of give your butterfly locks that flow you're. Looking for so, I did wrap numerous times so every time I'm done wrapping one wrap, I'm just gon na go ahead to tie it, then I'm gon na go ahead. The restaurant that left, I just put the super glue and kind of just wrap it around, because it's a wig and I do want it to be very durable. So that's why I go ahead with the super glue and for the super glue guys. I kind of find out that if you don't wait for it to dry before you Palm roll, it's going to turn white so before you pan bro, you want to make sure it's kind of it's a bit dry before you go ahead to Palm roll. If not, it's just going to be it's going to turn white, but it's not that messy, but it's going to turn wise and you're gon na see it foreign foreign. I actually wish I did for this week. It will be to have put the attachment in hot water. Do a hot water treatment before I actually use it to ventilate, or when I was done ventilating I would have dipped the hair like the braids. I would have dipped them into hot water when I was done ventilating because I just feel the hair came out a lot stiffer than I would have wanted. It'S a bit stiff. I don't know if, at the end like in the long run, I don't know if it's going to become more flexible but right now it's a bit. It'S a bit stiff and I just feel I don't know it's very experimental. But in my head, I'm just telling you my thought process in my head. I feel I should have dipped it into hot water, because that would just make it be more flexible because you know with attachments when you're, not when you've not put it in hot water. It'S a bit stiff, then, when you put in hot water it becomes flexible and more movable. So I just think that's something I should have done, but it's my first time. I don't really know if that will work, but in the back of my head it just tells me I should have done that, but the wig still came out cute regardless. Don'T get me wrong, but I would have just loved it to be more flexible. Thank you. Foreign ahead, to finish one side of the wig - and this is how we came out - I was really feeling this week at this point. I think the color coordination is actually quite nice, if I do say so myself all right. So this is what it looks like. I'M just going to go ahead to show you what I started doing at the end of the video right. So, at the end of the week like towards the middle of the week, I just started doing this method instead, so I stopped cutting the extension to be shorter. I stopped using the razor comb, I'm just going to go ahead to braid it. So now I'm showing you the locks all right, so you want to unravel it's in the middle right. You want to make sure it's in the middle. You want to set it aside all right, so you don't struggle when you're making it you want to kind of set it aside all right, so I'm just going to go ahead and braid now and I start adding this locks a lot more closer to the hair Than before, if I was braiding to like the bottom a bit before I add the locks, but this one I kind of start adding the locks a bit closer to the braids. I don't know if you get that but yeah, so I just go ahead to weave the whole thing down. Then I take my crochet pin and then I just kind of do the same thing. I do pass it through crochet the hair in, but I go ahead to crochet to the air twice now. Alright, since I'm no longer cutting it, I go ahead to crochet the air another time again, one more time, so I crochet the head twice right before I was cutting it and just portraying it once, and I discovered during this - helps with the body in a way It helps it look more Fuller from the teeth right I didn't have to kind of make it look full like kind of just does that, but it did make the hair a lot more stiffer. If, I'm being honest, that's why I said I could have dipped it in hot water. From my own point of view, all right, so I'm just gon na go ahead and crochet the wrapping hair in and then I just go ahead to wrap so the first wrap. I kind of do it like I'm kind of joining the whole three strands of braids. I don't know if that makes sense, I'm kind of wrapping everything together. So it's very easy for me to wrap. So the first wrap is like a little bit. It'S just a little piece of wrapping hair right, so I just use that to wrap it. So it's not like I'm wrapping it, I'm just tying the hair together. So it's easy for me to start wrapping. Then I go ahead to wrap it's pretty easy. It'S pretty simple you just it's basically repetitive, actually you're just doing the same thing over and over again. Thank you foreign. So now we're done with the frontal portion of this wig we're done installing the locks on the frontal pads. So the next thing we're going to do is cover up the back, we're going to pay attention to the back. So now we're just going to start from where the wig cap and wet the frontal Nets where they are joined together. We'Re going to start covering that up, I'm going to be using my big crochet hook for this part of the process. So basically, you just want to unravel the middle of the locks, pass it through with your crochet hook and then Loop it and then you just start wrapping and wrapping this part to kind of just give it a blend in with the other. You just don't want to kind of just crochet in and leave it there. You want to go ahead to wrap it to just kind of feel what you you're going for right. So everything will just look identical. You don't just want to look it and just leave it. Thank you. So now we're just done with covering only the wig cap and the net parts, and you can just see how covered that is looking already like it looks, classif already installed the back, so you want to take your time with this, make sure you have minimal spacing Make sure the whole wig cap and the net Parts make sure they're very well covered, and now I'm just going to progress and start doing the back of the wig cap, I'm just going to go ahead and start filling in in case I didn't mention the locks. I'M using there are 18 numbers because I got four packs and they're 20 in each, so I'm using 80.. So I'm gon na head to use I'm thinking about 50, something in the front, so I have less than 20 something left. So you want to be wise if you're, not, if you don't have enough locks or they are not as much you want to be wise with how you distribute the locks at the back. You want to pay more attention to the middle of the locks, so you kind of have a enough locks at the middle because the side, you already have the side side covering it, but the back. You don't have a lot of it going on. You don't have a lot of stuff going on at the back, so you want to take your time and kind of just arrange it so that whenever you drop it at the back, it's still looking full and it's not you're, not seeing your wig cap. It'S your wig cap is not poking through foreign, so for the back of the wig, I'm just going ahead to use my middle and thread and I'm just going to go ahead to make sure I Loop that very tightly as tightly as possible. That'S what I'm going to do. I didn't go ahead to crochet this at the back because it was just tearing the net, so I didn't want to do that. It'S going to tear the net really bad, so I just went ahead with the needle and thread method and it kind of really holds well. You just want to make sure you Loop it full. You tie it well, alright. So this is what the hair is. Looking like, when we're done, you can see that back is well covered. Nothing is showing the wig cap is not showing, so that's a plus. So I'm just going to go ahead and apply my mousse to the wig. Now we're done, I'm gon na go ahead to apply my mousse all over the wig and just let it dry foreign it I'm not going to lie. I was like um all right, but one thing I'm gon na say which I wish. I did also all right. There'S a lot of things I wish I did, but I'm flopping, so you don't flop all right. I'M gon na tell you as as it is all right, so I did go ahead to spray the wig down. I'M a spray girl. I always love to spray. My wig down, I never reach out for a glue, but for deluxe wig for this week. I wish I did reach out for a clue because it was looking pretty late when I was done, but at the point I discovered that the wig was just pulling back. It was just going back and back and back so I just advised using a glue, a very strong glue and just have this day where it's meant to stay without it shifting. So this is how it's looking when I was done. I just felt the hair was too full personal opinion. I don't really I like full hair, but this hair was just giving two cool, so I kind of just packed it - and I was just thinking like what style would be cute with this wig but yeah. This is what we have and I love it. I was doing a mini happy dance because I just loved how it came out and how it looked so now I'm trying the side part. So you can see the wig is kind of pushing back. I don't know if you can see the glue sticking the tacky glue Parts, it's kind of pushing back already, and I was really sad about that, but yeah. So I'm just showing you that you can Pat it to the side, even though it's not as flexible as I would have wanted it, but it still came out very cute. So now I'm showing you the back of the wig and how it's not showing how we covered it really properly and really well and yeah. So lovelies we're done with this week. It really came out really gorgeous. I really loved the the final look. How it looks on me. It'S really gorgeous, like you can't tell me otherwise, and you guys know that this color is my color like dropped it for me. Do you get like Drop Browns for me because it always looks banging on my skin but yeah, I'm so happy with how it came out. Another frequently Asked question right: how long do does it? Take me to you know, produce a wig like this. I can't tell you for a fact: even this one, I can't tell you for a fact, because I've been on it for a while, and I had other projects too. It was just crazy, so I was sick. A lot of things happened to be honest and even like half of the side, my younger sister was the one that I've been slated. Let me just be honest and it was so amazing to just see her ventilate because she blend from me and yeah. So it's actually very easy. If you just put your mind on it, you can do it so I mean my younger sister can do it, you can do it, don't think about it, just go for it. If you want to try one. This is the perfect time. Go for it, let me know your thought, let me know whatever you think. Let me know if you're going to be trying it out and let me know your suggestions of your suggestions, also all right. So another thing I want to say is I hear you don't worry, I get you for the full lace, jumbo um braided wig, I'm gon na. I guess among the projects I'm gon na do next. So just look I'm going to bring a poll for the colors around somehow somehow sharp around. So I don't know when but summer I'm gon na bring it out. So look out for that. Thank you so much for watching to the end of this video guys, if you've not hit that, like button, make sure to hit this like button, make sure to hit the like button and also make sure to share this video. Let everybody see it all right make sure to like this video, because it helps me it helps me and helps other people see this video also all right so lovely, that's really it for this video. I really hope you enjoyed it. I really hope you liked it all right so make sure to check out my other content. I have a cool hair playlist for you to check out. I have been installing wigs. I have full lace, wig cancellation. I have a ventilation video also. I have a lot of videos that you can check and gain a lot of Knowledge from so make sure to check it out. Thank you so much for watching to the end of this video and if you watch at the end of this video, you already know you know what you already know: you're the real MVP. Thank you so much bye,

Comments
Precious Uchechi: I love the wig and the colour combo blends so well with your skin❤️. I'll just sew on an elastic to mine cos I'm definitely thinking of making it
happy simon: So beautiful I love this please give us more ❤️
Rozzy's Computer World: My love Through u I made my first frontal braided wig Am so in love with myself I did ventilated the frontal tho not do neat I wish I could share the pics here U are an amazing teacher
Odekunle Esther: So beautiful ❤
peggy ogwihi: It is beautiful. I'm going to try it
Hannah Songden: Just the cover of the video alonewig is really beautiful. You're gifted.
MinuteswithAngie: I’m definitely trying this Thanks dear
Verona James: Love it
black pearl 🖤: So beautiful
Juliet Jiks: U are just too good at this Plz what’s the name of the locs
Maybell Enoghase Enoghase: Waoo is Beauthful
Patience Jassy: This what have been searching for long time..thanks for sharing hun
Queen Knyoki: What colours did you use hun? I want the same too pls
Adeshile Adequate abigail: Please do you have training sessions cos I just love you. Your videos are so so easy to understand. Thank you. GOD bless you.
okoli IFEOMA: Wow..... Bob braided wig pls....am very sure urs will come out exceptional
okoli IFEOMA: U didn't mention the brand of the butterfly locs u used... What brand was it pls
Reign Okojie: Please did you make this for sell?
Romoya James: Sew a elastic band in the wig and three combs trust me it won't move
faithylaza vlog: I really wanna try this but I don’t no were to start never done this before
Patience Jassy: Pls whats the brand name of the locs hair you used
Ayemere Francess: Its own the way I ran here when I got the notification
Theresa Singabele: Please what your iG handle?
Binta touray: Wow nice but i need to talk to you plz