Hot Glue U-Part
- Posted on 19 December, 2012
- U Part Wig
- By Anonymous
upart wig using a hot glue gun
what you'll need:
- foam wig head
- shower/processing cap
- dome cap
- hot glue gun
- hot glue sticks
- hair
- needle
- thread
- scissors
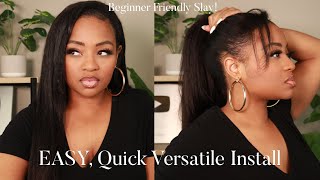
Lee I am having a little fun with a new part that I made. I thought we put a cute natural and I did this using a hot glue gun, so I'm gon na call, as my hot glue part and you're just gon na start off. I started off with my foam head and a dome cap and a plastic shower cap. So first I put the shower cap over my dome head. This is to protect the dome head because we are going to be using hot glue, and so I just went ahead and put the dome cap on top of the shower cap and adjusted my head to the way I wanted it so that we can get started. So then the next part is I'm gon na. Take my hair and you I'm obviously using some scraps on, because I want to kind of use some dark and some highlighted colors. So I'm using some for some too and some for 30. But I'm gon na measure off the piece at the very bottom of the nape that I want and taking my little mini hot glue gun. I'M going to just follow that little line at the bottom of your dome cap with the hot glue gun. And since this is a short piece, I was able to just do all the glue and just place the hair right on top almost like a quickly. You know, except for dries, a lot easier and a lot faster. So be very careful. You shouldn't really worry about. Having to burn yourself, if you're careful with it and as you can see right here, going all the way through, isn't always the best it's better to do a little piece at a time and lay the hair on top and just give it like a little second To cool it really doesn't take long, probably about the time it takes you to get set up for your next track up hair. The boo is already nice and cool, or a slick form by me very good sure that my edges were down cuz. I was really paranoid that my interests might come up so then, the next step here, I'm going to show you how I measured it out. I use my thumb because I wanted this wood to look a little more natural, not too overly full without looking thin either. But I use my thumb and about the distance and my thumb with the distance between tracks and I lined up the hair and from there. I go ahead and cut the peony and I'm going to start this time in just a little dirt. Looking a little at a time as you can see again, I measure my thumb so what it is. I took the hot glue gun and it's a little glue and then I'm gon na lay the track there take just right there. Then I'm gon na hold there and I put that there I'm going to continue to put a little bit of glue and lay the track down doing it. This way, the glue dries so quickly, this kind of shirt that you taught your gal and that there are you face a nice and tight and afterwards I like to just go and make sure I press into the dome cab and into the glue, make sure everything's Nice just tight seal around and then, if you have any little tiny parts of glue, just make sure to pull that off once and I love to do. I have to check my because I'm always paranoid if they're gon na, but they really didn't, know pepper in the wild now so is about for the top. I was kind of paranoid about fall behind. I wanted aim to be lined up quick, so they did I'm sore Audis final pencil and woman when the gum cap, drawing that line and just continue to do the same a little bit of glue at a time playing a track a little bit of a time Like a track, I didn't really have two views very much hug. Louise, you should have a mini hot glue gun and I used probably about I once I had two and a half sticks that I use for the entire way. So that was not too good once again after it's over going through making sure everything's, nice and secure and press down into the glue. So I did that all the way throughout and then as I fit when I got enough hair on for me, I, like kind of a larger hole. What I did is this is a method of course taught by T's black curls, and what I'm doing is I'm taking my needle and thread, and I am going to tie a knot from one side to the other and what this is going to do. The Habu will actually pretty much keep the way shape to begin with, but stay, if maybe apart with a little too wide or something sometimes you can tighten it by changing this string after the way was done. But for me this is just to hold it on my head clearly, so this little string is just what's gon na hold every tooth thing together when we put the lid on and you'll see, because we're actually gon na cut out the rest of the dome. That does not have hair in and you can make you know your parts larger. You can make me smaller. You tape around. You can make a little more square. That'S up to you. This is just how I made the part for this hair and, as you can see, I tied the string going over the wig cap and then now I'm tying a knot on the other corner of my new part. I'M doing there is tie a knot. Oh cut your string there already now we're going to cut out the circle portion. So I'm going to take everything off from my foam head and put that to the side we're going to pull the plastic cap out and you see how the plastic cap did actually protect our foam head because, as you can see, some of the blue melted. This is why do not use a hot glue gun on your own head? Please do not. I know some people do too quickly. You can't do that with the hugs are done FYI, and so that should already be nervous, but anyway. So now, what I'm going to do is I'm going to cut a line in the center, we're going to make sure that this scissors go under the string that we just tied down and, as you can see, everything's going to print yeah, just kind of hold your Phone shape we're gon na go around and we're gon na cut the rest of the open hole of the caps out. I don't get too close to the hair. I kind of leave like maybe half a centimeter of fabric, just kind of cut, especially with this being phileas kind of paranoid. But that way I don't have to worry about accidentally cutting my tracks or anything so once that's done, you're ready to style. So I already pulled out the little part of my hair in center and tied the rest back in a ponytail, so I just flipped the wig on and place it where I want it, then I'm going to take a rat tail comb and pull out my hair In front of those string that we tied and I'm just gon na start kind of, like laying the rest of my hair over the wig to cover up the tracks, and now I'm going to make my part, I, like a part in my hair, one little tip And trick that T's black pearls with you with their string is shoot but concealer on it to make it blend in with her scalp. For me, that's not really a problem, so I don't really bother. As you see here is my finished product, just kind of smoothing. My hair with the wig and I think it looks gorgeous it blends very well. It looks very natural, it's something I can wear for a little body right now, I'm using this as my protective styles. As we all know, I was sick and I don't. I think I told you my hair was falling out and stuff, so I kind of like this to kind of give me back my little body and you could go. I got my hair again in protective style it until I feel it is ready to be strong enough for loops and things or whatever I want to do with it later on, but for now this is my style, and I hope you all like enjoyed this tutorial. Don'T forget to rate comment and subscribe and I will see you next time. Bye, bye,


Comments
Mariska P: i like this method keneitha...looks really natural...im gonna try it....keep up the good job girl...luv ur vids!
Mariska P: girl...i made mine yesterday but i have yet to wear it....i will be putting it on tmrw to see how it looks and if it is ....it will b my new years hair....thank you soo much...i enjoy watching your vids you always have fun and easy ideas to try.....do u have instagram or twitter so i can add u and show u the pics?
divakenietha: oh yeah, my hair just isn't very thick or long right now so putting it into a down ponytail and tucking it in the wig, works fine for me. as you can see in the video, i didn't sew on this wig, it just sat on my head which is why i didn't need braids. so just put your hair in a down ponytail and tuck it in the wig and you should be fine
divakenietha: thanks! i just got a lot of hair so i might be doing some more styles
Zanya425: Im.glad to see ur feeling better hun. The style is very cute. Goo Girrl.
Jennifer Briggs: how many packs of hair did you use
Mareshasprettypaynt8: What kind of hair did you use? Cute
divakenietha: thanks =)
divakenietha: This was really just some scrap hair I had laying around but i believe most of it was milky way que and the lighter 4/30 hair was the milky way pure.
divakenietha: i did have a twitter but i never went on it and i forgot the password =( but send me a link =) I'd love to see how urs turns out. oh and i do have a hairlista account. if you're on there just look up kenietha the diva ;p
TBJ Stylist7: You said in the video that you put your hair in a pony tail. You didn't braid it underneath. May I ask why? The reason I'm asking is that I'm not a braider, so that method would be great for me.
divakenietha: i was just using scraps of old packs that weren't finished, but i'd say about a pack and a half
Jenna1814: kool cuz very cute
divakenietha: thanks cuzn