U Part Wig Tutorial - How To Sew/Fold Over Method
- Posted on 17 January, 2015
- U Part Wig
- By Anonymous
Slow, repetitive & easy to understand ! I'm no expert but here
is the way I do mine. Hope it helps !
Make sure your cap fits your head before sewing :)
T Pins - http://ebay.eu/1BhBXkt
Mannequin Head Stand - http://ebay.eu/1CjPB3w
Search for "wig head" or "mannequin head" for a
plastic or foam head.
First bundle of hair is some old Peruvian Adora hair that I've
worn before.I decided to dye it so when I curl it there's a small amount of turquoise peeking though. Its not actually a whole bundle.
Second bundle is Peruvian from Hair Perfection Ltd - 16 inches.
Might cut into a bob? What do you think ?
Rings: H&M
Nail Polish: Bourjois 'Succes azure'
♡♡♡♡♡♡♡♡♡♡♡♡♡♡♡♡♡
T W I T T E R: http://twitter.com/mykawaiilife
T U M B L R: http://mykawaiinails.tumblr.com
I N S T A G R A M: http://instagram.com/mykawaiinails
E M A I L: [email protected]
♡♡♡♡♡♡♡♡♡♡♡♡♡♡♡♡♡
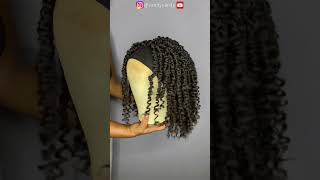
Like I said before, we start I'm just gon na show you what you need. So the first thing is a mannequin weight. Headstand, I don't know what the hold, but basically you just put it on. So whatever you want. I haven't won this stool at the moment. So it's nice and tight, and this actually moves around and yeah. It just makes life a lot easier, makes it process faster because you don't have to hold the mannequin head down with your hand. Your hands are free to just sew, and the process is a lot easier. I have made two weeks without this thing, but it definitely makes life easier. So I will recommend that if you can find it, I thought this would be. The last thing is obviously what you need to sew and you need a pair of needle, not a straight needle just makes life so much easier, so you can get these from any pizza parlor as well as some black string. This usually comes together with the COG needle. The next thing is that I need are some t, pins and I'll. Show you what one looks like if you don't know - and it just has this bit at the end - it helps the hair to stay on the mannequin head and also allows your hands to be free to just sew and get things on quicker. If it is a straight pin, the hair will just slide right through. I have done a wig with like foam tacks that I use for my board, but they pop out really easily so it'd, be so much better, so get some TVs he's also from eBay. These are only to cut the string. I don't cut my laughs, so yeah just need some scissors for the string, you're also going to need a weaving net or a dumb cap or whatever you want to use. This one has the adjustable band at the nape of the neck, and it has like a flap in the front and a flap in the back. I just like using this one, and this scribe has a lot of different ones to choose from, but I like this one here, sir yeah Welsh, what the brand is but yeah it's a naxi collection, okay with us, so I just wanted to make this quick clip. Just to clear up any confusion, because I didn't really mention the mannequin hanging in a mannequin head, you can get these from eBay or your local Beauty Supply. When you put your cap on, you can pin it down like on the sides this one. It'S got a fold it out, but you can pin the cap down in front on the sides and the back. However, you need to - and I had already started putting the Hale in this week before I decided to make this video. So I'm sorry that I closed it from if I beginning, but hopefully when you see me put in the second bottom one you can just take that as guidelines for your first bundle, because it's the same exact thing. The first sort of line will be a bit small and then eventually just sort of make it you're in a u-shape as fast as you can. It doesn't have to be perfect, but you know: that's all there is to release if you have any questions back it up back it up so thread your needle with about an arm's length of about it. You don't want too much because then it just becomes a bit hard to manage, but you don't want to show it because then you'll have to keep rewriting it every five seconds, so just make sure the ends are even a bad tire. In a lot we have our needle started here with a knot at the end, just cut off the excess thread that is below the knot so taking the needle underneath you left. This is the left here. Pick pot sits point out like this, and then I just wrap you hit a rock beat arm string around it. Just like that. Why did I again needle on that, needle under okay string on this side around oops, nothing, I get it just follow its kind of over, because I have my thing in a weird position by Mike andhe around sort of pulling here away back it up back it Up, okay, guys so it's time to start a new bottle of hair. I just have some jet-black proving here here from half of action, so little whack that oil and we'll start this like yeah, so yeah, I'm gon na stop putting my pins in all around so that I can keep it nice and organized sit nice to her okay. So when I might start with the new piece of string, I just like to take it right through back and I try to keep it as close to the edge as possible. So, let's try to make sure they're actually taking a little through the net, because sometimes I accidentally miss it. I prefer using this sort of cap over gym cap. I make my first one on a gin cap I'll show you that, in a sake, I'll show you a clip, but I find that this fits on my head nicer and it just feels a little bit better. No, but because it's a preference thing I do feel like this is a bit more sturdy, but that's just my opinion, so it just depends on what you like. Some people might think the dome cap, because it's stretchy is more comfortable, so you try both, but this one, the one that I really always have one at my Instagram fit is Carly one with the same cap. It'S really really comfortable, sir yeah, just rail. Whatever have energy, you just make sure the reason I keep lifting it up. It'S just to make sure you know it's kind of a bit nice even spacing so now, as you can see, I'm right at the front of the cab and it's time to flip over the hair. So I've just taken the needle and going right through the thick part right through the weft. So that's what I always do at the edge of the hair and that just ensures a mean flat sort of effect. And I did that as well. When I flip over the hair, I go through the graft for the first stitch and then I continue on as normal. So that's how you got a really nice fly fat. Okay, so I have my next row ready. As you can see, I did the fold-over method. So you want something: here's here, then I'll flip this back afterwards for last one, oh yeah, this part first, so as always, when I just make sure this is off in the world and gon na go through back, a lot of people have different opinions on going Through the rafts - but I you know when I start off a new track or a new thread or when I fold it over, I just like to go through the router. Just gon na get some with a bit more secure. It'S just preference, oh yeah. I love to do that wrong. I'M just gon na mix this up a bit. It'S pretty much just resting. I just like this stuff, like that. It'S pretty much just like resting on the one Bolivia and we don't want that and when I lift it up, take it through try not to stab yourself and then carrot one or so, and I'm just gon na take it didi laughs and let it go through. The UM sort of middle of thread yeah so sometimes like a really bad tangle, happens for whatever reason, and if you can't like unravel it, this public baths are just cut off all of that thread. I just threaded that one, but it's just easier that way. So I'm just noting this - I have known, never happened, but yeah we'll start again. Okay, so I'm gon na do the photo of a method again right now, so I'm just going to take this cheap info, and I'm going to do the wraps here on the edge before I flip over and over here make sure not nice and snug. All right got your tea please, so we have. We have filled it over here and I'm gon na pop the next layout don't take it. Take the new affinity left as close to the edge as possible. Thank you guys. So I'm done for today. I'M not sure why angled this up like this, you can just keep it sort of straight, but anyway that's what I've come up with, but I have actually just run out of strain to finish this pot off. I actually had to use scraps that I had caught from like other pieces of string but yeah, so I think this will be part one I'm going to end the video here. I really hope that this has helped and I will make a part to finishing this with all of and I'll show you what it looks like on and all that sort of stuff. So yeah. Let me know if this helped and I'll see you in my next video. I don't know what's going on, but I guess I guess you just go through phases with things really and yeah.


Comments
Caprice Nabors: Thank You for being so Patient, and teaching a Step by Step method. I needed that.
Best Friend House Party!!!!: YAAAY! Thanks for showing the step by step under the weft sewing technique. When I sewed it on the weft I wondered why the wig cap didn't fit on my head I was doin it all wrong so thank u 4 this video.
Malaika120: Thank you for going SLOW to show exactly what you are doing! SUPER helpful!
gabbi757va: Your Video was extremely help in helping me learn how to make a wig, especially your detailed direction on your sewing technique. Thank you so much!!
Helen M: Most helpful video so far , thanks xx
mdona1981: Great video do you sew on the elastic band and the front side flaps when you're curving the hair?;
porcia hall: Are you moving the tracks forward as you add them
Robyn Carmouche: your show video the First video that explained it to me very easy thank you can you please do a video putting on a closure on a wig ,ty luv
SUPERWISEWOMEN MAGA: i did mine yesterday am proud i use so not. all surprise but first time am happy
🌬Răww: how many packs of hair is this
SUPERWISEWOMEN MAGA: i did mine yesterday am proud i use so not. all surprise but first time am happy
Febreezy: Music?
lana neill: Why