Introducing My U-Part Wig
- Posted on 19 September, 2012
- U Part Wig
- By Anonymous
Hey :)..in this video I briefly describe my U-part wig. Stay tuned for the application of this wig later on this week.
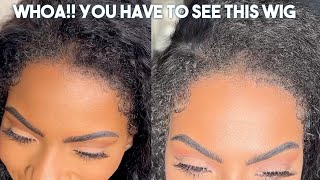
Hi guys it's ashley again with another video um. First of all, I just want to say welcome to my new subscribers. You guys are amazing because I didn't think such people would subscribe to my channel, but there's quite a bit of you around here. So thanks for subscribing and watching my videos, so this video is about my. U part, wig, that you saw and my task the video. So you haven't seen my last video and you want to actually see the wig on and what it looks. Like then watch my last video is called update, update something I don't even know what yeah um. This is her. The wig right here I haven't, gave it a name yet feel like. I should, because a lot of people have names for their wigs yeah. This is her. This is the wig um, so I made this myself and this is the part and when I were the hair, that the part is in this big, the parts. Actually let me show you when I wear my hair. The part is like I move the part in so it's um covering a really like thin sliver of hair, maybe who hard to get on, but maybe this much like really small, really small, and I like it that way because um. The reason I were you part is not for um, you know flashing long weave around really, even though it's a big bonus, but the reason I do wear it is for protective style and the less of my hair that I have out the better. It is for me because that means that the hair, more of my hair, can be protected, protected out of the way and you know being cared for and situated so yeah. That is, this is the wig. So talking about the wig, the hair that I used is called premium yaki premium to premium like tea, oh yeah, premium to yakky um. I used two packs of hair and I like a full two packs of hair and what the what the cap is so don. Two and i'll show it to you it's owed on to a dome cap, so i went to the beauty supply store and i asked for a dome cap and then so. This is the. This is the inside of the wig, and this is the dome camp and you could see the stitching there. I sewed the hair on. I know some people opt if sewing since sewing is a problem for them. They opted to use hot glue like the glue gun to glue the hair on not quite sure how effective that method is, or they use um just regular hair glue. That'S another method, but I wanted this wig to last. Just because I wanted to apply it multiple times to my hair, it took me about a date a day to make it, but I am or a day and like I not a full day, maybe a couple hours like five hours. I only wear the wig two weeks at a time and yeah when i'm done with it. I just by the way I don't show the back of the wig. I just so like the you part and then the just the sides and I'm very careful with sewing the side. I don't do that tight at all, because lord knows i do not want my edges to disappear. I don't because then my family, it already runs that we have thin hair right here, like it's just our natural hairline like it's just it's thinner like I was born with it like legit, so um. I just I'm very careful when I'm sewing down the edges, and you should be too because you don't want to be playing your hair like unnecessarily like the wig honestly like sewing. The you part is just like you. That'S all you really need, like the hair. Isn'T really gon na go anywhere like you? Don'T need to sew on the full thing. Like you know, unless you what you want to, whether you part wake up um, then i guess, like you, could seal the back down, but i'm not wearing that wave up. I'M wear it down and that's completely fine with me and if you wanted to wear the you part up what you would do or what you could do is um you could so like. You see how the hair kind of stops there like. If you wanted to wear it up, you could sew a track like on this side, so so a track on both sides on the bottom and do it on both sides all around, and so that way we flip the hair up. You don't see. Wait cap you see track so or you see hair top track. You see hair so yeah. This is pretty much it. If you have any questions about like about the you part, I will be doing a video of me actually applying it. I just wanted to get all the necessary things away, because the next video that I'm doing it's just showing minimal talking so yeah look out for that video. It will be coming soon because at the end, today's 30 wednesday. So, at the end of this week, actually friday, i'm putting that wig, I'm putting the you part back on. So I'm going to wash my hair um Friday look out for a video because i will be showing how to do it and i will be showing just briefly the products that I used to wash my hair and how would prepare my hair for the wig. So yeah stay tuned for that video and thanks for watching bye,


Comments
Ashleigh CoilyTresses: Yes! I will get on that :) Thanks for watching
PurpleRedKisses1: Can you do a tutorial on this bun looks cute !?
Ashleigh CoilyTresses: The hair actually came straight. the slight curls you see was actually me using a flat iron to slightly curl it. The curls stayed in all week so the hair really holds curls well. Thanks for watching :)
Chris_missy: hey. was the hair already wavy?? id like to get some of this hair also thanks =)
Ashleigh CoilyTresses: Really! I started doing sew ins first and then doing the upart is kind of similar and somewhat easier i think because you are sewing it on a manequin instead of up on your head where you can't see what you're doing. Hopefully you get the hang of the u-part sometime :)
Monique Williamson: Can you do a video on how you make the wig