No Leave Out V-Part Wig!!!! |Hergivenhair
- Posted on 28 August, 2022
- U Part Wig
- By Anonymous
#hergivenhair #wigs #vpartwig #naturalhair
0:00 Unboxing
1:07 Family Update
1:58 Washing & Conditionig
2:52 Hair Quality
3:33 Install
6:06 Crochet
10:44 Take Down
Email: [email protected]
Video Hair: https://www.hergivenhair.com/curly-thi...
Coupon code: Cbrilee
$15 off for order $100+
Hair length: 18 inch
Hair texture: Curly (3B-3C)
Cap Size: Medium
Hair Oil: https://heeey-lovely.ecwid.com
Instagram: @Brileelovely
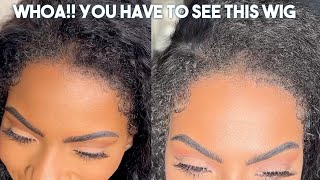
Hey lovelies in today's video i'm going to be reviewing her giving hairs the part theater parting wig. Technically, it's a u-part wig with just thinner parting. Just to make things simple, so the wig i received is 18 inches and the texture is curly. 3B. 3C. It came with an instruction manual that you're going to find really useful. It'S going to have the answers to all of your questions, so you're definitely going to want to pick this up and go through it first. It also came with a silk drawstring bag. To put your wig in and some combs here's the wig right out of the box you can tell it is in great condition. It has a very nice pattern. Already, here's a close-up of that v closure shout out to her giving hair for sending me this wig to try out it could not have come at a better time. I'Ve been looking for something, convenient and quick to just do to my hair, because i'm responsible for pretty much everybody's hair in my household and it has not been easy, exhibit a is my son who likes to make his own hair mask, which would not be a Problem if he did not despise getting his hair comb, he literally screamed bloody murder. So i was like i cannot do this with you. I'M gon na have to cut the hair down. Trim it down, cannot have you walking around with breakfast lunch and dinner in your head. So this is us cutting his hair down. He turned up after this clip, as you can see, he's already kind of upset and it ended up being a much lower cut, but i'm hoping as he gets used to it. Things will get better me and my husband had to take turns attempting to cut it because he would not sit still. It didn't come out perfect, but this is the outcome and he is much more pleased with his hair styling process so back to the wig um. This is a clip of me, washing it um it's so thick, so i decided to lay it out on a towel and just go through it with my hands and go through with the detangling brush. Look how beautiful the curls already are. I went with this aussie moist, shampoo and conditioner, because that's just what i had around you totally could just co-wash this hair and it'll be perfectly fine, and here is a clip of me just detangling and really working the conditioner in there. I really wanted to make sure that it just got all the way down to the end, so the ends can coil up really nicely. Look at how beautiful it is. I did end up leaving the aussie moist conditioner in as the styler, because it just worked and responded so well with the curls. The instruction manual that came with the wig has a bunch of product recommendations on things that work well with this unit and just a testament to tell you how high quality and how long lasting this hair is. I had a drawstring ponytail same texture from her given hair, and i received this like four years ago and this is it right out of the bag kind of matted, because it's just been sitting in the bag. This is the ponytail brushed out, it's still very full. So that's how you know: there's minimal, shedding, but look at how these curls bounce back. Once i wash and condition it look how beautiful it is. It looks like day one just rejuvenated, so this hair is really long. Lasting you're gon na get a good return on your investment, so i highly recommend it now. For the moment you have been waiting for i'm going to install the v part wig on my natural hair. I went ahead and blowed it out that way, it's easier to braid down. So this is just a quick messy braid pattern. You just want to make sure you have four main braids and then braid the rest of the way. The top two braids is where you're gon na want to crochet the hair over and i'm gon na show you how to do that soon. These two braids are going to be your anchors you're, going to put your clips in here, and it's just going to secure the top of the wig and then the last two is just to get the rest of the hair out of the way, and you can Also insert your combs here that are on the side of the wig in the back. I just went ahead and secured everything and looped it. So it's not hanging out of the wig. Now it's also a good time to go ahead and oil. Your scalp i'll leave a link to mine below i'm in the process of rebranding and switching websites, so this oil is at the lowest price that it's going to be so make sure that you get yours. If you want to try it out, go ahead and brush those edges back with some edge control. That way they look nice and neat. This is the wig dried and it looks so nice shiny. I was able to get the curls very defined, so on the inside of the wig, we have several clips. We have four at the top where the v is two combs on the sides and two adjustable straps, one more so in the middle and then one towards the back and then there's also a comb in the very back. I'M gon na go ahead and apply this baby, and i do have to say that there was a little more space than necessary in the back, but it wasn't a big deal. The strap still helped it feel secure and i'd. Rather, it be a little bit big than small. I thought i measured my head accurately, so i don't know if they just come a little bigger, but it really wasn't a problem. Okay. So now, since i have the wig on i'm going to go ahead and secure the clips to that second row of braids that i made so now it's time for the crocheting. So what you're going to do is you're going to take the very top layer of hair, the hair from the first weft and you're, going to crochet it through the top of those braids to conceal them. With this method, you won't have to leave any hair out. Just in case, you don't feel like blending your hair with the unit so you're going to stick the hair through the braid and collapse it through. The hair then bring the hair through the braid. That way, the hair falls on top of that braid and it's concealed. Now i can say that i would recommend doing it when the hair is still damp, it's much easier to pull through than when the hair is already set and dry, because it causes a little bit of friction between the unit and your hair, but either way it's Still doable so once again, you're just gon na put the crochet needle through the braid open it up, put the first layer of hair through the needle and then close the clasp and bring it through the braid pull the hair until the hair is on top of The braid, so the hair is going to cover up that braid you're just going to continue to do it section by section until the braid is completely covered, also, if you're thinking about purchasing this unit or anything else from her given hair. As long as you spend over a hundred dollars, you can use my coupon code c. Breedly, make sure you put the c in front of brilliant. It will not work, but if you use my code you're going to get 15 percent off your purchase of a hundred dollars or more oh and i will be leaving a direct link to this unit. If you are interested in purchasing it and now that i'm finished with one whole side, you can see the difference here. One braids covered one is not doing. This method also adds a little bit more volume to your hair. So, if you're looking for that, that is a way to achieve it. So once again, you're just gon na put the crochet needle through the braid open it up, put the first layer of hair through the needle and then close the clasp and bring it through the braid pull the hair until the hair is on top of the braid. So the hair is going to cover up that braid. Now, looking at some things in hindsight, i think i would have tried to make the top two braids a little smaller a little closer together. That way, the part doesn't look so um far apart so yeah. Let me know in the comments how you feel about this method. Have you tried this method before? Do you prefer just having to leave out? Let me know i do have a few questions on how you would take the unit out after doing the crochet method, and i didn't have to take my braids down or anything. I just undid the clips on the second layer of braids. I took out the combs undid, the straps in the back, and i was able to just pull the top hair out of the braids. I was able to just pull the hair out of the top braids without taking the braids out. It was so simple, came out. Didn'T give me any issues, so this is my final look. Let me know what you think. Does this resemble my natural hair? Would you think this is a wig? Do you like the crochet method and don't forget to subscribe, like comment and share and don't forget to click the notification bell that way you can see when i post also, if you found this video helpful at all, and you want to show your thanks, you can Now purchase a super thanks, i really appreciate it and the money will be going towards supporting this channel you'll find that button right below the description on the same row where the like button is - and i want to say thank you for watching this video - don't forget To use this coupon code until next time, bye,


Comments
RealWordz: OMG!, it looks like your own hair. Wow! Love it ❤
eurecab: Great idea and it looks so natural.
Arianne: I tried to crochet it just got all tangled but again I didn't cornrow because I don't know how I just did a braid and pinned it. Looks beautiful on you,