Your Best Wig Install Ever! Detailed Skin Melt No Babyhair Natural Density Wig Install
- Posted on 19 March, 2023
- Clip-in Hair Extensions
- By Anonymous
✨Detailed walk through on installing your wig with ease! If you are still struggling with applying a wig naturally this is the video you NEED to watch!
WIG LINK : https://www.afsisterwig.com/products/1...
DISCOUNT: MARIE
LENGTH: 20
DENSITY: 150
Wig Dealer Essentials Kit https://bit.ly/3KXxZqQ Includes: Travel bag, lace bonding gel, lace melting spray, adhesive holding band,lace cutting scissors, and razor.
DISCOUNT: MARIE10
SHOP EVERY TOOL AND PRODUCT I USE: https://www.amazon.com/shop/msprecious...
Every product and tool I use will be in this link.
THE OTTER SPIRIT BRACELET SETS https://theotterspirit.com/marie
DISCOUNT: MARIE20
EDGE BAND https://bit.ly/3xzGsc8
✦ ✦✦✦✦✦✦✦✦ HELPFUL INSTALL VIDEOS ✦✦✦✦✦✦✦✦✦✦✦
HOW TO CUT EAR TAB ON WIGS https://bit.ly/3AkkyL1
HOW TO CUSTOMIZE A LACE WIG https://bit.ly/3QrGuKM
CUTTING EAR TAB AREA 360 LACE WIG https://bit.ly/3w8zYAp
HOW TO MEASURE WIG TO FIT HEAD https://bit.ly/3A41UXg
NO BABY HAIR BEGINNER WIG INSTALL https://bit.ly/3CdZLuX
TIPS FOR APPLYING WIG ON NATURAL HAIRLINE https://bit.ly/3CcyCZy
SECURE NO GLUE WIG INSTALL https://bit.ly/3c00y8e
8 TIPS TO MAKE YOUR WIG LOOK BETTER https://bit.ly/3w94quf
HOW TO BLEACH KNOTS ON A WIG https://bit.ly/3w7zASY
HOW TO REMOVE WIG & WASH PROPERLY https://bit.ly/3SWCLq8
HOW TO SEW FAKE SCALP MATERIAL https://bit.ly/3PP5MBH
✦✦✦✦✦✦✦✦✦✦✦✦✦✦✦✦✦✦✦✦✦✦✦✦✦✦✦✦✦✦✦✦✦✦✦✦✦✦✦✦✦✦
Get the SCALP Material:
Fake Scalp Material https://bit.ly/3mp7qwU
___________________
FOLLOW ME HERE:
♡ Tik Tok @ Mariesspace23
♡Instagram: https://www.instagram.com/mspreciousma...
♡My Website: https://mspreciousmarie.com/
SPONSORSHIP INQUIRES EMAIL: [email protected]
If you would like your product shared in my videos, email me for details.
TIMESTAMPS:
*Hair or products shared are my OWN personal and honest experience. This video may contain sponsored content and affiliate links which I get a small percentage that helps invest back in my channel to continue to bring great content! Thank you for being so supportive!*
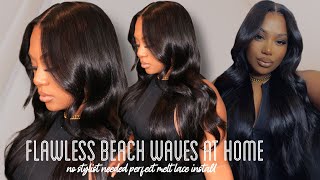
Hi, everyone welcome back hope. You all are having a wonderful weekend happy Sunday, today's wig, I am going to show you how to install a wig to look Flawless from start to finish. If you want to know how to do the ball, cap method definitely check out. My previous video today I just want to focus on helping you all get your best wig installed just by applying the wig, because a lot of you still tell me it's hard for you to get that. Today'S video is going to have lots and lots of tips. So if you stick through today's video, you definitely will find it very very helpful. On my own, this wig is from AF sister wig, we'll have it linked in below in the description box. The details on this particular wig is their 13x6 skim. Milk Balayage highlight body wave, lace, frontal wig, it does come in several different lengths. I believe the lymph that I have it in is about a 20 inch, but you can get it from 14, all the way to 26 inch. If you want to it, has these beautiful highlights going through it? It'S a 1B I'm guessing. This is just like a blonde. This wig is their skin melt, wig, so skim milk means that the lace is going to melt effortlessly with the skin. It'S perfect for me showing you how to do that in today's video, so you want a good lace. Of course you get capsized options and it does have a six inch deep parting. Okay, so you get lots of parting. You get to choose what this tea! You want honestly to choose your density. You have to know your lifestyle, I think, for anyone that has like a really rough lifestyle and you are prone to shedding definitely go for the one eighty percent. If you, you want a more natural everyday, I don't want to feel like I'm wearing a wig go with the 130 and if you're, just like me, just kind of like cool with anything 150, then is your thing before we get into it. I want to show you all something. So if you know me, you know that I love accessories, especially simple accessories. I want to share with you all a company that sent me over some of their accessories. They asked me if I can share them with you all, and I was like okay, why not? I am wearing their bracelets. These are their natural gemstone bracelets. This one is the Scorpio packs. If you are into Zodiacs, they have bracelets. That is specifically for your zodiac. They have so many different bracelets on their website that you can check out. They come in different sizes. These that I have is the mini size. They are super cute. They are very just simple. I have three of them and each one of them stand for a different meaning energy bracelets, and they are made a hundred percent natural gemstones featuring stainless steel. I have the success Stone, the stability and strength Stone and also the patience and forgiveness Stone on mine. Ten percent of the profits go to Wildlife and ocean conservation pretty, and I just wanted to show them to you guys want to check them out, I'm going to drop their link below in the description box and also they gave you all a 20 discount. So everything will be below in the description box. We already have set the wig down. So the first thing you want to do when you put your wig on, is tighten the straps just know that it could affect the hairline once it's glued down, if you untighten them, if you are wearing a daily wear adhesive - and you know you're going to take Your wig off and tighten the straps before you do your wig installed. You already know you're taking it off at the end of the day anyway, so it really doesn't matter. If you are wearing a long term, you may want to leave the straps in the back. Untightened until after you do the wig and stall okay, so I hope you all got your wig on your head and we are ready to start a brush hot comb whatever and just push that hairline completely back. Some of you will prefer the natural hairline this one isn't as thin as most. You want to get you some sort of Clips. Just make sure you get the hair out of the way. Now we're going to size up the cap to make sure it fits properly from ear to ear I'm going to go in with these scissors. These are from wig Dillard super tiny and they are really good. They are going to cleanly cut the lace. Look at the cap up right here and make sure you cut off whatever is over top of the ear, even if you have to go into the hair, of course, just make sure you do not cut that elastic strap. Take off about this much. It should fall right like that around the ear on the other side. Sometimes you don't need to cut as much. It just depends on the cap. So now that you have the ear area cut and fitting perfectly now, you want to go back and you want to determine where you want your hairline to fall. You can either keep it like this and just cut off the extra lace or you can choose to cut it back now. This is the tricky part. If your head is bigger, if you cut back too much, then the cap around the hairline may not fit properly. Oh - and this is another tip - if you do have this widow's peak area, if you get Rippling with your lace wig, sometimes this area is what ripples the most your head may not be big enough to kind of fit that part of the capsule yeah we're going To cut this back, I'm going to show you how to do that. I'M going to start on the sides of the cap and I'm going to follow the hairline. Take the scissors and begin to cut and just follow the hairline of the wig and then do the same thing with the other side, all right now, with this lace, you can tint it. If you want to, there is actually two lace, tint that I use, but this one right here is the most currents that I'm using, and it smells amazing too. This one right here is by wig dealer. This is their lace blend and this is in the color sand. It'S super affordable. I mean it comes in several different colors. It does not have that orange tint. So if you wanted to tint your lace prior to your install, you can just spray this around the cap. When you get to this part, I'm going to cut off maybe about a half an inch of that widow's peak area. I wanted to go back just a little bit. You can cut in a straight line but use the end of the scissors small pieces at a time. You can even go in like a u-shape just to keep the shape of the front of the hairline yeah. This is what it looked like. You can barely see this lace, it's so invisible brush out some of them strands and loose strands out the wig, the laces, just beautiful. On this wig I mean like look at this hairline. I have not glued this down. Hairline looks good in the lace. It'S just melting so well for the sake of the lace not showing I'm going to just cut just a little bit more off of there, so it won't have that lifting hairline is everything and I'm gon na show you guys the most basic simplest install today. Just push that hairline back, you want to hold on to like the piece of lace, which is as much as you got left and just make sure you are flattening down and pushing back that hairline, especially on the sides. You want the lace to be the only thing in the glue if you have sideburns at least try to lay them down with some gel dry them glue over top of them, basically and if they're flat enough, and if the hair color matches your natural hair color. It probably can still look natural and won't even bother it now, if you are new to wig installs. I recommend this kit because it comes with three wig glues. It could have scissors that I was just using. It'S like a whole bundle deal for one price. Instead of buying everything individually, I will have this link below this adhesive. I'M using today does come out of that kit, and this is their melting spray, really good for getting the most easiest installs. So I'm gon na show you that right now, of course, again make sure that hairline is backing out the way I'm going to start with this side shake this can first and we are going to spray right over the lace. So I also have this um little spatula, it's good, because sometimes your fingers can cause white residue if you're, pressing, all wig stuff will be on my Amazon storefront. That leak will also be below just spray foreign that product into the hairline. Only keeping the product on the lace do not go back into this section of the hair just right here at the edge and then when you get to the top. I'M keeping my finger here to make sure that does not lift, but I want to move fast too spring little sections at a time and, as you can see, it's instantly just melting that lace and I'm gon na. Take this and just press make sure all the lace is down and then go in with the dryer on cool air when you start to dry, do this side first to make sure it's a hair that the sideburns and then you can let go and start pressing Around the hairline, you only need 30 seconds right in this part and then, after that, you want to get your Edge band. So I'm getting my Edge band and tie it down. So I'm just going to press it at the edge of the lace and take it on around, and if you want this, pretty pink one it can be found on my website. I will also have it linked. Everything will be linked basically in the description box, so we're going to let this sit for 15 minutes, I'm going to go over to Instagram and style. This hair and I'll be back to show you guys the final results, but we are back. I styled the hair and I've. Let the hairline sit for 15 minutes now. As you can see, this looks so good a daily install, so I most likely will take it off, but if you want a longer hold again, you can use wig, adhesive glues. I love the color, it turned out really well and, as you can see, the hairline and everything looks very clean now, if I needed to, if I did, do a parting go in with this wig dealer kit here, and it has four different colors for your scalp Color, this is not for your forehead colors for your scalp, it's very inexpensive and you can use it on the go and I'm going to go in with the darkest shade just to match my forehead. Since this area is on my forehead and just kind of Pat it over top did bleach the knot, sometimes all the knots don't bleach, you have to probably go in a second time. Okay, so I will be sure to link this wig Below in the description box. For you guys, I will also put a discount down there and don't forget to check out their bracelets. It will be also linked in the description box, yeah, be sure to follow me on Instagram, Tick, Tock and also be sure to subscribe to the channel. Thank you guys so much for joining me back for today's video, if you don't mind liking the video by giving it a thumbs up and I'll, see you back in my next video. Thank you.


Comments
verrell hanley-moncree: Beautiful! Thanks for the step by step tips!
Zariyah Nicole: As long as I have been wearing wigs, coloring them, figured out the best method to bleach and toning my knots; it was your videos that showed me how to cut my ear tabs. I look forward to all of your videos.
73pinkchocolate: Beautiful as always, Marie! ❤
Crystal Amos: HEY MARIE love the hair color your detailed install is every thing .Been following you since 2012 huny you always bring the slay of the day
Ronnie Sims-Farrie: Absolutely Beautiful Slayed to the Gods!! Marie Thank you for this Great wig install very informative
Ms. Shabria Gxo: Gorgeous as always, thank you for sharing ❤
Graciously Blessed: Hello Ms. Precious Marie. This presentation on how to do a detailed wig installation is absolutely great. I appreciated seeing it, and it has been so helpful to me. Thank you for what you do. May GOD, our HOLY FATHER, continue to bless you and your family, in JESUS' Holy Name. Amen.
L. Lewis: Very pretty. Informative. I've never tried a real hair wig. I'm definitely wanting to try for the summer. I'll keep you posted. I've seen several so not sure yet.
Alebra Smith-Cooper: Happy Sunday Great install,very helpful step by step tips.Thanks for sharing those beautiful bracelets.I love those kinds of bracelets,plus supporting a great cause that’s close to my heart.
Beauty by Jay Morris: This wig is beautiful Marie, I love it, the bracelets are cute too, it’s Scorpio for me girl
Zariyah Nicole: This wig you have on, is too pretty!
Sha La La La: Thanks Marie, this was an EXCELLENT tutorial. I'm always worried how to prevent lifting when I'm out dancing and I'm sweating a little - any suggestions?
Donna Wallace: Awesome as per usual. Thank you. God Bless
Jasmine W: Gorgeous
Jocelyn Lincoln: This color is stunning on you!!! #scorpiovibes
SoVeryMessy!😏😒: Beautiful #teamnobabyhair
M. Crittendon: Thank you for the tips. I'm going to purchase the Wig Dealer kit.
Felicia Moss: This wig is beautiful. I have a quick question that is kind of off topic of the video. I had watched your video on doing highlights on a wig and in the video you said that you preferred 30 developer. I only have 20 and 40 developer so which one would you suggest me use? Please tell me the additional timing of leaving it in the hair after the 30-35 mins of application. I don’t want to mess it up. Thank you in advance. ❤
Esther Sowell: Oh my goodness i always get my hairline wrong awesome
Юлия Каштанова: Привет Красавица ,Здоровье тебе и близким . С Любовью из Москвы.
Tora Augusta: When do you have a sale on your wigs
Paricia Jones: ♥️♥️♥️♥️♥️✅️✅️✅️